
MazBook.ru
English Русский
Български
Беларускі
Український
Српски
Hrvatski
Română
Polski
Slovenský
Magyar
• Bookmark • Sitemap • Contacts •   
Cars Opel Cars Ford Cars Volkswagen Cars Audi Cars Kia Cars Renault Cars Peugeot


Familia Capella Mazda3 Mazda6 CX-? Others Articles
Capella 3 (1982-1992, petrol) Capella 3 and 4 (1982-1992) Capella 4 (1987-1992) Capella 5 (1991-1997) Capella 6 (1997-2005, petrol)

Vacuum booster — removal, inspection and installation (Mazda Capella GE)

  • Home
  • Mazda Capella
  • Capella GE (1991-1997)
  • Chassis
  • Brake system
  • Vacuum booster — removal, inspection and installation
0
Contents: Checking the work ⇓ Leak test ⇓ Removal ⇓ Installation ⇓

Checking the work


1. Press the pedal and start the engine. If the pedal drops slightly, then the vacuum booster is working properly.

2. Depress the brake pedal several times with the engine running and check that the brake pedal travel reserve is always the same.

Leak test


3. Start the engine and turn it off after a couple of minutes. Slowly depress the brake pedal several times. The brake pedal travel should decrease each time.

4. Depress the brake pedal with the engine running, then turn off the engine without releasing the brake pedal. If the pedal does not drop within 30 seconds, the booster is sealed.

Removal


1. Remove the brake master cylinder. Disconnect the vacuum hose from the booster.

2. Disconnect the booster pushrod from the brake pedal.
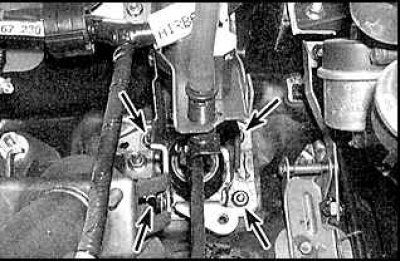
2. Disconnect the booster pushrod from the brake pedal.


3. Unscrew the four mounting nuts and remove the amplifier.

Installation


1. Installation is carried out in the reverse order of removal.

2. Connect a vacuum pump to the booster and create a vacuum of 500 mmHg.
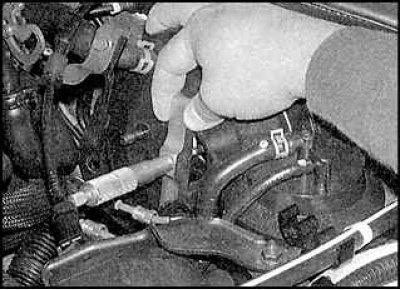
2. Connect a vacuum pump to the booster and create a vacuum of 500 mmHg.


3. Measure the distance from the surface of the vacuum booster to the pusher – this is distance "A".
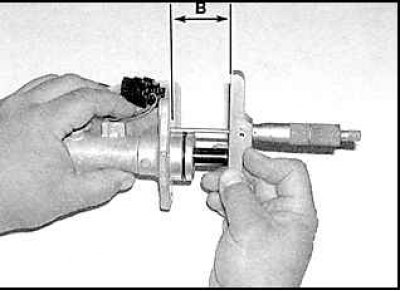


3. Measure the distance from the surface of the vacuum booster to the pusher – this is distance «A».


4. Measure the distance from the mounting flange to the end of the master cylinder - this is distance "B".
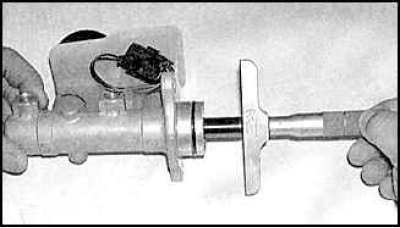
4. Measure the distance from the mounting flange to the end of the master cylinder - this is…


5. Measure the distance from the end of the master cylinder to the recess in the piston - this is distance "B".

6. Subtract the value "B" from the value "B", then subtract the resulting value from the value "A". The resulting value is the servo amplifier pushrod clearance.
6. Subtract the value «B» from the value «B», then subtract the resulting value from the value «A».…


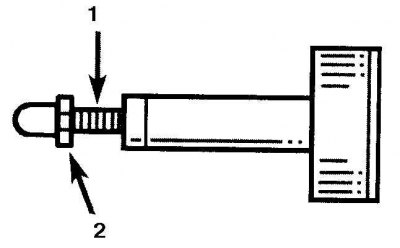
7. Adjust the length of the push rod (1) if necessary by loosening the lock nut (2) and turning the push rod adjuster.
This article is available at: russian, bulgarian, belarusian, ukrainian, serbian, croatian, romanian, polish, slovak, hungarian
This text was checked by: Evgeny Mereshnikov
Share with friends on social networks:

Previous
Capella 5 » Brake system
Next

Bleeding the brake system
Brake pipes and hoses
Brake master cylinder — removal and installation
Wheel cylinder — removal and installation
Brake shoes for drum brakes
Brake pedal height and free travel
Adjusting the handbrake
Handbrake cables
Low brake fluid level warning light switch
More articles on repairing other Mazda models
Brake master cylinder and vacuum booster Mazda Familia 5 (1985-1989)
Vacuum brake booster — description Mazda3 BK (2003-2009)
Vacuum brake booster — description Mazda6 GG (2002-2008)
Brake booster sensor Mazda CX-5KE (2012-2017)
Vacuum brake booster — check Mazda BT-50 (1) (2006-2011)
Link in different formats to this article
Comments and feedback from visitors
No comments yet


How much will 26 + 40 ?


Capella 6 (1997-2005, petrol) 
  • General information
  • Introduction to guide
  • User manual
  • Troubleshooting
  • Maintenance
  • Power unit
  • 4-cylinder engines
  • 6-cylinder engines
  • Engine overhaul
  • Cooling and ventilation
  • Power and exhaust systems
  • Engine electrics
  • Control system
  • Transmission
  • Mechanical gearbox
  • Automatic gearbox
  • Clutch and drive shafts
  • Chassis
  • Brake system
  • Car suspension
  • Steering
  • Body
  • Exterior (external elements)
  • Interior (internal elements)
  • Doors, windows and locks
  • Electrical equipment
  • Equipment and devices
  • Electrical circuits
Capella 5 (1991-1997) 
  • General information
  • User manual
  • Maintenance
  • Helpful hints
  • Power unit
  • Petrol engines 1.6 and 1.8
  • Petrol engines 2.0
  • 2.5 petrol engines
  • Overhaul engines 1.6 and 1.8
  • Overhaul engines 2.0 and 2.5
  • Diesel engine 2.0
  • Engine electrics
  • Cooling system
  • Air conditioner
  • Carburetor Nikki 30/34
  • Power system (1.6 and 1.8)
  • Power system (2.0 and 2.5)
  • Control system
  • Transmission
  • Mechanical gearbox
  • Automatic gearbox
  • Clutch and axles
  • Chassis
  • Brake system
  • Suspension and wheels
  • Steering
  • Body
  • Exterior (external elements)
  • Interior (internal elements)
  • Doors and windows
  • Electrical equipment
  • Equipment and devices
  • Electrical circuits
Capella 4 (1987-1992) 
  • General information
  • Introduction to manual
  • Vehicle specifications
  • Power unit
  • Engine repair
  • Lubrication system
  • Cooling system
  • Fuel system (carburetor)
  • Fuel injection (FE)
  • Fuel injection (DOHC)
  • Fuel system (diesel)
  • Ignition system
  • Transmission
  • Clutch
  • Gearbox
  • Drive shafts
  • Chassis
  • Front suspension
  • Rear suspension
  • Steering system
  • Brake system
  • Electrical equipment
  • Equipment and devices
  • Electrical circuits
Capella 3 and 4 (1982-1992) 
  • General information
  • User manual
  • Maintenance
  • Power unit
  • Gasoline engine
  • Engine overhaul (gasoline)
  • Diesel engine
  • Cooling and heating
  • Supply system
  • Ignition system
  • Emission reduction
  • Transmission
  • Clutch
  • Mechanical gearbox
  • Automatic gearbox
  • Drive shafts
  • Chassis
  • Brake system
  • Suspension and wheels
  • Steering
  • Body
  • Exterior (external elements)
  • Interior (internal elements)
  • Electrical equipment
  • Equipment and devices
  • Power devices
  • Electrical circuits
Capella 3 (1982-1992, petrol) 
  • General information
  • User manual
  • Maintenance
  • Troubleshooting
  • Late models
  • Power unit
  • Engine in car
  • Engine overhaul
  • Cooling and heating system
  • Fuel and exhaust system
  • Engine electrical system
  • Emission control system
  • Transmission
  • Mechanical gearbox
  • Automatic gearbox
  • Clutch and drive shafts
  • Chassis
  • Brake system
  • Suspension and wheels
  • Steering
  • Body
  • Exterior (external elements)
  • Interior (internal elements)
  • Electrical equipment
  • Equipment and devices
  • Lighting and lamps
  • Electrical circuits
MazBook.ru © 2018–2026 · Mobile version · Articles and news · Sitemap: EN BG BY UA RS HR RO PL SK HU · Feedback · Site search · Add to bookmarks Familia 5 (BF) · Familia 6 (BG) · Capella 3 (GC) · Capella 3 and 4 (GC) · Capella 4 (GD) · Capella 5 (GE) · Capella 6 (GF) · Mazda3 BK · Mazda6 GG · CX-5KE · Mazda 121 (3) · Mazda BT-50 (1) ·
By continuing to use the site, you agree to the use of cookies 🔐