MazBook.ru
English Русский
Български
Беларускі
Український
Српски
Hrvatski
Română
Polski
Slovenský
Magyar
• Bookmark • Sitemap • Contacts •   
Cars Opel Cars Ford Cars Volkswagen Cars Audi Cars Kia Cars Renault Cars Peugeot


Familia Capella Mazda3 Mazda6 CX-? Others Articles
Capella 3 (1982-1992, petrol) Capella 3 and 4 (1982-1992) Capella 4 (1987-1992) Capella 5 (1991-1997) Capella 6 (1997-2005, petrol)

Camshaft Position Sensor — checking and replacing (Mazda Capella GF)

  • Home
  • Mazda Capella
  • Capella GF (1997-2005)
  • Power unit
  • Control system
  • Camshaft Position Sensor — checking and replacing
0
Contents: Models produced from 1993 to 1997 ⇓ Models produced since 1998 ⇓

Models produced from 1993 to 1997


Examination


1. The camshaft position sensor determines the order of fuel injection into the cylinders. On models produced from 1993 to 1997, the sensor is located in the ignition distributor housing. A sensor malfunction is detected by the diagnostic system and a corresponding code appears in the system memory (see paragraph 2).

2. With the ignition on and the engine not running, measure the voltage at the B+ contact relative to ground on the outside of the larger distributor connector (see Figure 8.3,b). There should be battery voltage at the contact. If there is no voltage, find and fix the problem in the power supply circuit.

3. Remove the ignition distributor from the engine and reconnect the larger of the two connectors.

Caution: Do not connect the 3-pin connector as this will cause the coil to generate a spark during the test below. Also disconnect the wiring connector to the injectors so that the injectors will not operate during the upcoming test.


4. Measure the voltage at the CMR contact on the outside of the connector (the second probe of the voltmeter is connected to the GRD contact) (see Fig. 8.3,b). With the ignition on, turn the distributor rotor by hand and observe the voltage. For one revolution of the rotor, the voltmeter should register one voltage pulse.

5. If the test does not produce the specified results, replace the sensor.

Replacement


6. The camshaft position sensor is an integral part of the distributor and cannot be replaced separately from it.


Models produced since 1998


Examination


7. Locate the camshaft position sensor electrical connector behind the camshaft position sensor pulley. Disconnect the connector and measure the resistance of the sensor between its contacts (see Figure 8.3,b). For a 4-cylinder engine it should be 950-1250 ohms, and for a V-shaped engine - about 550 ohms.

Replacement


4-cylinder engine


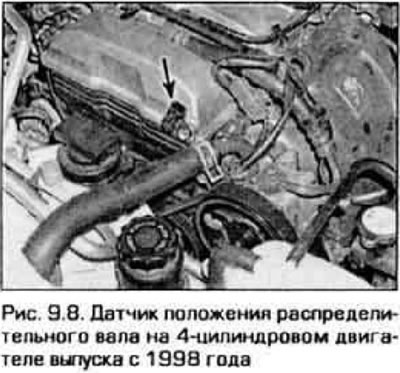
8. Disconnect the electrical connector from the sensor, unscrew the sensor mounting bolt and pull the sensor out of the cylinder head cover (figure 9.8).

8. Disconnect the electrical connector from the sensor, unscrew the sensor mounting bolt and pull…


9. The sensor is installed in reverse order, V-shaped engine.

10. Remove the timing belt and camshaft sprocket (see chapter 2B).

(The original text is published on: MazBook.ru)

11. Disconnect the sensor electrical connector. Loosen the sensor mounting bolt and remove the sensor from the cylinder head.

12. The sensor is installed in reverse order.
This article is available at: russian, bulgarian, belarusian, ukrainian, serbian, croatian, romanian, polish, slovak, hungarian
This text was checked by: German Vorobyov
Share with friends on social networks:

Previous
Capella 6 » Control system
Next

Crankshaft Position Sensor — checking and replacing
Coolant Temperature Sensor — checking and replacing
Intake Air Temperature Sensor — checking and replacing
Mass Air Flow Sensor — checking and replacing
Throttle Position Sensor — checking, adjusting, and replacing
Power Steering Hydraulic Pressure Sensor — checking and replacing
Oxygen Sensor (O2S) — checking and replacing
Knock sensor — testing and replacement
Vehicle speed sensor — checking and replacing
Idle Air Control Valve — checking and replacing
More articles on repairing other Mazda models
Checking the throttle position sensor Mazda Familia 6 (1989-1994)
Camshaft position sensor (CMP) Mazda3 BK (2003-2009)
Camshaft Position Sensor (CMP) Mazda6 GG (2002-2008)
Removal and installation the camshaft position sensor Mazda CX-5KE (2012-2017)
Camshaft Position Sensor Mazda BT-50 (1) (2006-2011)
Link in different formats to this article
Comments and feedback from visitors
No comments yet


How much will 15 + 37 ?


Capella 6 (1997-2005, petrol) 
  • General information
  • Introduction to guide
  • User manual
  • Troubleshooting
  • Maintenance
  • Power unit
  • 4-cylinder engines
  • 6-cylinder engines
  • Engine overhaul
  • Cooling and ventilation
  • Power and exhaust systems
  • Engine electrics
  • Control system
  • Transmission
  • Mechanical gearbox
  • Automatic gearbox
  • Clutch and drive shafts
  • Chassis
  • Brake system
  • Car suspension
  • Steering
  • Body
  • Exterior (external elements)
  • Interior (internal elements)
  • Doors, windows and locks
  • Electrical equipment
  • Equipment and devices
  • Electrical circuits
Capella 5 (1991-1997) 
  • General information
  • User manual
  • Maintenance
  • Helpful hints
  • Power unit
  • Petrol engines 1.6 and 1.8
  • Petrol engines 2.0
  • 2.5 petrol engines
  • Overhaul engines 1.6 and 1.8
  • Overhaul engines 2.0 and 2.5
  • Diesel engine 2.0
  • Engine electrics
  • Cooling system
  • Air conditioner
  • Carburetor Nikki 30/34
  • Power system (1.6 and 1.8)
  • Power system (2.0 and 2.5)
  • Control system
  • Transmission
  • Mechanical gearbox
  • Automatic gearbox
  • Clutch and axles
  • Chassis
  • Brake system
  • Suspension and wheels
  • Steering
  • Body
  • Exterior (external elements)
  • Interior (internal elements)
  • Doors and windows
  • Electrical equipment
  • Equipment and devices
  • Electrical circuits
Capella 4 (1987-1992) 
  • General information
  • Introduction to manual
  • Vehicle specifications
  • Power unit
  • Engine repair
  • Lubrication system
  • Cooling system
  • Fuel system (carburetor)
  • Fuel injection (FE)
  • Fuel injection (DOHC)
  • Fuel system (diesel)
  • Ignition system
  • Transmission
  • Clutch
  • Gearbox
  • Drive shafts
  • Chassis
  • Front suspension
  • Rear suspension
  • Steering system
  • Brake system
  • Electrical equipment
  • Equipment and devices
  • Electrical circuits
Capella 3 and 4 (1982-1992) 
  • General information
  • User manual
  • Maintenance
  • Power unit
  • Gasoline engine
  • Engine overhaul (gasoline)
  • Diesel engine
  • Cooling and heating
  • Supply system
  • Ignition system
  • Emission reduction
  • Transmission
  • Clutch
  • Mechanical gearbox
  • Automatic gearbox
  • Drive shafts
  • Chassis
  • Brake system
  • Suspension and wheels
  • Steering
  • Body
  • Exterior (external elements)
  • Interior (internal elements)
  • Electrical equipment
  • Equipment and devices
  • Power devices
  • Electrical circuits
Capella 3 (1982-1992, petrol) 
  • General information
  • User manual
  • Maintenance
  • Troubleshooting
  • Late models
  • Power unit
  • Engine in car
  • Engine overhaul
  • Cooling and heating system
  • Fuel and exhaust system
  • Engine electrical system
  • Emission control system
  • Transmission
  • Mechanical gearbox
  • Automatic gearbox
  • Clutch and drive shafts
  • Chassis
  • Brake system
  • Suspension and wheels
  • Steering
  • Body
  • Exterior (external elements)
  • Interior (internal elements)
  • Electrical equipment
  • Equipment and devices
  • Lighting and lamps
  • Electrical circuits
MazBook.ru © 2018–2026 · Mobile version · Articles and news · Sitemap: EN BG BY UA RS HR RO PL SK HU · Feedback · Site search · Add to bookmarks Familia 5 (BF) · Familia 6 (BG) · Capella 3 (GC) · Capella 3 and 4 (GC) · Capella 4 (GD) · Capella 5 (GE) · Capella 6 (GF) · Mazda3 BK · Mazda6 GG · CX-5KE · Mazda 121 (3) · Mazda BT-50 (1) ·
By continuing to use the site, you agree to the use of cookies 🔐