
MazBook.ru
English Русский
Български
Беларускі
Український
Српски
Hrvatski
Română
Polski
Slovenský
Magyar
• Bookmark • Sitemap • Contacts •   
Cars Opel Cars Ford Cars Volkswagen Cars Audi Cars Kia Cars Renault Cars Peugeot


Familia Capella Mazda3 Mazda6 CX-? Others Articles
Capella 3 (1982-1992, petrol) Capella 3 and 4 (1982-1992) Capella 4 (1987-1992) Capella 5 (1991-1997) Capella 6 (1997-2005, petrol)

Oil pan — removal and installation (Mazda Capella GF)

  • Home
  • Mazda Capella
  • Capella GF (1997-2005)
  • Power unit
  • 6-cylinder engines
  • Oil pan — removal and installation
0
Contents: Removal ⇓ Installation ⇓

Removal


1. Disconnect the negative cable from the battery.

Warning. If your vehicle has a theft-protected audio system, make sure you have the unlock code for it before disconnecting the battery.


2. Raise the vehicle and place it on secure supports.

3. Remove the mudguard from under the engine.

4. Drain the engine oil and remove the oil filter.

5. Disconnect the exhaust pipe from the front and rear exhaust manifolds (see paragraph 9), as well as from the catalytic converter (see chapter 4). Lower the exhaust pipe.

6. Remove the suspension cross member.

7. Loosen the oil pan mounting bolts and remove it from the engine (Fig. 12.7). If the pan is stuck to the gasket, gently pry it away from the crankcase with a small screwdriver or spatula. Be careful not to scratch the mating surfaces, otherwise the gasket will leak.
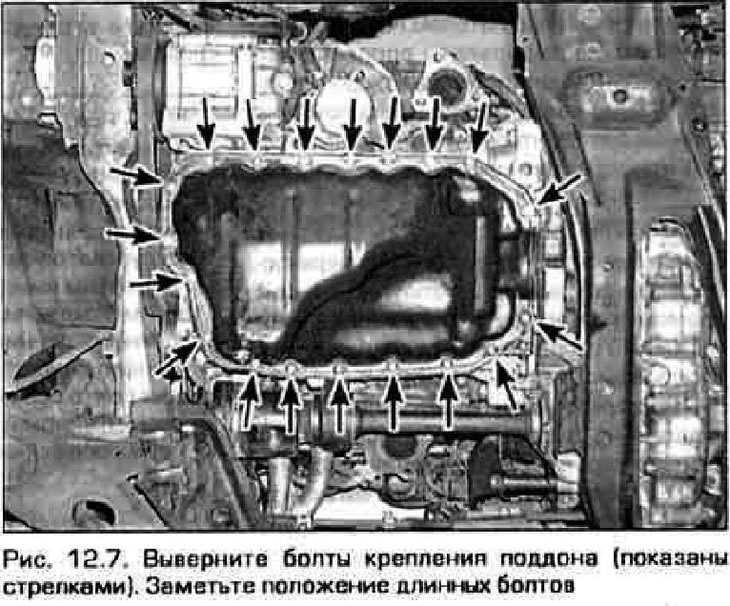
7. Loosen the oil pan mounting bolts and remove it from the engine (Fig. 12.7). If the pan is stuck…


Note: Remember the position of the long bolts so that you can screw them back into their original locations later.


Installation


8. Scrape off any remaining sealant from the mating surfaces of the sump and crankcase and wash them with nitro solvent or acetone. Also remove any remaining sealant from the threaded holes in the crankcase.


9. Check the installation surface of the tray for flatness, especially in the area of the holes. If necessary, place the flange on a block of wood and straighten it with a hammer.

10. Apply a 3-4 mm wide bead of RTV sealant to the tray flange (figure 12.10).
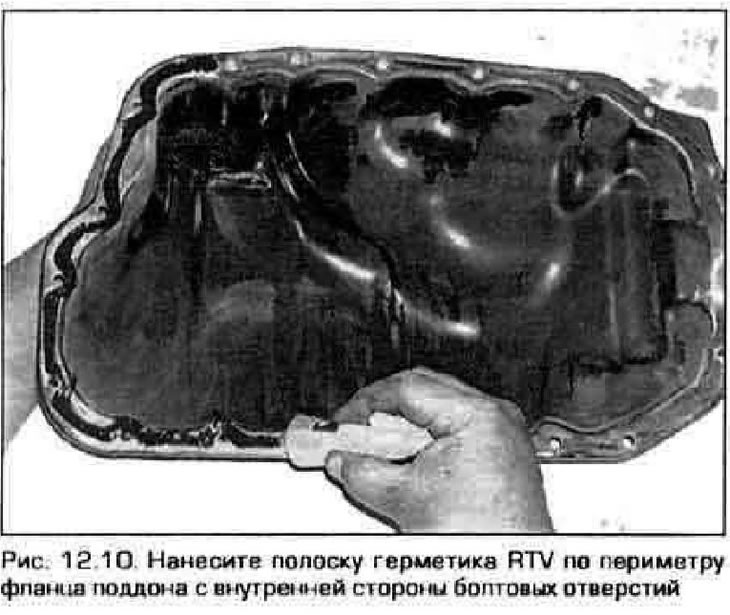
10. Apply a 3-4 mm wide bead of RTV sealant to the tray flange (figure 12.10).


Note: The tray must be installed no later than 5 minutes after applying the sealant, otherwise it will dry out.


11. Place the tray back in place and secure it with bolts. Tighten the bolts gradually to the required torque (see Technical Data) in sequence from the middle to the edges of the pallet.

Note: The tightening torque for short and long bolts is different.


12. Install the remaining parts in the reverse order of removal.

(The text of the article is taken from the website: «mazbook.ru»)

13. Start the engine and check for oil leaks.
This article is available at: russian, bulgarian, belarusian, ukrainian, serbian, croatian, romanian, polish, slovak, hungarian
This text was checked by: German Vorobyov
Share with friends on social networks:

Previous
Capella 6 » 6-cylinder engines
Next

Front Crankshaft Oil Seal — replacement
Cylinder heads — removal and installation
Exhaust manifolds — removal and installation
Intake manifold — removal and installation
Camshafts and tappets — removal and installation
Oil pump — removal, inspection and installation
Flywheel/faceplate — removal and installation
Rear Crankshaft Oil Seal — replacement
Powertrain Supports — inspection and replacement
Link in different formats to this article
Comments and feedback from visitors
No comments yet


How much will 30 + 13 ?


Capella 6 (1997-2005, petrol) 
  • General information
  • Introduction to guide
  • User manual
  • Troubleshooting
  • Maintenance
  • Power unit
  • 4-cylinder engines
  • 6-cylinder engines
  • Engine overhaul
  • Cooling and ventilation
  • Power and exhaust systems
  • Engine electrics
  • Control system
  • Transmission
  • Mechanical gearbox
  • Automatic gearbox
  • Clutch and drive shafts
  • Chassis
  • Brake system
  • Car suspension
  • Steering
  • Body
  • Exterior (external elements)
  • Interior (internal elements)
  • Doors, windows and locks
  • Electrical equipment
  • Equipment and devices
  • Electrical circuits
Capella 5 (1991-1997) 
  • General information
  • User manual
  • Maintenance
  • Helpful hints
  • Power unit
  • Petrol engines 1.6 and 1.8
  • Petrol engines 2.0
  • 2.5 petrol engines
  • Overhaul engines 1.6 and 1.8
  • Overhaul engines 2.0 and 2.5
  • Diesel engine 2.0
  • Engine electrics
  • Cooling system
  • Air conditioner
  • Carburetor Nikki 30/34
  • Power system (1.6 and 1.8)
  • Power system (2.0 and 2.5)
  • Control system
  • Transmission
  • Mechanical gearbox
  • Automatic gearbox
  • Clutch and axles
  • Chassis
  • Brake system
  • Suspension and wheels
  • Steering
  • Body
  • Exterior (external elements)
  • Interior (internal elements)
  • Doors and windows
  • Electrical equipment
  • Equipment and devices
  • Electrical circuits
Capella 4 (1987-1992) 
  • General information
  • Introduction to manual
  • Vehicle specifications
  • Power unit
  • Engine repair
  • Lubrication system
  • Cooling system
  • Fuel system (carburetor)
  • Fuel injection (FE)
  • Fuel injection (DOHC)
  • Fuel system (diesel)
  • Ignition system
  • Transmission
  • Clutch
  • Gearbox
  • Drive shafts
  • Chassis
  • Front suspension
  • Rear suspension
  • Steering system
  • Brake system
  • Electrical equipment
  • Equipment and devices
  • Electrical circuits
Capella 3 and 4 (1982-1992) 
  • General information
  • User manual
  • Maintenance
  • Power unit
  • Gasoline engine
  • Engine overhaul (gasoline)
  • Diesel engine
  • Cooling and heating
  • Supply system
  • Ignition system
  • Emission reduction
  • Transmission
  • Clutch
  • Mechanical gearbox
  • Automatic gearbox
  • Drive shafts
  • Chassis
  • Brake system
  • Suspension and wheels
  • Steering
  • Body
  • Exterior (external elements)
  • Interior (internal elements)
  • Electrical equipment
  • Equipment and devices
  • Power devices
  • Electrical circuits
Capella 3 (1982-1992, petrol) 
  • General information
  • User manual
  • Maintenance
  • Troubleshooting
  • Late models
  • Power unit
  • Engine in car
  • Engine overhaul
  • Cooling and heating system
  • Fuel and exhaust system
  • Engine electrical system
  • Emission control system
  • Transmission
  • Mechanical gearbox
  • Automatic gearbox
  • Clutch and drive shafts
  • Chassis
  • Brake system
  • Suspension and wheels
  • Steering
  • Body
  • Exterior (external elements)
  • Interior (internal elements)
  • Electrical equipment
  • Equipment and devices
  • Lighting and lamps
  • Electrical circuits
MazBook.ru © 2018–2026 · Mobile version · Articles and news · Sitemap: EN BG BY UA RS HR RO PL SK HU · Feedback · Site search · Add to bookmarks Familia 5 (BF) · Familia 6 (BG) · Capella 3 (GC) · Capella 3 and 4 (GC) · Capella 4 (GD) · Capella 5 (GE) · Capella 6 (GF) · Mazda3 BK · Mazda6 GG · CX-5KE · Mazda 121 (3) · Mazda BT-50 (1) ·
By continuing to use the site, you agree to the use of cookies 🔐