
Removing
1. Remove the oil pan (see paragraph 12).
2. Remove the toothed belt and crankshaft sprocket (see paragraph 6).
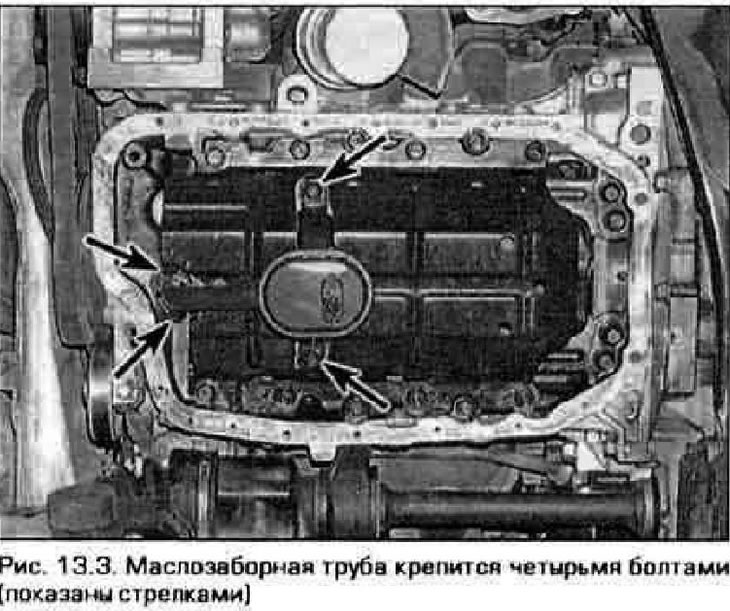
3. Remove the oil intake pipe of the oil pump (pic. 13.3).
4. Remove the air conditioning compressor and move it to the side without disconnecting the hoses.
5. Remove compressor bracket (pic. 13.5).
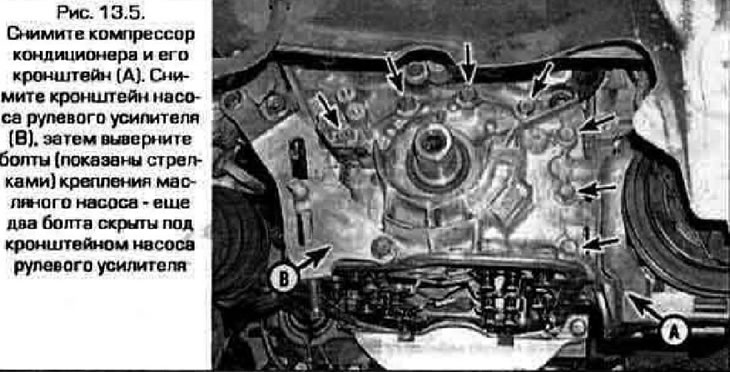
6. Turn out bolts of fastening of the pump of a steering amplifier (two of them are also attached to the oil pump), as well as its bracket and move them to the side without disconnecting the hoses (see chapter 10).
7. Turn out other bolts of fastening of the oil pump and remove the pump from the engine (see fig. 13.5).
8. If necessary, remove the oil damper by unscrewing its boots.
Inspection
9. Remove the o-ring from the back of the oil pump and remove any remaining sealant. Pull out the pressure reducing valve retaining ring (on some models - unscrew the valve plug). Remove the spring plug and valve plug.
Attention! The spring is preloaded with great effort - take care of your eyes.
10. Remove the eight screws securing the cover to the back of the pump.
11. Remove the cover and pull out on the coca gear.
12. Scrape off any old gasket and sealant from the pump-to-motor interface and clean the surfaces with nitro thinner or acetone.
13. Flush all pump parts with solvent and inspect for wear and damage.
14. Inspect the relief valve plunger and spring. If at least one of these parts is damaged, both of them should be replaced as a set. Measure the free length of the spring and compare the result with the value given in Technical Data at the beginning of this chapter.
15. Using a set of feeler gauges, check the following clearances and compare the measurements with the values given in Technical Data (see fig. 13.11, a-c in chapter 2A);
- A) Between driven gear and pump housing
- b) Between gear teeth
- V) Between the ends of the gears and the housing cover
Installation
16. Remove with a screwdriver or knock out the old cuff from the back of the pump bore. Don't damage the bore!
17. Lubricate the outer surface of the new cuff with engine oil and press it into the pump bore. Lubricate the working edge of the cuff with universal grease.
18. Insert the gears into the pump housing with the marks facing out.
19. Seal the pump cavity with petroleum jelly and install the pump cover. Screw in and securely tighten the cover screws in a cross pattern.
20. Lubricate the pressure reducing valve parts with engine oil and assemble the valve.
21. Wipe the mating surfaces of the pump and crankcase with a cloth soaked in nitro thinner or acetone.
22. Apply a strip of sealant 2-3 mm wide to the pump mounting surface. Sealant should not be too much - especially in the area of bolt holes and oil channels. The entire installation operation of the pump must be completed no later than 5 minutes after applying the sealant, otherwise the pump will dry out.
23. Install the O-ring under the pump on the engine crankcase.
24. Put the pump on the toe of the crankshaft. It may be necessary to turn the pump gears to engage the pump gear with the shaft toe. Reinstall the pump.
25. Screw in the pump mounting bolts in their original places and gradually tighten the bolts in a crosswise sequence until the required torque is reached.
26. Install the oil pick-up pipe with a new gasket and tighten its fasteners to the required torque.
27. Install the remaining parts in the reverse order of their removal.
28. Fill the engine with oil. Start the engine and check for oil leaks.
29. Check the engine oil level.