
MazBook.ru
English Русский
Български
Беларускі
Український
Српски
Hrvatski
Română
Polski
Slovenský
Magyar
• Bookmark • Sitemap • Contacts •   
Cars Opel Cars Ford Cars Volkswagen Cars Audi Cars Kia Cars Renault Cars Peugeot


Familia Capella Mazda3 Mazda6 CX-? Others Articles
Capella 3 (1982-1992, petrol) Capella 3 and 4 (1982-1992) Capella 4 (1987-1992) Capella 5 (1991-1997) Capella 6 (1997-2005, petrol)

Setting piston No. 1 to top dead center (TDC) (Mazda Capella GF)

  • Home
  • Mazda Capella
  • Capella GF (1997-2005)
  • Power unit
  • 6-cylinder engines
  • Setting piston No. 1 to top dead center (TDC)
0
Contents: Models produced in 1997 and earlier ⇓ Models produced since 1998 ⇓ All models ⇓
Note: The following procedure assumes that the ignition distributor is installed correctly. If you need to set TDC for distributor installation, the piston position can be determined using the method described below for models without a distributor (released since 1998).


1. Top dead center (TDC) is the extreme upper position of the piston in the cylinder, which it can occupy when the crankshaft rotates. In a four-stroke engine, each piston is at TDC twice during the working cycle - at the end of the compression stroke and at the end of the exhaust stroke. Usually has the value of TDC in the compression stroke.

2. Setting the pistons to TDC is necessary when performing many repair and adjustment works, such as removing and installing parts of the valve timing and ignition mechanism.

3. Before starting this operation, put the transmission in neutral and block the rear wheels, for example by applying the handbrake. Also disable the ignition system by disconnecting the low voltage wires from the ignition coil (see chapter 5). Also remove the spark plugs (see chapter 1).

4. To set any piston to TDC, it is necessary to turn the crankshaft in one of the following ways. The normal direction of rotation of the crankshaft is clockwise when looking at the engine from the guard pulley.
  • a) The most common method of rotating the shaft is with a thorium key placed on the end shaft screwed into the nose of the crankshaft.
  • b) You can use a remote starter switch. If you have such a switch, use it according to the manufacturer's instructions. Bring the crankshaft close to the TDC position, then tighten it with a wrench as described above.
  • c) You can ask an assistant to turn on the starter with the ignition key in short pulses. This method allows you to rotate the crankshaft close enough to TDC, then finish turning it using method (a). Make sure your assistant removes the ignition key and exits the car.


Models produced in 1997 and earlier


5. Locate the terminal on the distributor cap that corresponds to cylinder #1. If the terminals on the cap are not marked, follow the high-tension wire from the spark plug to the cap.

6. Mark the distributor cap and housing opposite terminal No. 1 with a felt-tip pen or chalk.

7. Remove the distributor cap and set it aside (if necessary see chapter 1).

8. Rotate the crankshaft until the notch on its pulley aligns with the TDC mark on the timing scale (figure 3.8).
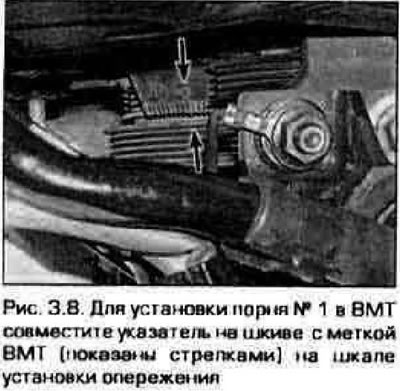
8. Rotate the crankshaft until the notch on its pulley aligns with the TDC mark on the timing scale…


9. Look at the ignition distributor rotor. It must be directed exactly to the mark you made on the body.
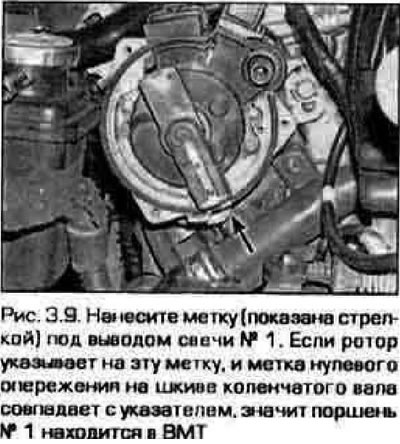
9. Look at the ignition distributor rotor. It must be directed exactly to the mark you made on the…


10. If the rotor is turned 180° relative to the mark, this means that piston No. 1, although at TDC, is finishing the exhaust stroke.


11. To bring piston No. 1 to TDC in the compression stroke, turn the crankshaft a full revolution (360°) clockwise. Now the distributor rotor should turn towards the mark. If the distributor rotor points to the terminal of spark plug No. 1, and the mark on the crankshaft pulley coincides with the pointer, then piston No. 1 is at TDC in the compression stroke.

[Content based on information from: MAZbook.ru]

Note: If the distributor rotor is pointing towards spark plug contact #1 and the marks on the crankshaft pulley do not align, the camshaft drive belt is not installed correctly.


Models produced since 1998


12. Models produced since 1998 are equipped with a distributorless ignition system (see chapter 5). To set piston No. 1 to TDC, remove the spark plug from cylinder No. 1 and screw a compression gauge into the spark plug hole.

13. Turn the crankshaft (see point 4 of this paragraph). As the piston approaches TDC in the compression stroke, the pressure recorded by the compression gauge will begin to increase. Continue turning the crankshaft until the pointer on the crankshaft pulley aligns with the TDC mark (see figure 3.8). Once the pressure has started to increase, do not turn the crankshaft more than necessary to align the marks.

14. To set the piston to TDC of the compression stroke, up to two more crankshaft revolutions may be required. If the pressure does not start to increase during the first revolution, continue rotating the crankshaft. If there is pressure and the marks match, then piston No. 1 is set to the correct position.


All models


15. After piston #1 is set to TDC on the compression stroke, the remaining pistons can also be set to TDC by turning the crankshaft in 120° increments and monitoring the firing order of the cylinders (i.e., an additional 120° turn will bring piston #2 to TDC, etc.).
This article is available at: russian, bulgarian, belarusian, ukrainian, serbian, croatian, romanian, polish, slovak, hungarian
This text was checked by: German Vorobyov
Share with friends on social networks:

Previous
Capella 6 » 6-cylinder engines
Next

Repair operations performed without removing the engine
General information about repairing a six-cylinder engine
Technical data of the six-cylinder engine
Cylinder Head Covers — removal and installation
Valve springs and valve stem seals — replacement
Timing Belt and Sprockets — removal, inspection, and installation
Camshafts and tappets — removal and installation
Intake manifold — removal and installation
More articles on repairing other Mazda models
Setting the ignition timing Mazda Familia 5 (1985-1989)
Storage compartment in the center console Mazda3 BK (2003-2009)
Storage compartment in the center console Mazda6 GG (2002-2008)
Disassembling the cylinder block and connecting rod and piston group Mazda CX-5KE (2012-2017)
Setting the engine to the TDC position of the first cylinder Mazda 121 (3) (1996-2003)
Link in different formats to this article
Comments and feedback from visitors
No comments yet


How much will 29 + 37 ?


Capella 6 (1997-2005, petrol) 
  • General information
  • Introduction to guide
  • User manual
  • Troubleshooting
  • Maintenance
  • Power unit
  • 4-cylinder engines
  • 6-cylinder engines
  • Engine overhaul
  • Cooling and ventilation
  • Power and exhaust systems
  • Engine electrics
  • Control system
  • Transmission
  • Mechanical gearbox
  • Automatic gearbox
  • Clutch and drive shafts
  • Chassis
  • Brake system
  • Car suspension
  • Steering
  • Body
  • Exterior (external elements)
  • Interior (internal elements)
  • Doors, windows and locks
  • Electrical equipment
  • Equipment and devices
  • Electrical circuits
Capella 5 (1991-1997) 
  • General information
  • User manual
  • Maintenance
  • Helpful hints
  • Power unit
  • Petrol engines 1.6 and 1.8
  • Petrol engines 2.0
  • 2.5 petrol engines
  • Overhaul engines 1.6 and 1.8
  • Overhaul engines 2.0 and 2.5
  • Diesel engine 2.0
  • Engine electrics
  • Cooling system
  • Air conditioner
  • Carburetor Nikki 30/34
  • Power system (1.6 and 1.8)
  • Power system (2.0 and 2.5)
  • Control system
  • Transmission
  • Mechanical gearbox
  • Automatic gearbox
  • Clutch and axles
  • Chassis
  • Brake system
  • Suspension and wheels
  • Steering
  • Body
  • Exterior (external elements)
  • Interior (internal elements)
  • Doors and windows
  • Electrical equipment
  • Equipment and devices
  • Electrical circuits
Capella 4 (1987-1992) 
  • General information
  • Introduction to manual
  • Vehicle specifications
  • Power unit
  • Engine repair
  • Lubrication system
  • Cooling system
  • Fuel system (carburetor)
  • Fuel injection (FE)
  • Fuel injection (DOHC)
  • Fuel system (diesel)
  • Ignition system
  • Transmission
  • Clutch
  • Gearbox
  • Drive shafts
  • Chassis
  • Front suspension
  • Rear suspension
  • Steering system
  • Brake system
  • Electrical equipment
  • Equipment and devices
  • Electrical circuits
Capella 3 and 4 (1982-1992) 
  • General information
  • User manual
  • Maintenance
  • Power unit
  • Gasoline engine
  • Engine overhaul (gasoline)
  • Diesel engine
  • Cooling and heating
  • Supply system
  • Ignition system
  • Emission reduction
  • Transmission
  • Clutch
  • Mechanical gearbox
  • Automatic gearbox
  • Drive shafts
  • Chassis
  • Brake system
  • Suspension and wheels
  • Steering
  • Body
  • Exterior (external elements)
  • Interior (internal elements)
  • Electrical equipment
  • Equipment and devices
  • Power devices
  • Electrical circuits
Capella 3 (1982-1992, petrol) 
  • General information
  • User manual
  • Maintenance
  • Troubleshooting
  • Late models
  • Power unit
  • Engine in car
  • Engine overhaul
  • Cooling and heating system
  • Fuel and exhaust system
  • Engine electrical system
  • Emission control system
  • Transmission
  • Mechanical gearbox
  • Automatic gearbox
  • Clutch and drive shafts
  • Chassis
  • Brake system
  • Suspension and wheels
  • Steering
  • Body
  • Exterior (external elements)
  • Interior (internal elements)
  • Electrical equipment
  • Equipment and devices
  • Lighting and lamps
  • Electrical circuits
MazBook.ru © 2018–2026 · Mobile version · Articles and news · Sitemap: EN BG BY UA RS HR RO PL SK HU · Feedback · Site search · Add to bookmarks Familia 5 (BF) · Familia 6 (BG) · Capella 3 (GC) · Capella 3 and 4 (GC) · Capella 4 (GD) · Capella 5 (GE) · Capella 6 (GF) · Mazda3 BK · Mazda6 GG · CX-5KE · Mazda 121 (3) · Mazda BT-50 (1) ·
By continuing to use the site, you agree to the use of cookies 🔐