
Removing
1. Disconnect the negative cable from the battery.
Caution, If your vehicle has an anti-theft audio system, make sure you have the unlock code before disconnecting the battery.
2. Drain the coolant, including from the block (see chapter 1). Disconnect the upper radiator hose from the engine side.
3. Remove air ducts and air cleaner. Remove intake manifold (see paragraph 8).
4. Remove exhaust manifolds (see paragraph 9).
5. Remove the generator. Disconnect and remove high voltage wires, distributor and ignition coil (or coil pack on later models) (see chapter 5).
6. Remove the toothed belt, camshaft sprockets, guides and tension rollers (see paragraph 6).
7. Remove camshafts and tappets (see paragraph 7).
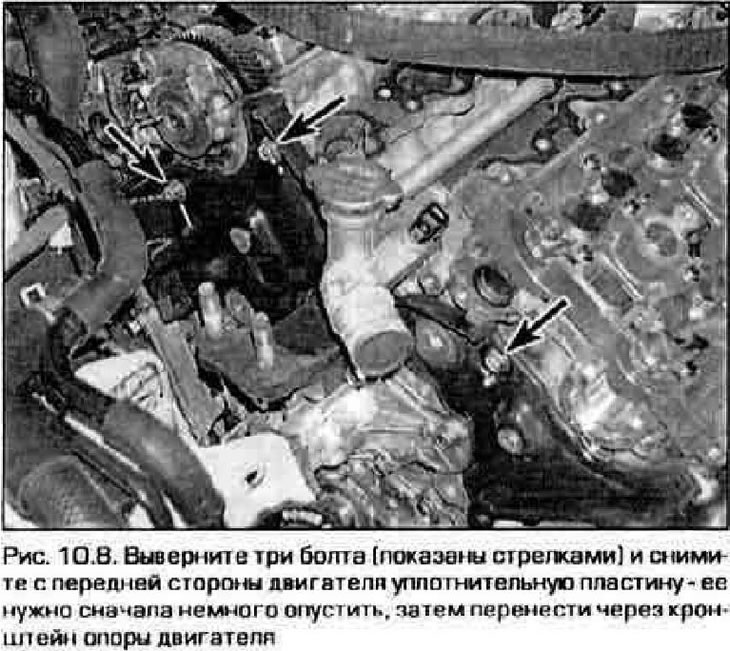
8. Turn out bolts and remove a sealing plate from the forward party of the engine (pic. 10.8).
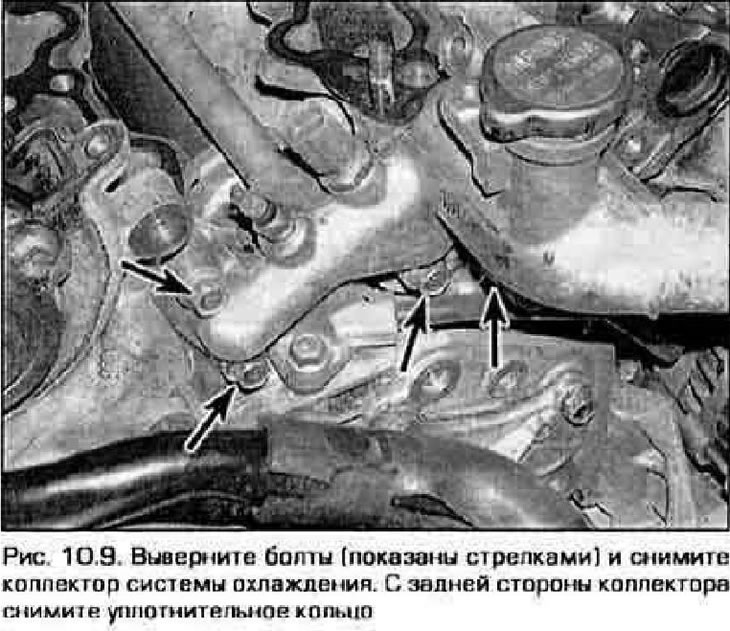
9. Remove the cooling system outlet manifold from the cylinder heads (pic. 10.9).
10. Release the wire harnesses from the back of the heads and move them to the side.
11. In the reverse order. which is shown in fig. 10.22. Gradually loosen and back off the cylinder head bolts no more than 1/4 turn at a time until it is possible to turn them all the way out by hand. The bolts can be thrown away - they will have to be replaced, and the washers can be saved for recycling,
12. Lift the head off the block. If the head has dried on the gasket, tap it with a hammer through a block of wood. Do not be afraid to tear the head off the block by sticking a screwdriver or other similar tool between them. This will damage the surfaces and the joint will leak.
13. Remove the second head in the same way.
Installation
14. Before installing the heads, thoroughly clean the mating surfaces.
15. Scrape off the old gasket residue and carbon deposits from the surfaces, then wash the surfaces with nitro thinner or acetone. If traces of oil remain on the surfaces, the gasket will not reliably seal the joint and leaks may occur. When cleaning the block surfaces, plug the cylinder bores with a rag to keep dirt out of the cylinders. At the end of the work, for insurance, clean the cylinders with a vacuum cleaner.
16. Inspect the mating surfaces of the head and block for scratches, dents, or other damage. Any damage should only be repaired by machining - do not attempt to do this with a file or sandpaper.
17. Drive the threaded holes under the head bolts with a tap, then blow out the holes with compressed air so that chips do not remain in them.
Attention! Wear protective goggles when working with compressed air.
18. It is recommended to replace all head bolts with new ones. Washers can be reused.
19. Install a new gasket on the block.
Note. Each gasket has a marking that indicates which side up it should be installed and for which block - front or rear - it is intended.
20. Carefully lower the head onto the block, being careful not to move the gasket.
21. Before screwing in the bolts, lubricate their threaded parts with clean engine oil.
22. Screw bolts into all holes and tighten them at first only by hand. Then, in the sequence shown in Fig. 10.22, progressively tighten them until the torque indicated in the Technical data at the beginning of the chapter is reached (1st step).
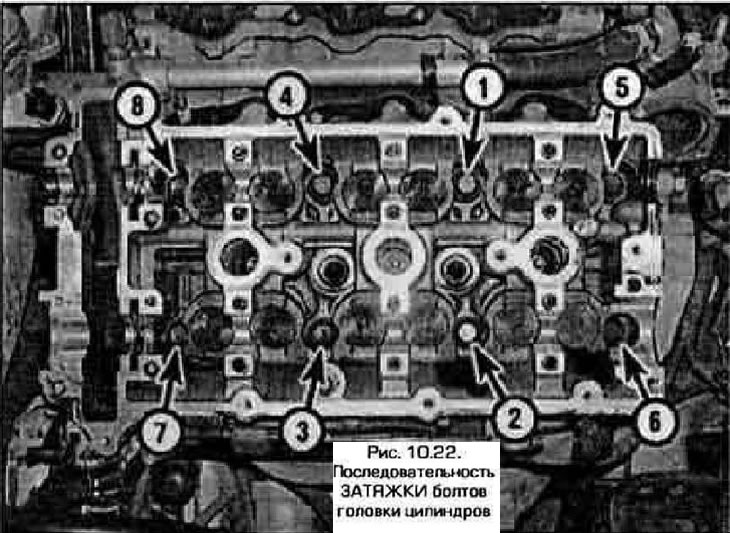
23. Paint a mark on the front face of the bolt or on the thorium head used to tighten the bolts. Put the head on the bolt like this. so that the mark is visible, and tighten the bolt 1/4 turn (those. 90°, 2nd tightening stage). Turn in the same way all the bolts in the sequence shown.
24. Go through all the bolts again and tighten them in the same sequence by another 90° (3rd tightening stage).
25. Install the second head in the same way.
26. The rest of the installation is performed in the reverse order of disassembly. When installing the coolant manifold, replace its gasket and O-ring. This must be done before installing the intake manifold.
27. Fill the cooling system, change the oil and oil filter. Start the engine and check for leaks.