


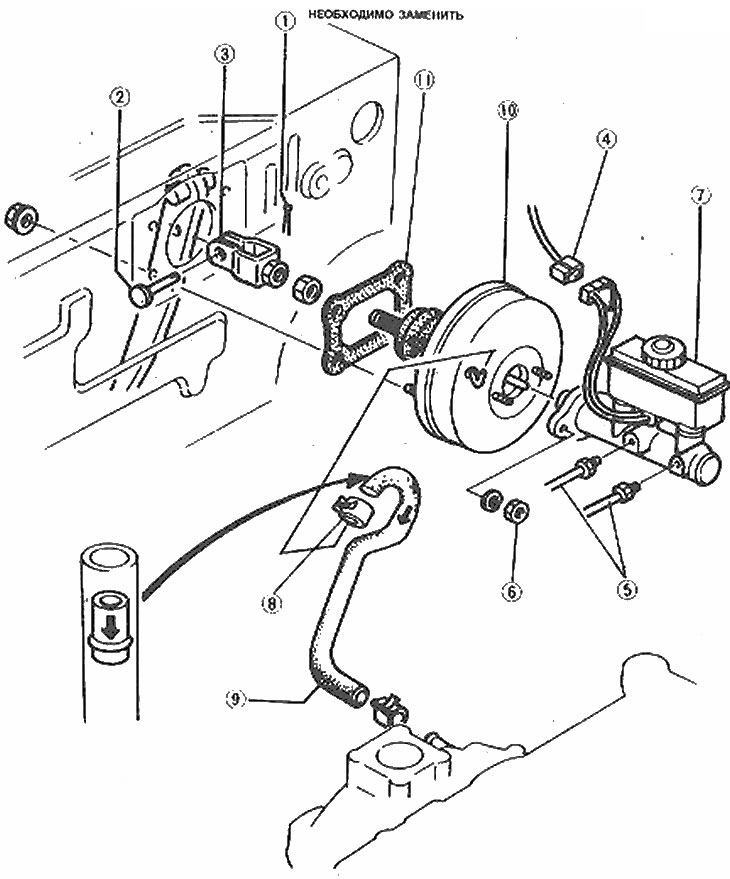
Brake booster components
1. Hairpin; 2. Pin with a hole for a stud; 3. Fork and Bunny; 4. Liquid level sensor connector; 5. Brake pipes; 7. Master cylinder assemblies; 8. Hose clamps; 9. Vacuum hose; 10. Brake booster unit; 11. Gasket
1. The brake booster does not require any special maintenance, other than periodic inspection of the hoses and inspection of the air filter under the boot at the end of the pedal pusher.
2. Overhauling the brake booster requires the use of special tools. If the amplifier is faulty, it is recommended to replace it rather than attempt to repair it.
3. Remove the mounting nuts securing the brake master cylinder to the brake booster. Disconnect the brake fluid level sensor connector and move the master cylinder to the side, being careful not to deform the tubes leading to the master cylinder. If there is any doubt about the flexibility of the lines, disconnect them from the cylinder and plug their ends.
4. Disconnect the vacuum hose going to the front end of the brake booster. Cap the end of the hose.
5. Remove the fan duct and trim from under the dashboard. Remove the stud and pin and disconnect the booster pushrod from the brake pedal. When disconnecting, do not move the pusher to the side.
6. Remove the four vacuum booster unit mounting nuts and carefully remove the unit from the engine compartment.
7. When installing a new booster, measure the clearance between the primary piston of the master cylinder and the pushrod of the booster unit - see Chapter 8, paragraph 24.
8. Tighten the four mounting nuts and connect the push rod to the brake pedal. Tighten the nuts and connect the vacuum hose to the master cylinder. If the brake lines have been disconnected, bleed the entire system (see Chapter 15).
9. Check the position of the brake pedal free play and adjust them if necessary - see Chapter 11, paragraph 8.