
MazBook.ru
English Русский
Български
Беларускі
Український
Српски
Hrvatski
Română
Polski
Slovenský
Magyar
• Bookmark • Sitemap • Contacts •   
Cars Opel Cars Ford Cars Volkswagen Cars Audi Cars Kia Cars Renault Cars Peugeot


Familia Capella Mazda3 Mazda6 CX-? Others Articles
Capella 3 (1982-1992, petrol) Capella 3 and 4 (1982-1992) Capella 4 (1987-1992) Capella 5 (1991-1997) Capella 6 (1997-2005, petrol)

Anti-roll bar — removal and installation (Mazda Capella GC)

  • Home
  • Mazda Capella
  • Capella GC (1982-1992)
  • Chassis
  • Suspension and wheels
  • Anti-roll bar — removal and installation
0
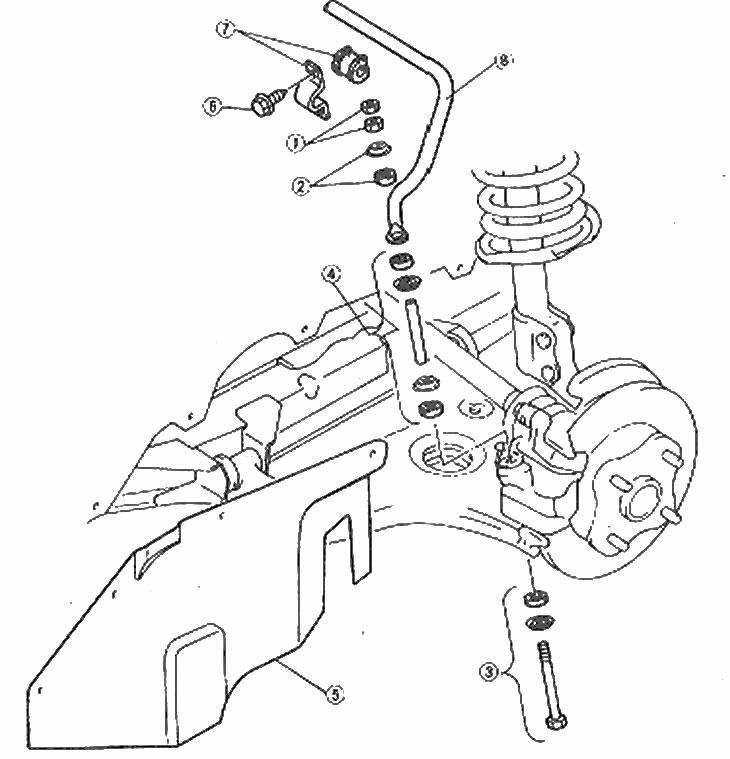
Front anti-roll bar component locations

Front anti-roll bar component locations

1. Nuts; 2. Retainer and sleeve; 3. Bolt, retainer and bushing; 4. Bushings, clamps and gaskets; 5. Mudguards; 6. Bolts; 7. Bushing and suspension; 8. Anti-roll bar
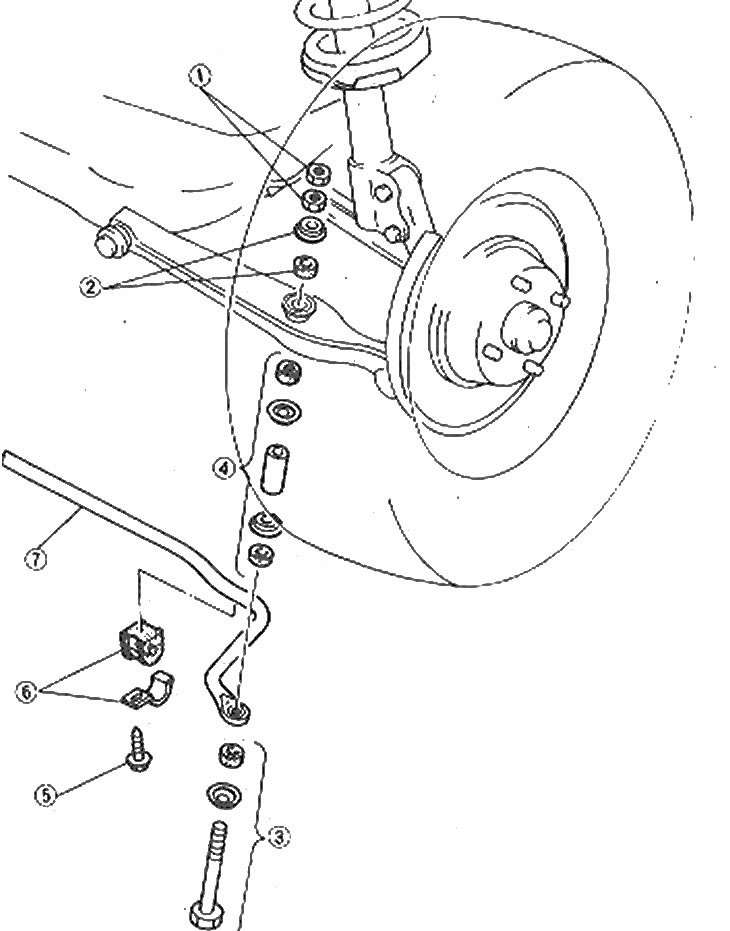

Location of rear anti-roll bar components

Location of rear anti-roll bar components

1. Nuts; 2. Sleeve and retainer; 3. Retainer, bushing and bolt; 4. Fasteners, bushings and gaskets; 5. Bolts; 6. Bushings and suspensions; 7. Anti-roll bar


1. Raise the vehicle and securely support it on the jack stand.

2. On the front anti-roll bar, remove the wheels and mud flaps.

3. Remove the bolts securing the stabilizer bar to the suspension.

4. Remove the suspension bolts and bushing.

5. Remove the rear anti-roll bar from the vehicle.

6. At the front anti-roll bar, remove the rack and pinion assembly mounting bolt, pull the assembly out and then remove the unit, working carefully around the rack and pinion and out of the left wheel well. (On right-hand drive vehicles, it may be necessary to remove the rack and pinion mounting bolt).


7. Inspect the bushings to ensure they are not hardened, broken or excessively worn and replace if necessary.

8. Place the stabilizer bar in position. Make sure it is inserted with the bushing alignment mark on the left side of the vehicle (photo).
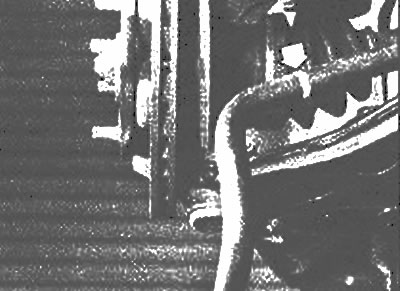
Front stabilizer bar bush alignment mark (arrow)

Front stabilizer bar bush alignment mark (arrow)


9. Install the left side front bushing of the anti-roll bar with the rib installed according to the mark and the cut of the lining to the rear of the car.
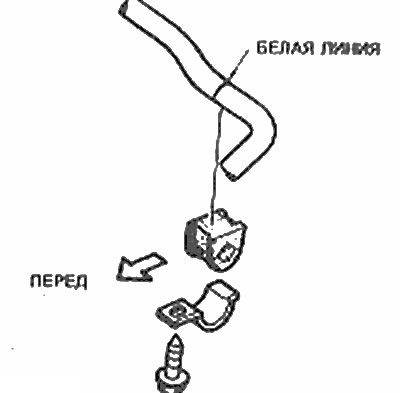
The white line on the stabilizer bar must be aligned with the edge of the left bushing when…

The white line on the stabilizer bar must be aligned with the edge of the left bushing when installed


10. After installing the bushing suspension bolts, tighten them to the specified tightening torque Specification.

11. Install the ends of the bolts and nuts and tighten them securely to one inch of exposed thread after compression on the front stabilizer bar and to 0.6 inch of exposed thread after compression on the rear stabilizer bar.
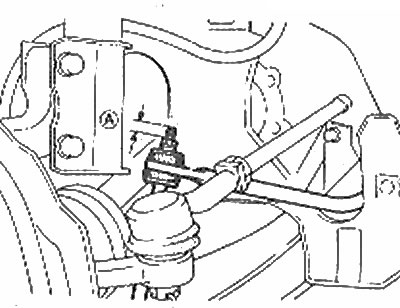


After compression, the front stabilizer bar link bolt should have one inch of exposed threads

After compression, the front stabilizer bar link bolt should have one inch of exposed threads


12. If the rack and pinion mounting bolts are removed, remember to tighten them to the specified tightening torque Specification.
This article is available at: russian, bulgarian, belarusian, ukrainian, serbian, croatian, romanian, polish, slovak, hungarian
This text was checked by: Evdokia Filimonova
Share with friends on social networks:

Previous
Capella 3 » Suspension and wheels
Next

Suspension system — inspection
Suspension system — general description
Suspension adjustment — general information
Wheel and tire removal and installation
Wheels and tires — general information
Front Lower Control Arm — removal, repair and installation
Front strut shock absorber assembly — removal and installation
Rear strut assembly — removal, inspection and installation
Rear suspension, lateral and longitudinal balancers — removal and…
Three-way damper control switches — checking, removal and installation
More articles on repairing other Mazda models
Removal and installation the anti-roll bar Mazda Familia 5 (1985-1989)
Electronic immobilizer (anti-theft system) Mazda3 BK (2003-2009)
Electronic immobilizer (anti-theft system) Mazda6 GG (2002-2008)
Removal and installation the front anti-roll bar Mazda CX-5KE (2012-2017)
Front suspension anti-roll bar Mazda BT-50 (1) (2006-2011)
Link in different formats to this article
Comments and feedback from visitors
No comments yet


How much will 27 + 14 ?


Capella 6 (1997-2005, petrol) 
  • General information
  • Introduction to guide
  • User manual
  • Troubleshooting
  • Maintenance
  • Power unit
  • 4-cylinder engines
  • 6-cylinder engines
  • Engine overhaul
  • Cooling and ventilation
  • Power and exhaust systems
  • Engine electrics
  • Control system
  • Transmission
  • Mechanical gearbox
  • Automatic gearbox
  • Clutch and drive shafts
  • Chassis
  • Brake system
  • Car suspension
  • Steering
  • Body
  • Exterior (external elements)
  • Interior (internal elements)
  • Doors, windows and locks
  • Electrical equipment
  • Equipment and devices
  • Electrical circuits
Capella 5 (1991-1997) 
  • General information
  • User manual
  • Maintenance
  • Helpful hints
  • Power unit
  • Petrol engines 1.6 and 1.8
  • Petrol engines 2.0
  • 2.5 petrol engines
  • Overhaul engines 1.6 and 1.8
  • Overhaul engines 2.0 and 2.5
  • Diesel engine 2.0
  • Engine electrics
  • Cooling system
  • Air conditioner
  • Carburetor Nikki 30/34
  • Power system (1.6 and 1.8)
  • Power system (2.0 and 2.5)
  • Control system
  • Transmission
  • Mechanical gearbox
  • Automatic gearbox
  • Clutch and axles
  • Chassis
  • Brake system
  • Suspension and wheels
  • Steering
  • Body
  • Exterior (external elements)
  • Interior (internal elements)
  • Doors and windows
  • Electrical equipment
  • Equipment and devices
  • Electrical circuits
Capella 4 (1987-1992) 
  • General information
  • Introduction to manual
  • Vehicle specifications
  • Power unit
  • Engine repair
  • Lubrication system
  • Cooling system
  • Fuel system (carburetor)
  • Fuel injection (FE)
  • Fuel injection (DOHC)
  • Fuel system (diesel)
  • Ignition system
  • Transmission
  • Clutch
  • Gearbox
  • Drive shafts
  • Chassis
  • Front suspension
  • Rear suspension
  • Steering system
  • Brake system
  • Electrical equipment
  • Equipment and devices
  • Electrical circuits
Capella 3 and 4 (1982-1992) 
  • General information
  • User manual
  • Maintenance
  • Power unit
  • Gasoline engine
  • Engine overhaul (gasoline)
  • Diesel engine
  • Cooling and heating
  • Supply system
  • Ignition system
  • Emission reduction
  • Transmission
  • Clutch
  • Mechanical gearbox
  • Automatic gearbox
  • Drive shafts
  • Chassis
  • Brake system
  • Suspension and wheels
  • Steering
  • Body
  • Exterior (external elements)
  • Interior (internal elements)
  • Electrical equipment
  • Equipment and devices
  • Power devices
  • Electrical circuits
Capella 3 (1982-1992, petrol) 
  • General information
  • User manual
  • Maintenance
  • Troubleshooting
  • Late models
  • Power unit
  • Engine in car
  • Engine overhaul
  • Cooling and heating system
  • Fuel and exhaust system
  • Engine electrical system
  • Emission control system
  • Transmission
  • Mechanical gearbox
  • Automatic gearbox
  • Clutch and drive shafts
  • Chassis
  • Brake system
  • Suspension and wheels
  • Steering
  • Body
  • Exterior (external elements)
  • Interior (internal elements)
  • Electrical equipment
  • Equipment and devices
  • Lighting and lamps
  • Electrical circuits
MazBook.ru © 2018–2026 · Mobile version · Articles and news · Sitemap: EN BG BY UA RS HR RO PL SK HU · Feedback · Site search · Add to bookmarks Familia 5 (BF) · Familia 6 (BG) · Capella 3 (GC) · Capella 3 and 4 (GC) · Capella 4 (GD) · Capella 5 (GE) · Capella 6 (GF) · Mazda3 BK · Mazda6 GG · CX-5KE · Mazda 121 (3) · Mazda BT-50 (1) ·
By continuing to use the site, you agree to the use of cookies 🔐