
Raise the front of the vehicle and secure it on stands.
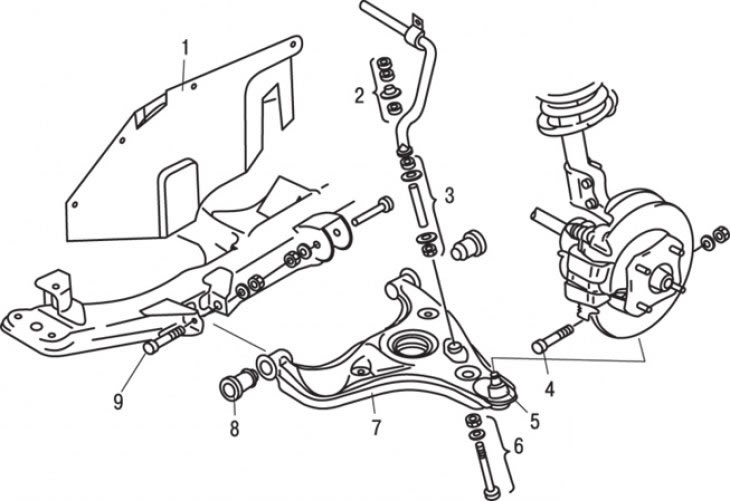
Pic. 11.8. Fastening elements of the lower arm of the front suspension: 1 - mudguard; 2 - nuts, retainer and bushing; 3 - bushings, clamps and gasket; 4 – a bolt and a nut of fastening of the spherical hinge; 5 - dustproof cover of the ball joint; 6 – a bolt and a nut of fastening of the stabilizer of cross-section stability to the bottom lever; 7 - the lower arm of the front suspension; 8 - rubber bushing; 9 - nuts and bolts for securing the lower arm to the frame
If only the lower arm is removed, disconnect only the anti-roll bar connecting bolt from it (pic. 11.8). If both lower control arms are removed, remove the anti-roll bar.
Remove the wheel (wheels) and mudguard (mud flaps).
Turn out bolts of fastening of plugs of the lever to the lower frame.
Loosen the nut securing the ball joint to the steering knuckle and use a pry bar to disconnect the ball joint from the steering knuckle.
Lower the lower arm.
Check all rubber bushings for hardening, wear and splitting and replace if necessary.
Check dust boot and ball joint for wear and damage.
To replace the dust cover, you must use special equipment; in addition, certain skills are needed in operation, therefore, to perform this work, take the lower arm to a specialized workshop. The ball joint cannot be replaced separately from the lever. New bushings can be installed using a vise and tubes or mandrels of suitable diameter to press the old bushings out of the lever and press in the new ones. When installing bushings, use soapy water as a lubricant.
Installation of the lower arm of the front suspension is carried out in the reverse order of removal.
Attention! The final tightening of the nuts and bolts of the lower front suspension arm to the lower frame is carried out after the car is on wheels.