
MazBook.ru
English Русский
Български
Беларускі
Український
Српски
Hrvatski
Română
Polski
Slovenský
Magyar
• Bookmark • Sitemap • Contacts •   
Cars Opel Cars Ford Cars Volkswagen Cars Audi Cars Kia Cars Renault Cars Peugeot


Familia Capella Mazda3 Mazda6 CX-? Others Articles
Capella 3 (1982-1992, petrol) Capella 3 and 4 (1982-1992) Capella 4 (1987-1992) Capella 5 (1991-1997) Capella 6 (1997-2005, petrol)

Front suspension stabilizer bar (Mazda Capella GC)

  • Home
  • Mazda Capella
  • Capella GC (1982-1992)
  • Chassis
  • Suspension and wheels
  • Front suspension stabilizer bar
0
Raise the vehicle and support it securely on stands.

Remove the front wheels and mudguards.

Remove the bolts securing the anti-roll bar to the suspension arms.
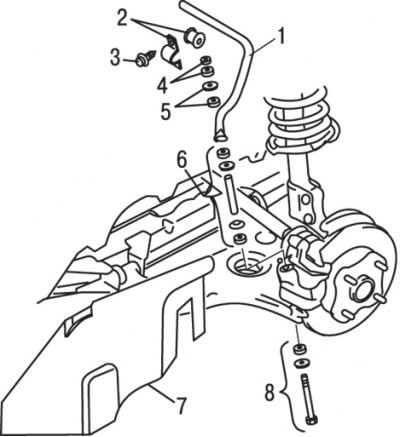
Figure 11.4. Location of front anti-roll bar components: 1 – anti-roll bar; 2 – support brackets…

Figure 11.4. Location of front anti-roll bar components: 1 – anti-roll bar; 2 – support brackets and bushings; 3 – bolt; 4 – nuts; 5 – retainer and sleeve; 6 – bushings, clamps and gaskets; 7 – mudguard; 8 – bolt, retainer and bushing
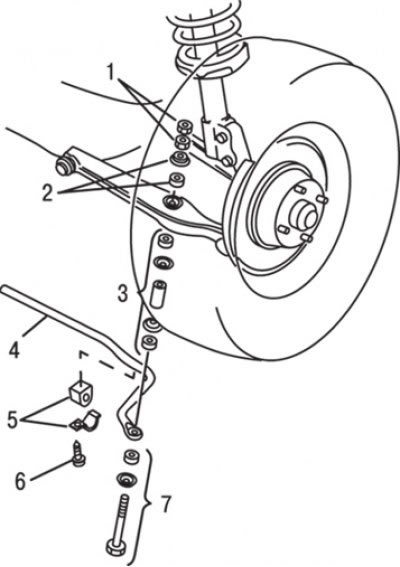

Figure 11.5. Location of rear anti-roll bar components: 1 – nuts; 2 – bushing and retainer; 3 –…

Figure 11.5. Location of rear anti-roll bar components: 1 – nuts; 2 – bushing and retainer; 3 – clamps, bushings and gasket; 4 – anti-roll bar; 5 – support brackets and bushings; 6 – bolt; 7 – retainer, sleeve and bolt


Unscrew the bolts, remove the support brackets and bushings (figure 11.4, 11.5).

Check all rubber bushings for wear and tear and replace if necessary.


Remove the rear stabilizer bar from the vehicle.

On the front anti-roll bar, unscrew the bolts, remove the steering gear and stabilizer, carefully moving it near the steering gear, and remove it through the left wheel arch.

Check all rubber bushings for hardening, wear and tear, and replace if necessary.

Position the anti-roll bar correctly. Make sure the stabilizer is installed so that the bushing alignment mark is on the left side of the vehicle.
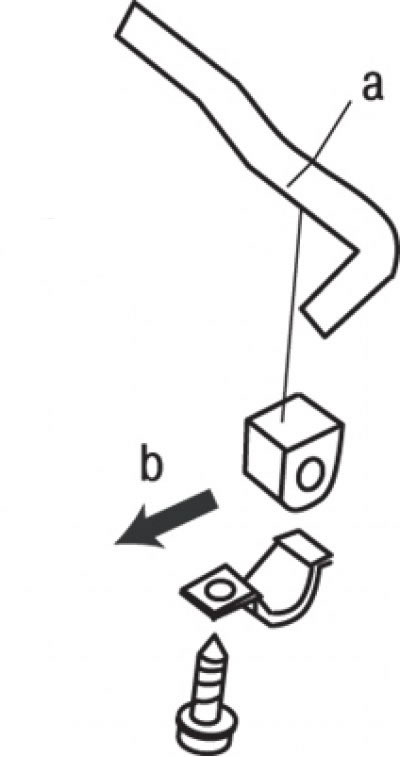
Figure 11.6. Installation location and position of the support bracket and anti-roll bar mounting…

Figure 11.6. Installation location and position of the support bracket and anti-roll bar mounting bushing: a – white mark; b – to the front of the car


Install the bushing on the left side of the front anti-roll bar so that its end is aligned with the mark and the cut facing the front of the vehicle (figure 11.6).

Install the support brackets and secure them with bolts, tightening them to the required torque.

Install the bolts and nuts onto the end of the stabilizer bar and tighten them securely until the threads protrude 25.0 mm after tightening the front stabilizer bar and 15.0 mm after tightening the rear stabilizer bar (figure 11.7).
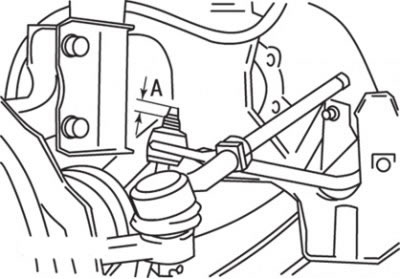
Figure 11.7. Protrusion of the threaded portion of the bolt after fastening the end of the…

Figure 11.7. Protrusion of the threaded portion of the bolt after fastening the end of the anti-roll bar: A=25.0 mm (for front anti-roll bar)


If the steering gear mounting bolts were loosened, screw them back in and tighten them to the specified torque.
This article is available at: russian, bulgarian, belarusian, ukrainian, serbian, croatian, romanian, polish, slovak, hungarian
This text was checked by: Georgy Afanasyev
Share with friends on social networks:

Previous
Capella 3 and 4 » Suspension and wheels
Next

Checking the front suspension
General information about the suspension
Wheel alignment angles
Changing wheels
General information about wheels and tires
Lower control arm of the front suspension
Steering knuckle and hub
Front shock absorber strut — removal, installation and repair
Three-stage front suspension damping control switches
Rear shock absorber strut — removal, installation and repair
More articles on repairing other Mazda models
Detailed technical specifications of the front suspension Mazda Familia 5 (1985-1989)
Front suspension — description Mazda3 BK (2003-2009)
Removal, checking and installation the front stabilizer Mazda6 GG (2002-2008)
Removal/installing the front suspension strut Mazda CX-5KE (2012-2017)
Front suspension — design description Mazda 121 (3) (1996-2003)
Link in different formats to this article
Comments and feedback from visitors
No comments yet


How much will 19 + 49 ?


Capella 6 (1997-2005, petrol) 
  • General information
  • Introduction to guide
  • User manual
  • Troubleshooting
  • Maintenance
  • Power unit
  • 4-cylinder engines
  • 6-cylinder engines
  • Engine overhaul
  • Cooling and ventilation
  • Power and exhaust systems
  • Engine electrics
  • Control system
  • Transmission
  • Mechanical gearbox
  • Automatic gearbox
  • Clutch and drive shafts
  • Chassis
  • Brake system
  • Car suspension
  • Steering
  • Body
  • Exterior (external elements)
  • Interior (internal elements)
  • Doors, windows and locks
  • Electrical equipment
  • Equipment and devices
  • Electrical circuits
Capella 5 (1991-1997) 
  • General information
  • User manual
  • Maintenance
  • Helpful hints
  • Power unit
  • Petrol engines 1.6 and 1.8
  • Petrol engines 2.0
  • 2.5 petrol engines
  • Overhaul engines 1.6 and 1.8
  • Overhaul engines 2.0 and 2.5
  • Diesel engine 2.0
  • Engine electrics
  • Cooling system
  • Air conditioner
  • Carburetor Nikki 30/34
  • Power system (1.6 and 1.8)
  • Power system (2.0 and 2.5)
  • Control system
  • Transmission
  • Mechanical gearbox
  • Automatic gearbox
  • Clutch and axles
  • Chassis
  • Brake system
  • Suspension and wheels
  • Steering
  • Body
  • Exterior (external elements)
  • Interior (internal elements)
  • Doors and windows
  • Electrical equipment
  • Equipment and devices
  • Electrical circuits
Capella 4 (1987-1992) 
  • General information
  • Introduction to manual
  • Vehicle specifications
  • Power unit
  • Engine repair
  • Lubrication system
  • Cooling system
  • Fuel system (carburetor)
  • Fuel injection (FE)
  • Fuel injection (DOHC)
  • Fuel system (diesel)
  • Ignition system
  • Transmission
  • Clutch
  • Gearbox
  • Drive shafts
  • Chassis
  • Front suspension
  • Rear suspension
  • Steering system
  • Brake system
  • Electrical equipment
  • Equipment and devices
  • Electrical circuits
Capella 3 and 4 (1982-1992) 
  • General information
  • User manual
  • Maintenance
  • Power unit
  • Gasoline engine
  • Engine overhaul (gasoline)
  • Diesel engine
  • Cooling and heating
  • Supply system
  • Ignition system
  • Emission reduction
  • Transmission
  • Clutch
  • Mechanical gearbox
  • Automatic gearbox
  • Drive shafts
  • Chassis
  • Brake system
  • Suspension and wheels
  • Steering
  • Body
  • Exterior (external elements)
  • Interior (internal elements)
  • Electrical equipment
  • Equipment and devices
  • Power devices
  • Electrical circuits
Capella 3 (1982-1992, petrol) 
  • General information
  • User manual
  • Maintenance
  • Troubleshooting
  • Late models
  • Power unit
  • Engine in car
  • Engine overhaul
  • Cooling and heating system
  • Fuel and exhaust system
  • Engine electrical system
  • Emission control system
  • Transmission
  • Mechanical gearbox
  • Automatic gearbox
  • Clutch and drive shafts
  • Chassis
  • Brake system
  • Suspension and wheels
  • Steering
  • Body
  • Exterior (external elements)
  • Interior (internal elements)
  • Electrical equipment
  • Equipment and devices
  • Lighting and lamps
  • Electrical circuits
MazBook.ru © 2018–2026 · Mobile version · Articles and news · Sitemap: EN BG BY UA RS HR RO PL SK HU · Feedback · Site search · Add to bookmarks Familia 5 (BF) · Familia 6 (BG) · Capella 3 (GC) · Capella 3 and 4 (GC) · Capella 4 (GD) · Capella 5 (GE) · Capella 6 (GF) · Mazda3 BK · Mazda6 GG · CX-5KE · Mazda 121 (3) · Mazda BT-50 (1) ·
By continuing to use the site, you agree to the use of cookies 🔐