
Removal and installation
Raise the front of the vehicle and secure it on stands.
Loosen the nuts securing the strut to the steering knuckle and then remove one nut and bolt.
In a motor compartment remove the top casing of a rack.
Remove the three-stage damper switch (if available).
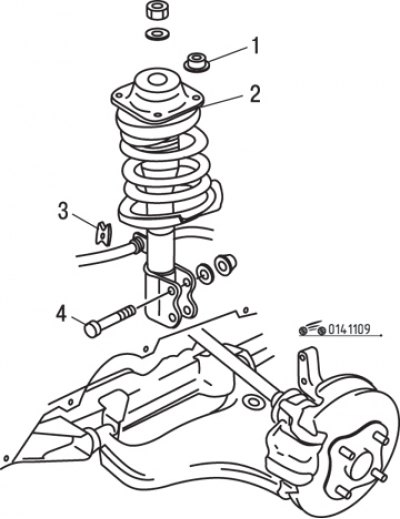
Pic. 11.9. Elements of fastening of a shock-absorber rack of a forward suspension bracket: 1 - nut; 2 – the top support of a rack; 3 – a clip of fastening of a brake hose; 4 - bolt and nut
Loosen the four nuts securing the strut to the body (pic. 11.9). Apply marks for subsequent alignment of the upper part of the rack with the body.
If it is necessary to disassemble the column, loosen the stem fixing nut, while
secure the shock absorber rod from turning. Do not loosen the nut completely.
Turn out the remained bolt and a nut of fastening of a rack to a rotary fist, lower a rack down and remove from the car.
Check the strut for shock-absorbing fluid leaks, damage to dust covers and suspension spring.
Installation is carried out in the reverse order of removal. Align the previously applied marks when attaching the upper part of the rack to the car body.
Attention! The spring has a very high compression force, so use only a very reliable tool.
Attention! Never tie the spring with wire.
Attention! When using a special device for spring compression, it is necessary to securely grasp the coils of the spring and compress the spring from opposite sides.
Repair
Remove the front suspension strut. If equipped, remove the 3-way damping control switch as well (drive mechanism).
Secure the front shock absorber strut in a soft jaw vise and, using the special tool, compress the spring so that it moves away from the top of the strut. When using a special tool for spring compression, make sure that the coils of the spring are securely gripped, and compress the spring from opposite sides.
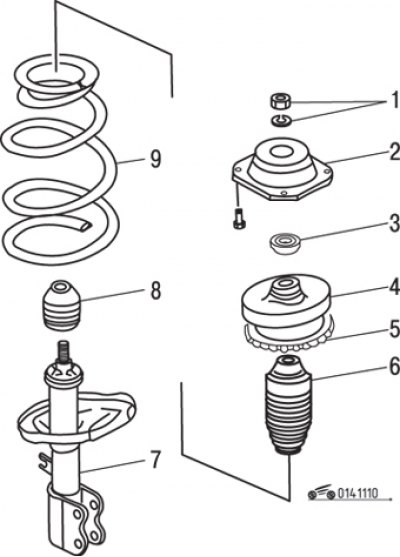
Pic. 11.10. Elements of the shock absorber strut of the front suspension: 1 - nut and washer for fastening the rod; 2 – the top support of a rack; 3 - bearing; 4 - the upper saddle of the spring; 5 - spring gasket; 6 - dust cover; 7 - shock absorber; 8 – compression stroke buffer; 9 - spring
Secure the shock absorber rod against turning with a wrench and, using the second ring wrench, unscrew the central nut of the shock absorber rod (pic. 11.10).
Remove the upper strut support, bearing and upper spring seat from the shock absorber rod.
Remove the spring together with the spring compressor.
Remove the dust cover and compression stroke buffer from the shock absorber.
If it is necessary to install a new spring, slowly, being careful, spread and remove the spring compressor from the spring, then compress the new spring.
When installing on the same axle of the vehicle, it is necessary to use springs with the same technical characteristics (with the same color marking).
Check the shock absorber for signs of fluid leaks. Check the entire length of the damper rod for pitting. Check the shock absorber housing for mechanical damage. Set the shock absorber to a vertical position and check its operation by moving the shock absorber rod through its full stroke. In all cases, the shock absorber rod should move smoothly, with perceptible resistance. If the shock absorber rod moves jerkily or there are mechanical damages, the shock absorber must be replaced.
The assembly of the shock absorber strut is carried out in the reverse order of disassembly.
The final tightening of the shock absorber rod mounting nut is carried out after installing the rack on the car.