
MazBook.ru
English Русский
Български
Беларускі
Український
Српски
Hrvatski
Română
Polski
Slovenský
Magyar
• Bookmark • Sitemap • Contacts •   
Cars Opel Cars Ford Cars Volkswagen Cars Audi Cars Kia Cars Renault Cars Peugeot


Familia Capella Mazda3 Mazda6 CX-? Others Articles
Capella 3 (1982-1992, petrol) Capella 3 and 4 (1982-1992) Capella 4 (1987-1992) Capella 5 (1991-1997) Capella 6 (1997-2005, petrol)

Removal and installation the engine (Mazda Capella GE)

  • Home
  • Mazda Capella
  • Capella GE (1991-1997)
  • Power unit
  • Overhaul engines 2.0 and 2.5
  • Removal and installation the engine
0
Contents: Removal ⇓ Installation ⇓
If you are removing the engine for the first time, you need to prepare a room for this, preferably equipped with a lift. You will need an assistant, ideally someone with specialized knowledge and experience. It is also necessary to prepare all the necessary tools and observe all necessary safety precautions during this complex procedure.

Removal


Caution! It is recommended to remove the engine together with the gearbox and only then disconnect the gearbox from the engine.


Please note: The models described in this manual are equipped with airbags. Before starting work, be sure to turn off the airbag system to avoid their sudden deployment.


Caution! Observe fire safety regulations when working with fuel system components.


1. Release the pressure in the fuel system.

(The text of the article is taken from the website mazbook.ru)

2. Disconnect the negative battery cable.

3. Remove the battery and its bracket.

4. Remove the hood.

5. Remove the air filter and mud flaps.

6. Raise and support the front of the vehicle. Drain the coolant and engine oil. Remove the drive belts.
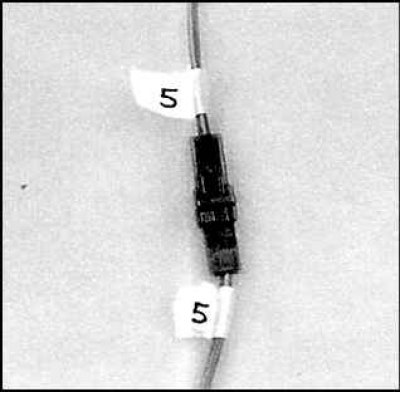
6. Raise and support the front of the vehicle. Drain the coolant and engine oil. Remove the drive…


7. Disconnect the vacuum hoses, coolant hoses, exhaust hoses, wires and fuel lines. Label all detachable parts to avoid confusion during installation.


8. Remove the radiator cooling fans, fan shroud, and radiator (see subsection 4.4). Disconnect the upper and lower radiator hoses and the heater core hoses from the engine.

9. Disconnect the fuel lines from the engine and cap them.

10. On 4-cylinder models, remove the intake manifold bracket.

11. Remove the starter.

12. Remove the crankshaft pulley.

13. On 4-cylinder models, remove the alternator.

14. Disconnect the cables of the various systems from the engine.
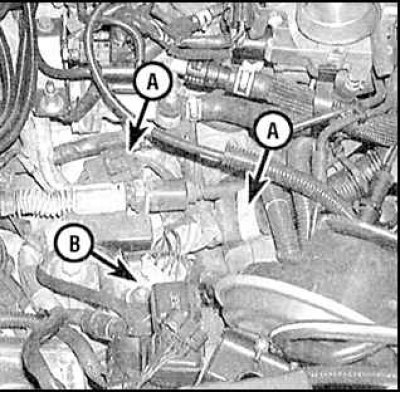
14. Disconnect the cables of the various systems from the engine.


15. Disconnect the plug (A) and ground wires (B) from the engine wire harness.
15. Disconnect the plug (A) and ground wires (B) from the engine wire harness.


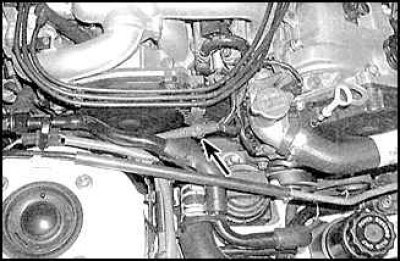
16. Disconnect the temperature sensors and the crankshaft sensor. Remove the engine wiring harness bracket (arrow) and place it aside.
16. Disconnect the temperature sensors and the crankshaft sensor. Remove the engine wiring harness…


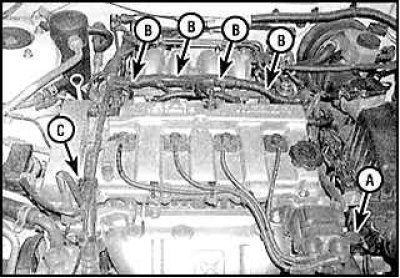
17. On 4-cylinder models, disconnect the wires from the ignition distributor (A) and the fuel injectors (B). Loosen the clamps (C) and disconnect the wiring harness from the engine.


18. Remove the power steering pump (without disconnecting the hoses from the pump) and place it away from the engine.

19. Remove the air conditioning compressor (do not disconnect the refrigerant hoses from the compressor) and place it away from the engine.

20. Disconnect the oxygen sensor wire. Disconnect the exhaust pipe from the exhaust manifold. Remove the crossmember and lower the exhaust pipe.

21. On 6-cylinder engines, remove the oil filter, disconnect the hoses from the oil cooler, and remove the radiator.
21. On 6-cylinder engines, remove the oil filter, disconnect the hoses from the oil cooler, and…


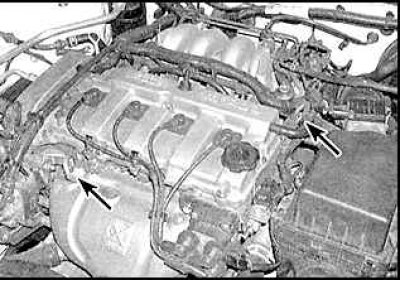
22. Secure the engine to the lift. Attach the hoist to the two lugs (arrows). Raise the engine slightly.

23. On 4-cylinder models with an automatic transmission, remove the right drive axle shaft and disconnect the torque converter dust shield from the bottom of the transmission housing. Remove the bolts securing the torque converter to the drive plate and carefully press the torque converter into the transmission housing.

24. In all models with a manual transmission, the engine is removed together with the transmission, so all wires and cables must be disconnected from it. Remove the axle shafts.


25. Remove the bolts and nuts from the front and rear engine mounts.

26. On 4-cylinder engines with an automatic transmission, remove the bolts securing the transmission to the engine and separate the engine from the transmission. The torque converter should remain in the transmission housing. In all other models, the engine is removed together with the gearbox.

27. Check that nothing other than the left and right engine mounts interferes with its removal.

28. Remove the bolts from the right and left engine mounts.

29. Carefully raise the engine on the lift and remove it from the vehicle.

30. Lower the engine onto a specially equipped stand or onto the workshop floor.

Installation


1. Check the condition of the engine and gearbox mounts; if they are worn, replace them.

2. On engines with a manual transmission, inspect the clutch components and lubricate the thrust bearing.

3. On engines with an automatic transmission, inspect the torque converter gasket and bushing and lubricate the front of the converter.

4. Connect the engine and gearbox and tighten the bolts.

5. Install the engine and other parts in the reverse order of removal.
This article is available at: russian, bulgarian, belarusian, ukrainian, serbian, croatian, romanian, polish, slovak, hungarian
This text was checked by: Evgeny Mereshnikov
Share with friends on social networks:

Previous
Capella 5 » Overhaul engines 2.0 and 2.5
Next

Engine dismantling methods
Checking the compression in the cylinders
Checking with a vacuum gauge
Engine disassembly sequence
Alternatives to engine overhaul
Overhaul and inspection of the cylinder head
Cylinder head assembly
Removal pistons and connecting rods
Removal the crankshaft
Checking the cylinder block
More articles on repairing other Mazda models
Main technical characteristics of the engine Mazda Familia 5 (1985-1989)
Engine number Mazda3 BK (2003-2009)
Engine number Mazda6 GG (2002-2008)
Emergency engine start Mazda CX-5KE (2012-2017)
Starting the engine from an auxiliary battery Mazda 121 (3) (1996-2003)
Link in different formats to this article
Comments and feedback from visitors
No comments yet


How much will 30 + 28 ?


Capella 6 (1997-2005, petrol) 
  • General information
  • Introduction to guide
  • User manual
  • Troubleshooting
  • Maintenance
  • Power unit
  • 4-cylinder engines
  • 6-cylinder engines
  • Engine overhaul
  • Cooling and ventilation
  • Power and exhaust systems
  • Engine electrics
  • Control system
  • Transmission
  • Mechanical gearbox
  • Automatic gearbox
  • Clutch and drive shafts
  • Chassis
  • Brake system
  • Car suspension
  • Steering
  • Body
  • Exterior (external elements)
  • Interior (internal elements)
  • Doors, windows and locks
  • Electrical equipment
  • Equipment and devices
  • Electrical circuits
Capella 5 (1991-1997) 
  • General information
  • User manual
  • Maintenance
  • Helpful hints
  • Power unit
  • Petrol engines 1.6 and 1.8
  • Petrol engines 2.0
  • 2.5 petrol engines
  • Overhaul engines 1.6 and 1.8
  • Overhaul engines 2.0 and 2.5
  • Diesel engine 2.0
  • Engine electrics
  • Cooling system
  • Air conditioner
  • Carburetor Nikki 30/34
  • Power system (1.6 and 1.8)
  • Power system (2.0 and 2.5)
  • Control system
  • Transmission
  • Mechanical gearbox
  • Automatic gearbox
  • Clutch and axles
  • Chassis
  • Brake system
  • Suspension and wheels
  • Steering
  • Body
  • Exterior (external elements)
  • Interior (internal elements)
  • Doors and windows
  • Electrical equipment
  • Equipment and devices
  • Electrical circuits
Capella 4 (1987-1992) 
  • General information
  • Introduction to manual
  • Vehicle specifications
  • Power unit
  • Engine repair
  • Lubrication system
  • Cooling system
  • Fuel system (carburetor)
  • Fuel injection (FE)
  • Fuel injection (DOHC)
  • Fuel system (diesel)
  • Ignition system
  • Transmission
  • Clutch
  • Gearbox
  • Drive shafts
  • Chassis
  • Front suspension
  • Rear suspension
  • Steering system
  • Brake system
  • Electrical equipment
  • Equipment and devices
  • Electrical circuits
Capella 3 and 4 (1982-1992) 
  • General information
  • User manual
  • Maintenance
  • Power unit
  • Gasoline engine
  • Engine overhaul (gasoline)
  • Diesel engine
  • Cooling and heating
  • Supply system
  • Ignition system
  • Emission reduction
  • Transmission
  • Clutch
  • Mechanical gearbox
  • Automatic gearbox
  • Drive shafts
  • Chassis
  • Brake system
  • Suspension and wheels
  • Steering
  • Body
  • Exterior (external elements)
  • Interior (internal elements)
  • Electrical equipment
  • Equipment and devices
  • Power devices
  • Electrical circuits
Capella 3 (1982-1992, petrol) 
  • General information
  • User manual
  • Maintenance
  • Troubleshooting
  • Late models
  • Power unit
  • Engine in car
  • Engine overhaul
  • Cooling and heating system
  • Fuel and exhaust system
  • Engine electrical system
  • Emission control system
  • Transmission
  • Mechanical gearbox
  • Automatic gearbox
  • Clutch and drive shafts
  • Chassis
  • Brake system
  • Suspension and wheels
  • Steering
  • Body
  • Exterior (external elements)
  • Interior (internal elements)
  • Electrical equipment
  • Equipment and devices
  • Lighting and lamps
  • Electrical circuits
MazBook.ru © 2018–2026 · Mobile version · Articles and news · Sitemap: EN BG BY UA RS HR RO PL SK HU · Feedback · Site search · Add to bookmarks Familia 5 (BF) · Familia 6 (BG) · Capella 3 (GC) · Capella 3 and 4 (GC) · Capella 4 (GD) · Capella 5 (GE) · Capella 6 (GF) · Mazda3 BK · Mazda6 GG · CX-5KE · Mazda 121 (3) · Mazda BT-50 (1) ·
By continuing to use the site, you agree to the use of cookies 🔐