
- For fluid replacement (oils): hex wrench for loosening the bolt in the fill hole.
- Bolt sealing ring.
- Filter with new O-ring.
Materials Needed: Automatic transmission fluid to specification Ford WSD-M2C 199-A or Tutela CVT Universal. The same applies to the Mazda 121.
Examination
The correct fluid level is very important for the correct operation of the automatic transmission. Therefore, you need to check very carefully.
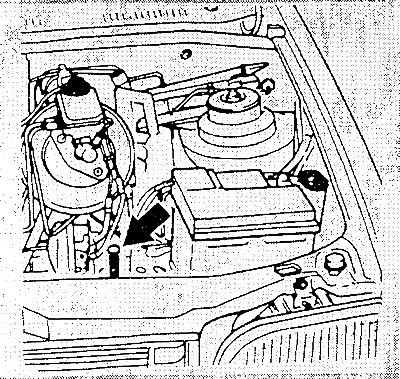
The dipstick for checking the level is located in the engine compartment. Through its tube, you can pour fluid into the gearbox.
Attention! The check must be carried out with the transmission warmed up.
Drive at least 10 km, preferably at high speed. In this case, the temperature of the liquid will be 60-70°C.
Put the unladen car on a horizontal surface without turning off the engine. Apply the parking brake.
Move selector to position «N». Don't give «gas» - the engine during the test must be idling.
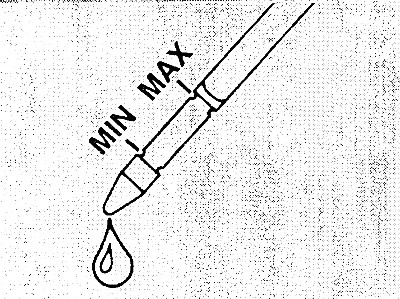
Pull out the dipstick and wipe it with a clean cloth. Then insert it back, pull it out and determine the fluid level.
The level must be between the marks «MIN» And «MAX».. The difference between the marks corresponds to the volume of liquid 250-300 cm3.
Attention! When the fluid level is low, the pump will make a sound of air being sucked in. This causes the liquid to foam, and an incorrect reading may be obtained when measuring the level. In this case, turn off the engine, after about 2 minutes add some fluid and then check the level again with the engine running.
If the liquid needs to be added, then use a clean funnel with a fine mesh.
Pour fluid with the engine off through the tube to measure its level in the gearbox.
Attention! Do not fill in too much liquid, because. this can lead to malfunctions in the automation. In this case, the excess liquid must be drained.
Check the fluid on the dipstick for appearance and smell. Normal fluid should be clear and red. Burnt friction linings lead to a burnt smell and darkening of the fluid. If the liquid contains metal filings or it becomes thick and sticky, then the gearbox must be removed and repaired (In workshop). Fluid contamination may cause malfunctions in the transmission control system.
After checking the level and topping up the liquid, insert the dipstick back.
Press the brake pedal and slowly switch the selector through all ranges. Finally, check the fluid level again.
Fluid Change/Strainer Replacement
When changing the fluid, absolute cleanliness must be observed. The smallest contamination can lead to the failure of automation.
Caution: Without fluid in the automatic transmission, the engine must not be started and the vehicle must not be towed.
The fluid must be changed when the gearbox is warm.
Raise and support the car, remove the lower engine cover.
Substitute a container for draining.
Remove the fluid drain bolt from the transmission pan and allow the fluid to drain completely.
Caution: If the fluid has a burnt odor, is dark in color, or contains metal shavings, the gearbox needs to be repaired.
Tighten the drain bolt with a new seal, unscrew the bolts and remove the transmission pan.
Wipe and clean the magnets in it from steel shavings.
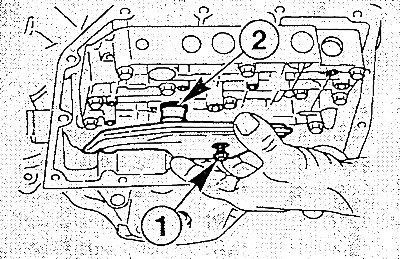
Unscrew the filter screw (1) and take out the filter.
Install new filter with new O-ring (2) and tighten the fastening bolt to 10 Im.
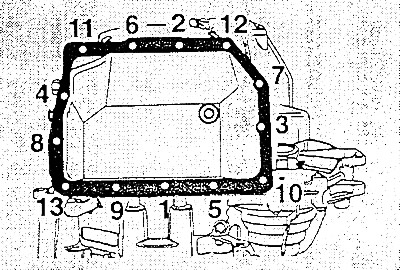
Install the pan with a new gasket and tighten its bolts first to 3 Nm, then to 10 Nm in the sequence shown. Do not overtighten the bolts, otherwise the gasket will be deformed.
Install the lower engine cover.
Lower the car.
Fill with 3.5 liters of automatic transmission fluid.
Caution: Use only the recommended fluid.
Check fluids as described above.