
MazBook.ru
English Русский
Български
Беларускі
Український
Српски
Hrvatski
Română
Polski
Slovenský
Magyar
• Bookmark • Sitemap • Contacts •   
Cars Opel Cars Ford Cars Volkswagen Cars Audi Cars Kia Cars Renault Cars Peugeot


Familia Capella Mazda3 Mazda6 CX-? Others Articles
Capella 3 (1982-1992, petrol) Capella 3 and 4 (1982-1992) Capella 4 (1987-1992) Capella 5 (1991-1997) Capella 6 (1997-2005, petrol)

Rear window defroster (Mazda Capella GC)

  • Home
  • Mazda Capella
  • Capella GC (1982-1992)
  • Electrical equipment
  • Equipment and devices
  • Rear window defroster
0
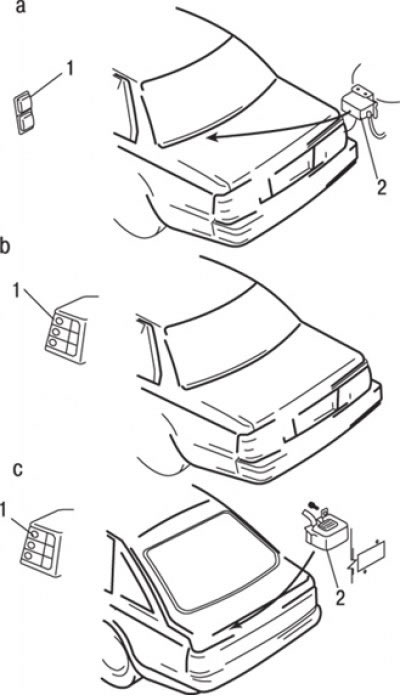
Figure 13.57. Rear window defroster elements: a – sedan body; b – coupe body; c – hatchback body; 1…

Figure 13.57. Rear window defroster elements: a – sedan body; b – coupe body; c – hatchback body; 1 – heater switch; 2 – interference suppression element


The rear window defroster consists of horizontally positioned heating elements sprayed onto the glass surface during its manufacture (figure 13.57).

Minor breaks in the heating elements can be repaired without removing the rear window.

To check the operation of the heater, start the engine and turn on the rear window defroster.

Connect one probe of the test lamp to the vehicle ground, and carefully touch each heating element with the second probe.

The brightness of the test lamp should increase as the probe moves from the right edge of the heating element to the left. If the indicator light glows brightly at both ends of the heating element, check that the ground wire is securely connected. All heating elements should be checked in at least two places.

To repair a broken heating element, it is recommended to purchase a repair kit designed specifically for this purpose.

To fix the break, first turn off the heating system and wait a few minutes.


Clean the repair area thoroughly with alcohol or solvent.

Place strips of masking tape on both sides of the repair area. The distance between the strips should be the same as between the heating elements. This can be checked from outside the vehicle.

Using a small brush, apply a small amount of silver paint between the strips of tape, overlapping the undamaged area on both sides.

Allow the paint to dry for 24 hours and treat the repair area with a stream of hot air. At an air temperature of 60°C the paint will dry in 30 minutes.

Even though the heater is now fully operational, it is not recommended to touch the repair area for 24 hours.

Article is based on website data MazBook
This article is available at: russian, bulgarian, belarusian, ukrainian, serbian, croatian, romanian, polish, slovak, hungarian
This text was checked by: Georgy Afanasyev
Share with friends on social networks:

Previous
Capella 3 and 4 » Equipment and devices
Next

Windscreen wipers and washers — removal and installation
Heater control cables
Heater control panel
Instrument panel switches
Instrument cluster — removal and installation
Sound alarm system
Constant speed control system (cruise control)
Removal and installation the turn signal flasher
Checking the fuel level and coolant temperature sensors
Fuel level indicator
More articles on repairing other Mazda models
Checking the rear window defroster Mazda Familia 6 (1989-1994)
Rear window defroster Mazda3 BK (2003-2009)
Rear window defroster Mazda6 GG (2002-2008)
Rear window wiper and washer (some versions) Mazda CX-5KE (2012-2017)
Scheme 10. Rear window defroster Mazda BT-50 (1) (2006-2011)
Link in different formats to this article
Comments and feedback from visitors
No comments yet


How much will 34 + 40 ?


Capella 6 (1997-2005, petrol) 
  • General information
  • Introduction to guide
  • User manual
  • Troubleshooting
  • Maintenance
  • Power unit
  • 4-cylinder engines
  • 6-cylinder engines
  • Engine overhaul
  • Cooling and ventilation
  • Power and exhaust systems
  • Engine electrics
  • Control system
  • Transmission
  • Mechanical gearbox
  • Automatic gearbox
  • Clutch and drive shafts
  • Chassis
  • Brake system
  • Car suspension
  • Steering
  • Body
  • Exterior (external elements)
  • Interior (internal elements)
  • Doors, windows and locks
  • Electrical equipment
  • Equipment and devices
  • Electrical circuits
Capella 5 (1991-1997) 
  • General information
  • User manual
  • Maintenance
  • Helpful hints
  • Power unit
  • Petrol engines 1.6 and 1.8
  • Petrol engines 2.0
  • 2.5 petrol engines
  • Overhaul engines 1.6 and 1.8
  • Overhaul engines 2.0 and 2.5
  • Diesel engine 2.0
  • Engine electrics
  • Cooling system
  • Air conditioner
  • Carburetor Nikki 30/34
  • Power system (1.6 and 1.8)
  • Power system (2.0 and 2.5)
  • Control system
  • Transmission
  • Mechanical gearbox
  • Automatic gearbox
  • Clutch and axles
  • Chassis
  • Brake system
  • Suspension and wheels
  • Steering
  • Body
  • Exterior (external elements)
  • Interior (internal elements)
  • Doors and windows
  • Electrical equipment
  • Equipment and devices
  • Electrical circuits
Capella 4 (1987-1992) 
  • General information
  • Introduction to manual
  • Vehicle specifications
  • Power unit
  • Engine repair
  • Lubrication system
  • Cooling system
  • Fuel system (carburetor)
  • Fuel injection (FE)
  • Fuel injection (DOHC)
  • Fuel system (diesel)
  • Ignition system
  • Transmission
  • Clutch
  • Gearbox
  • Drive shafts
  • Chassis
  • Front suspension
  • Rear suspension
  • Steering system
  • Brake system
  • Electrical equipment
  • Equipment and devices
  • Electrical circuits
Capella 3 and 4 (1982-1992) 
  • General information
  • User manual
  • Maintenance
  • Power unit
  • Gasoline engine
  • Engine overhaul (gasoline)
  • Diesel engine
  • Cooling and heating
  • Supply system
  • Ignition system
  • Emission reduction
  • Transmission
  • Clutch
  • Mechanical gearbox
  • Automatic gearbox
  • Drive shafts
  • Chassis
  • Brake system
  • Suspension and wheels
  • Steering
  • Body
  • Exterior (external elements)
  • Interior (internal elements)
  • Electrical equipment
  • Equipment and devices
  • Power devices
  • Electrical circuits
Capella 3 (1982-1992, petrol) 
  • General information
  • User manual
  • Maintenance
  • Troubleshooting
  • Late models
  • Power unit
  • Engine in car
  • Engine overhaul
  • Cooling and heating system
  • Fuel and exhaust system
  • Engine electrical system
  • Emission control system
  • Transmission
  • Mechanical gearbox
  • Automatic gearbox
  • Clutch and drive shafts
  • Chassis
  • Brake system
  • Suspension and wheels
  • Steering
  • Body
  • Exterior (external elements)
  • Interior (internal elements)
  • Electrical equipment
  • Equipment and devices
  • Lighting and lamps
  • Electrical circuits
MazBook.ru © 2018–2026 · Mobile version · Articles and news · Sitemap: EN BG BY UA RS HR RO PL SK HU · Feedback · Site search · Add to bookmarks Familia 5 (BF) · Familia 6 (BG) · Capella 3 (GC) · Capella 3 and 4 (GC) · Capella 4 (GD) · Capella 5 (GE) · Capella 6 (GF) · Mazda3 BK · Mazda6 GG · CX-5KE · Mazda 121 (3) · Mazda BT-50 (1) ·
By continuing to use the site, you agree to the use of cookies 🔐