
2. Position the vehicle with the charged battery as close to your vehicle as possible so that the batteries are practically next to each other, but do not allow the vehicles to touch.
3. Switch off all non-essential current consumers.
4. Loosen the caps of the jars of both batteries and place rags on the exposed batteries (except for batteries that do not require maintenance).
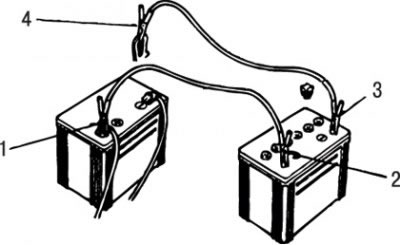
Pic. 1.38. The sequence of connecting wires when starting the engine with a battery - «donor»: a - a discharged battery; b - auxiliary battery; 1 - positive terminal of the auxiliary battery; 2 - positive terminal of the discharged battery; 3 – the negative plug of the auxiliary battery; 4 - «mass» stationary metal point
5. First connect one end of the cable to the positive terminal of the discharged battery, then the other end of the same cable to the positive terminal of the battery - «donor» (pic. 1.38). Next, connect one end of the second wire to the negative terminal of the auxiliary battery, and then the other end to «mass» stationary metal point (e.g. to the engine mount). Do not connect a wire from the negative terminal of the booster battery to the negative terminal of a discharged battery.
6. Start the support vehicle engine at high RPM to start generating voltage from the alternator.
7. If the engine does not start immediately, let the starter cool down. Then start the helper vehicle's engine, which will slightly charge the discharged battery.
8. When removing auxiliary wires, first disconnect the wire from the negative terminal of the charged auxiliary battery.