
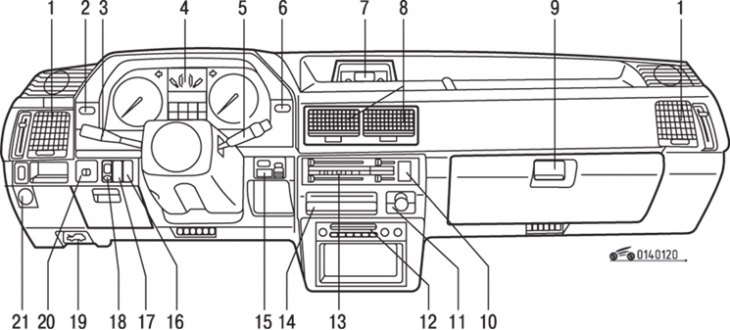
Pic. 1.20. Controls, instruments and equipment: 1 - side ventilation nozzles; 2 – the switch of heating of back glass; 3 - light switch; 4 – a combination of devices; 5 – switch of a cleaner and a washer of glass; 6 - emergency light switch; 7 - hours; 8 - central ventilation nozzles; 9 - glove box; 10 - air conditioner switch; 11 - cigarette lighter; 12 - radio; 13 - heater / air conditioner control unit; 14 - ashtray; 15 - air damper control knob (Gas engine); 16 - headlight washer switch; 17 – the switch of a cleaner and a washer of back glass; 18 - instrument backlight regulator; 19 - button for unlocking the hood lock; 20 – the switch of position of an external rear-view mirror with the electric drive; 21 - shock absorber regulator;
The location of instruments and controls is shown in fig. 1.20.

Pic. 1.21. Instrument clusters with analog instruments (type A): 1 - tachometer; 2 - control lamps for turning on the direction indicators / emergency light signaling; 3 - coolant temperature gauge; 4 - fuel gauge; 5 - speedometer; 6 - total mileage counter; 7* - daily mileage counter; 8* - button for resetting the daily mileage counter; 9 - control lamps
The appearance of combinations with analog devices is shown in fig. 1.21, the combination with electronic devices is shown in fig. 1.22.
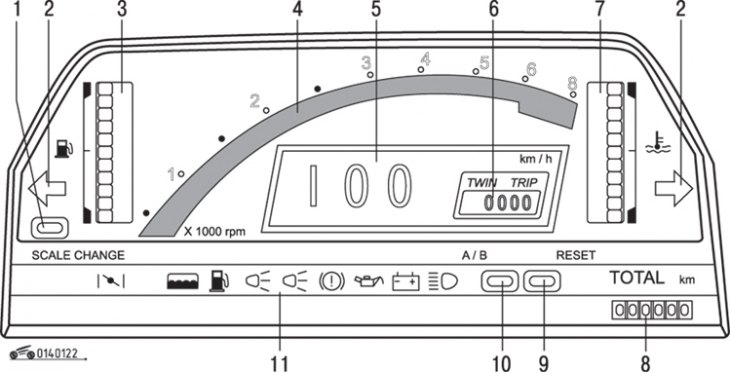
Pic. 1.22. Instrument cluster with electronic instruments (type B): 1 – button for switching display ranges; 2 - control lamps for turning on the direction indicators / emergency light signaling; 3 – fuel gauge; 4 - tachometer; 5 - speedometer; 6* - daily mileage counter; 7 - coolant temperature gauge; 8 - total mileage counter; 9* - button for resetting the daily mileage counter; 10 - daily run counter; 11 - control lamps
Note. The list of controls and instrumentation depends on the vehicle configuration or is installed on request.
Speedometer
Shows vehicle speed in km/h.
Total mileage counter
The meter shows the total mileage of the car.
Trip counter
Shows the mileage since the last reset.
Trip meter reset button
Pressing the button resets the counter.
Control lamps of inclusion of indexes of turn / the emergency light alarm system
If the direction indicator lights do not function properly, the direction indicator system is defective. The fault must be rectified as soon as possible.
Both turn signal indicator lamps come on at the same time if the hazard warning light system is activated.
Coolant temperature gauge
Shows the temperature of the coolant in the engine cooling system.
For type A:
if the pointer needle goes out of the normal range, then the engine is overheated.
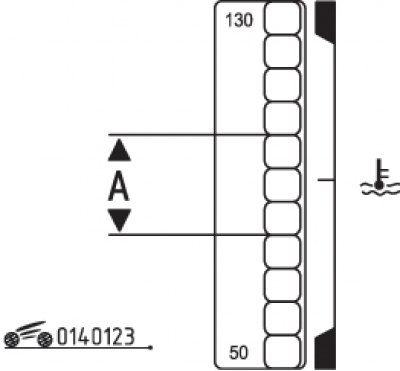
Pic. 1.23. normal temperature zone (A), indicated by the electronic coolant temperature gauge
For type B:
Attention!
when the engine is overheated, all indicator zones flash (pic. 1.23).
If the engine overheats, take the following measures.
1. Stop the car on the side of the road.
2. Turn off the air conditioner.
3. Stop the engine if coolant or steam comes out of the radiator. Turn the ignition key back to position «ON» («II»), without starting the engine. In this position of the ignition key, the fan operates in automatic mode. If it does not work, consult a Mazda dealer.
4. If no coolant comes out, leave the engine idling and open the hood for better cooling.
5. If the temperature does not drop when the engine is idling, stop the engine and wait until it cools down.
Attention! In the event of a malfunction of the coolant temperature gauge, a signal is given in the form of flashing zones «H» (130°С) And «WITH» (50°С). Take the necessary measures as soon as possible to eliminate the cause of the malfunction (only on cars with electronic devices).
6. Check the coolant hose at the connections for leaks. Stop the engine immediately if you detect a coolant leak.
7. Check the coolant level if there is no leakage. Top up with prescribed coolant if necessary.
Fuel gauge
The fuel gauge shows how much fuel is in the fuel tank. Tank capacity 60 l.
Attention! For type B: if the lowest zone of the indicator starts flashing, it means that the fuel level in the tank has dropped to about 5 liters.
If the ignition was not turned off when refueling, it will take a considerable time until the indicator is set to the correct fuel level. Therefore, when refueling, turn off the ignition. In the event of a malfunction in the operation of the fuel gauge, a signal is given in the form of flashing segments «F» («1») And («0»). Take the necessary measures to eliminate the cause of the malfunction as soon as possible.
Pilot lamps
Attention! The warning lamps can be checked by turning the ignition key to the «ON» («ll»), without starting the engine or applying the parking brake. If the warning lights do not come on, they should be checked by a Mazda dealer.
 High beam control lamp
Lights up when high beam is on.
 Battery charging warning lamp
Lights up when the ignition is turned on and goes out after starting the engine. Alternator drive by means of a durable V-belt. If the warning light comes on while driving, proceed as follows.
1. Stop the car.
2. With the engine running, check the V-belt tension and condition.
3. If the V-belt is OK, then there is a malfunction in the battery charging system. It is recommended to identify the problem as soon as possible and take the vehicle to dealers for repair.
 Warning lamp for insufficient brake fluid level and parking brake engagement
Parking brake applied warning
At the included parking brake and ignition the control lamp burns. It should go out when the parking brake is released.
Brake Fluid Level Warning
If this lamp comes on after the parking brake is released with the ignition on, the brake fluid level in the reservoir is too low. If the control lamp lights up while driving, proceed as follows.
1. Check if the parking brake lever is fully released.
2. If this is the case and the warning light remains on, carefully stop the vehicle on the side of the road.
3. With the engine running, immediately check the brake fluid level and add fluid if necessary. Check all elements of the hydraulic drive of the brake system for leaks.
4. If leaks are detected or the brakes are faulty, the control lamp will continue to burn - the car cannot be continued driving. The vehicle must be towed to a Mazda dealer to have the brake system checked and any necessary repairs made.
Attention! If the brake fluid level in the reservoir is too low, you should immediately find the nearest service center to check the working brake system. While driving, it is necessary to press the brake pedal harder when braking and take into account the possibility of increasing the braking distance and free play of the pedal.
 Warning lamp for turning on the emergency light
Illuminates when the hazard warning light system is activated.
At the same time, all direction indicators flash simultaneously.
 Low oil pressure warning lamp
It burns when the oil pressure is below the maximum allowable.
If this warning light comes on while driving, stop driving, stop the engine, check the engine oil level and top up if necessary.
If the control lamp is on, despite the fact that the engine oil level is normal, you cannot continue driving. The engine is not allowed to run even at idle - qualified assistance is needed.
Attention! If the above instructions are not followed and the vehicle is continued to be driven, the engine may be seriously damaged.
 Warning lamp and low fuel level warning sound
The low fuel level warning light and warning horn come on when approximately 10 liters of fuel remain in the fuel tank.
 Warning lamp for brake lamp burnout
If the brake light bulb burns out or a malfunction occurs in the brake light circuit, the warning light will come on. Repair the problem immediately.
 Fluid level indicator in the washer reservoir
The control lamp lights up as soon as the liquid level in the windshield washer reservoir drops to the lowest level. Check fluid level and add fluid if necessary.
 Upshift warning lamp
If this warning lamp lights up, it means that the fuel consumption in the engaged gear is excessively large. In this case, to reduce fuel consumption, shift the transmission to the next higher gear.
 Accelerator pedal overpressure warning lamp
This warning lamp comes on when the accelerator pedal is pressed too hard. In this case, to reduce fuel consumption, release the accelerator pedal until the lamp goes out.
 Indicator lamp for turning on the rear fog lights
This warning lamp comes on when the rear fog lamps are on.
 Air damper control lamp
The control lamp lights up when the air damper control knob is pulled out.
 Warning lamp for tail lamp burnout
If this warning lamp comes on, the tail light is not working or the electrical circuit is damaged. The problem must be corrected immediately.
Cold start warning lamp (diesel engine)
The control lamp lights up at the extended handle of start-up of the cold diesel engine.
 Warning lamp/coolant level warning (for diesel engine)
With the ignition on, this warning lamp is on to check the operation of the glow lamp and should go out after the engine is started. If the warning light comes on or the warning horn sounds while driving, the following steps must be taken.
1. Stop the car on the side of the road.
2. Turn off the engine and let it cool down. If there is no coolant leak, check the coolant level in the expansion tank and radiator. Top up coolant if necessary.
3. If the warning light does not go out, have the vehicle towed to the nearest Mazda dealer.
Attention! Since the engine is made of aluminum alloy, be sure to use ethylene glycol based antifreeze.
 Warning lamp/Water separator operation (for diesel engine)
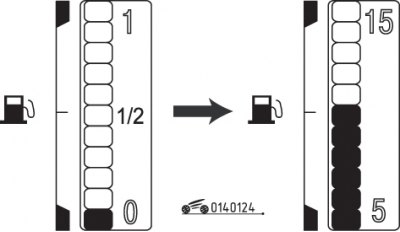
Pic. 1.24. Switching the fuel level indicator to the lower range of 5-15 liters at the touch of a button «SCALE CHANGE»
Switching the indication range of the fuel gauge
(only in electronic instrument cluster). If you press the button «SCALE CHANGE», the lower range of the fuel level indicator 5-15 liters will be shown in an expanded view (pic. 1.24). After approximately 5 s, it switches back to normal counting.
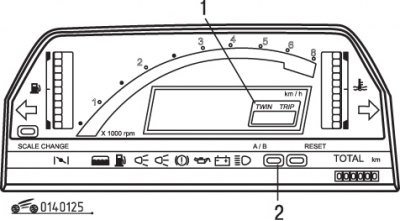
Pic. 1.25. Location of the trip meter (1) and buttons (2) switching in the electronic instrument cluster
Trip counter
(only in electronic instrument cluster). The meter can be used to measure two different sections of the track. If you press the button, it will switch between indications «A» And «IN» (pic. 1.25). Indication «A» (or «IN») can be set back to zero by holding down the reset button for approx. 1 s. You can, for example, use one meter to measure fuel consumption and another meter to measure distance travelled. The readings of the daily mileage in km correspond to the readings of the speedometer.
Tachometer
Specifies the engine speed in thousands of revolutions per minute.
Attention! Do not leave the engine running in the red sector of the tachometer - this can cause engine damage with serious consequences.
Hood release button
The hood opens after pulling the hood lock release button towards itself - the hood is released from the locking device and rises under the action of the spring.
Unlock the hood stopper and lift it up.
Use the support rod to secure the hood in the open position.
Before closing the hood, put the support rod back into the holder.
Lower the hood and let it engage in the latch.
Dashboard backlight adjustment
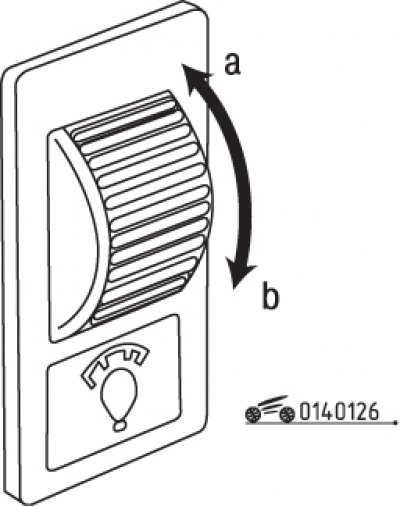
Pic. 1.26. Direction of rotation of the knob to increase (A) or decrease (b) instrument panel backlight brightness
Rotate the knob to set the brightness of the instrument panel illumination (pic. 1.26).
Heated rear window switch
Heated rear window with ignition on (key position in the ignition switch «ON» /» II») can be turned on by pressing the switch.
At the included heating of back glass the control lamp burns.
Attention! Do not use sharp objects or abrasive cleaners to clean the rear window from the inside, as this may damage the heating wires.
Rear window wiper and washer switch
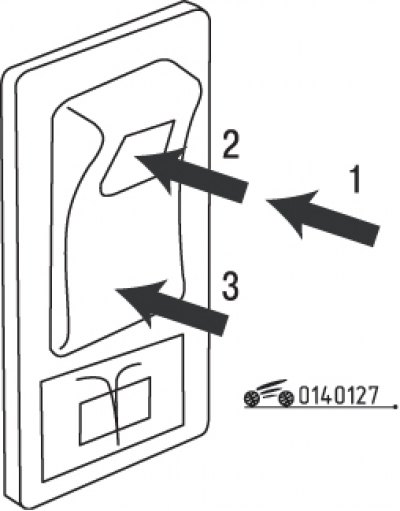
Pic. 1.27. Rear window wiper and washer switch: 1 - turn on only the wiper; 2 - turn on the wiper and washer; 3 - turn on only the windshield washer
The rear window wiper and washer are switched on by the switch shown in fig. 1.27.
Attention! If the washer does not work, check the fluid level in the washer reservoir.
Watch
To set the time, turn the key in the ignition switch to position «ON» («II»).
If you press the button «RESET» (return), the minutes display is set to zero.
When the button is released, the full hour will be set.
If, for example, the button is pressed between 0:01 and 9:29, the display will change to 9:00. Between 9:30 and 9:59 it will change to 10:00. In a similar way, the time can be set, for example, by means of an accurate time signal transmitted by radio.
If the button is pressed «HOUR», the clock will change.
If the button is pressed «MIN», the minutes will change.
Headlight washer switch
Washing liquid is sprayed onto the headlight lenses if the switch is turned on while the ignition is on.
Damper adjuster
Adjustable shock absorbers can be installed in three different positions: «SPORT», «NORMAL» And «AUTO».
Attention! The headlight washer must not be switched on for more than 10 s.
To improve the dynamic properties, all shock absorbers are set to «SPORT». In this case, with the switch position «SPORT» front and rear shock absorbers tuned «hard».
To ensure soft smooth dynamic properties (mode «NORMAL») all dampers installed «soft».
Automatic adjustment (mode «AUTO») has the following functions.
Stability at high speeds
To improve the dynamic properties, the front shock absorbers are set to «hard», if a speed of about 80 km/h is reached. If the driving speed drops to approx. 60 km/h, this setting is canceled again.
| Switch position | shock absorber | |
| front | rear | |
| Included | Hard | Fine |
| Included | Fine | Fine |
Oscillation about the transverse axis during braking
To prevent vibrations about the transverse axis during braking, all shock absorbers are set to «hard».
Holding the vehicle in a rollover
By turning the steering wheel and the speed of the vehicle, the lateral force is determined. When a certain value is exceeded, the shock absorbers are set to the mode «hard», which prevents the body from tipping over.
Cigarette lighter
The cigarette lighter turns on when you press it until it locks. After heating, it returns to its original position with a click and can be used. To be able to use the cigarette lighter when the engine is off, turn the key in the ignition switch to position «ACC» («I»).
Ashtray
To remove the ashtray from the socket, pull it forward as far as it will go and press down on the retaining spring.
If you are not using the ashtray, close it.
Attention! Do not use the ashtray to collect debris.
Lockable storage box under steering column
The drawer can be opened by pulling down on the handle located in the recess.
Glove box
To open the glove box, pull down on its lid.
If the lid has a lock, insert the key and turn it to the left until the lid opens.