


A bad injector can be determined by loosening the union nuts in succession and at fast idle (when engine warms up). If, after loosening the union nut, the engine speed does not change, this indicates a malfunction of the injector. The injector can be tested on a stand that creates a pressure of 135 bar.
The first signs of a malfunction of the nozzle appear as follows:
- false ignitions in engine cylinders;
- detonation in one or more engine cylinders;
- engine overheating;
- reduction in engine power;
- excessively strong black exhaust;
- increase in fuel consumption.
Removing
Disconnect the wire from the negative battery terminal.
With a cleaner or diesel fuel, carefully clean the outside of the fuel supply and return pipes.
Attention! When the wire is disconnected from the negative terminal of the battery, the memory of electronic storage devices, such as the radio code, is erased.
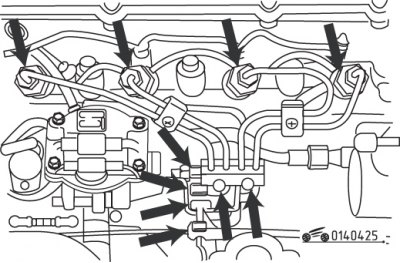
Pic. 4.25. Location of union nuts for fastening pipes to the high pressure fuel pump and fuel injectors
Loosen the union nuts on the high pressure fuel pump and injectors and remove the tubes as a set (pic. 4.25)
Attention! Do not disturb the shape of the tubing bend.
Unscrew the fuel injectors and arrange them in the same order as they were installed on the engine.
Attention! Dirt must not enter the combustion chambers through the holes for the injectors.
Each fuel injector hole contains a wavy gasket and washer that must be replaced.
Nozzle needles should not have knocked out and rough landing sites. Use a wooden spatula to remove carbon deposits from the nozzles.
Attention! Never clean the nozzle and nozzle needle with wire, file or sandpaper. Do not mix up the parts of different nozzles.
Installation
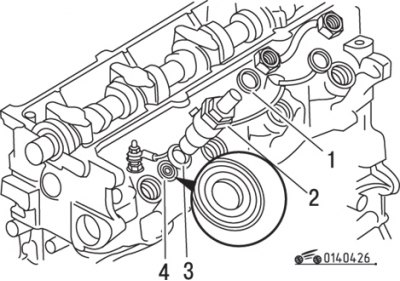
Pic. 4.26. Fuel injector installation: 1 - washer; 2 - fuel injector; 3 - washer; 4 - wavy gasket
Attention! Install four new wave gaskets and four washers to the injectors (pic. 4.26).
Attention! Observe the installation position of the corrugated gasket.
Screw in the fuel injectors and tighten them to 65 Nm.
Attention! Overtightening the fuel injectors to more than the specified torque may result in deformation, needle sticking, or other damage.
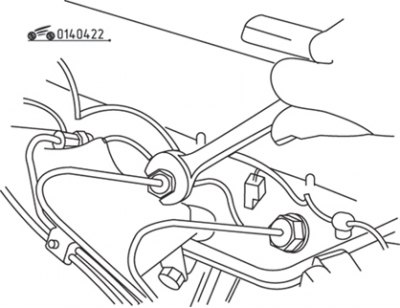
Pic. 4.22. Loosening the union nut securing the pipeline to the fuel injector to remove the air plug
Connect the fuel return pipes with new gaskets and secure with nuts, tightening them to a torque of 25 Nm (see fig. 4.22).
On all injectors, slightly loosen the union nuts securing the high pressure pipes.
Turn the crankshaft of the engine with a starter until the fuel exits the tubes without air bubbles. Tighten cap nuts to the required torque.
Install the air supply pipe and resonator channel.
Connect the wire to the negative battery terminal.
If you have a clock, set the time and enter the radio's security code.