


Contents: 1.6.1. Checking the engine oil level ⇓ 1.6.2. Checking the brake fluid level ⇓ 1.6.3. Checking the brake light ⇓ 1.6.4. Lighting control ⇓ 1.6.5. Tire pressure control ⇓ 1.6.6. Coolant control ⇓ 1.6.7. Checking the oil level in the…⇓ 1.6.8. Checking the gearbox oil level ⇓ 1.6.9. Servo control fluid level…⇓ 1.6.10. Checking the clutch fluid…⇓
Most maintenance work can be done independently. But sometimes it makes more sense to have the service done in a workshop, because the necessary equipment or experience is lacking, measuring instruments are required, or simply because the workshop will do the job faster.
First of all, regular inspection and control are important, which are listed below. Maintenance work that is carried out depending on a certain engine power or after a certain period of time is described in the relevant chapters.
1.6.1. Checking the engine oil level
The engine oil level should be checked after approximately 600 km. To do this, remove the oil level indicator and wipe it with a clean rag. Insert the level indicator again and remove it again.
The oil level should be between the "X" and "F" marks on the oil level gauge with the machine level. If the oil level is at the "L" mark, oil needs to be added. The amount of oil between the two marks is about 1.0 l, so you can conclude from this how much oil is missing. Under no circumstances should more oil be added to the engine than required, i.e. the oil level should not exceed the upper mark.
1.6.2. Checking the brake fluid level
The brake fluid container is located in the engine compartment as shown in the figure 8 place, on the top side of the master cylinder. The vessel is clearly visible and the liquid level can be determined. The level should be between the "Min" and "Max" marks. If necessary, add fresh brake fluid.
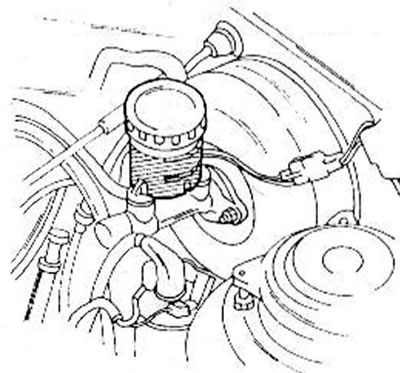
Figure 8. View of the mounted receiver for the master brake cylinder
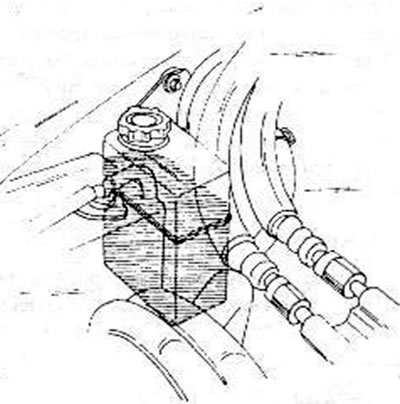
Figure 9. Receiver for servo control
1.6.3. Checking the brake light
The operation of the brake light can be checked with an assistant or alone. In the first case, you need to press the brake while the assistant checks the glow of the lamp. If you are alone, back up in front of the garage door. The lamp in front of the door will glow red. If the lamp does not light, replace it; if both lights are not on, it may mean that there is a fault in the brake light switch.
[Article is available on the website: mazbook.ru]
1.6.4. Lighting control
All lamps (including a sound signal and an emergency light system) turn them on one by one and monitor their operation. Reversing lights and tail lights are best controlled from in front of the garage door, but when exiting the vehicle.
1.6.5. Tire pressure control
Check your tire pressure at a gas station. If you don't know the required pressure, you can easily determine what pressure is needed for your car using the tables available at gas stations. Under normal load, the pressure is 2.2 atm (bar) in the front and 1.8 atm (bar) in the rear. If the vehicle is fully loaded, the pressure will be correspondingly higher.
1.6.6. Coolant control
Cold coolant must be stored until the expiration date indicated on the expansion tank label. If necessary, wait until the substance cools and add antifreeze. If the engine is hot, the radiator cap should be loosened to the first locking groove and wait until the pressure drops. After this, unscrew the lid completely.
1.6.7. Checking the oil level in the automatic transmission
Since an automatic transmission cannot shift properly without fluid, its level must be checked frequently. Control should be carried out in the following order:
- Pull the handbrake and move the control lever to the "P" position. Make sure the car is parked on a flat surface.
- Start the engine and idle for 1-2 minutes.
- With the engine running, move the control lever from position "P" to position "V" or to position "1". Leave the engine running again at idle speed and move the control lever to position "P".
- Unscrew the liquid level indicator and pull it out.
- When the transmission is warm and running, the fluid level should be between the "L" and "F" marks. When the transmission is cold, the fluid should be only approximately 10 mm below the "L" mark.
- If necessary, add fluid through the hole in the level indicator. For this you need a watering can. Under no circumstances should the gearbox be overfilled with oil. ATF fluid is recommended for gearboxes (Dextron II or III).
1.6.8. Checking the gearbox oil level
The gearbox oil level should only be checked after 40,000 km, but this should be done slightly differently than in known types of gearboxes:
- Place the car on a flat surface.
- Remove the tachometer spiral dust cover and unscrew the spiral from the gear.
- Unscrew the bolts securing the gear and remove the entire gear from the gearbox. If necessary, insert a screwdriver between the gearbox housing and the gear plane.
- Check if the oil level is between the two marks "L" and "F" on the tachometer gear (see figure 10).
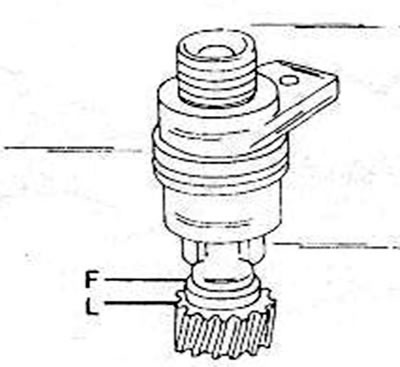
Figure 10. Removed tachometer gear with both transmission fluid level markings
- If necessary, add the required amount of oil through the hole in the tachometer gear (using a watering can). Make sure that automatic transmission fluid is also used for the step-type transmission (Dextron II or III).
- Reinstall the tachometer gear, close the tachometer spiral and insert the rubber cover.
1.6.9. Servo control fluid level control
For control, use only the fluid that is used for automatic transmission (Dextron II or M III). Use the corresponding oil from other manufacturers only for topping up.
According to the drawing 8 Check whether the liquid level is between the "Min" and "Max" marks on the tank.
1.6.10. Checking the clutch fluid level
The clutch fluid level can be checked from the outside in the same way as for the master cylinder reservoir.
The liquid should be between the "Min" and "Max" marks.
If necessary, add the missing amount of brake fluid.