MazBook.ru
English Русский
Български
Беларускі
Український
Српски
Hrvatski
Română
Polski
Slovenský
Magyar
• Bookmark • Sitemap • Contacts •   
Cars Opel Cars Ford Cars Volkswagen Cars Audi Cars Kia Cars Renault Cars Peugeot


Familia Capella Mazda3 Mazda6 CX-? Others Articles
Capella 3 (1982-1992, petrol) Capella 3 and 4 (1982-1992) Capella 4 (1987-1992) Capella 5 (1991-1997) Capella 6 (1997-2005, petrol)

Front timing belt, valve timing adjustment (RF engine) (Mazda Capella GE)

  • Home
  • Mazda Capella
  • Capella GE (1991-1997)
  • Power unit
  • Diesel engine 2.0
  • Front timing belt, valve timing adjustment (RF engine)
0
Contents: Removal ⇓ Installation ⇓ Tension ⇓

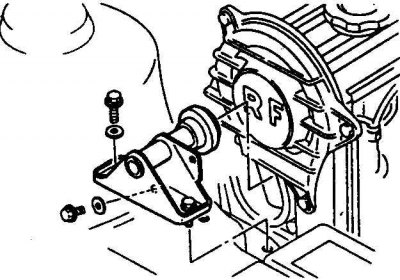
Removal the engine damper


Removal the engine damper


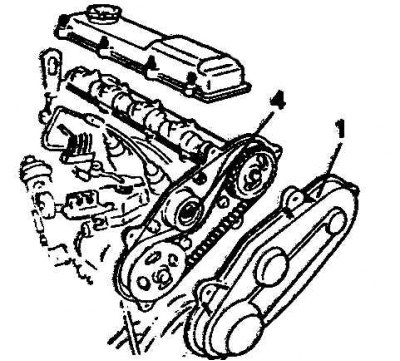
Removal the rear timing belt cover fastening


Removal the rear timing belt cover fastening


Unscrew the fastener (1). Loosen the tension belt nut (4).

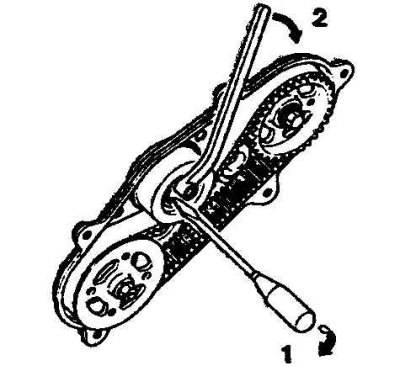
Loosening the timing belt tension


Loosening the timing belt tension


Turn the tension roller as far as possible with a screwdriver (1) to the right and tighten the tension roller nut (2).


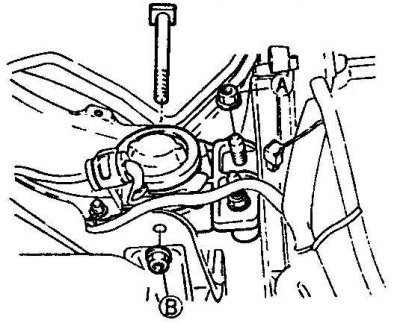
Installing the suspension


Installing the suspension


Install the engine mount, tightening (A) to 115 N·m and nut (B) to 90 N·m.

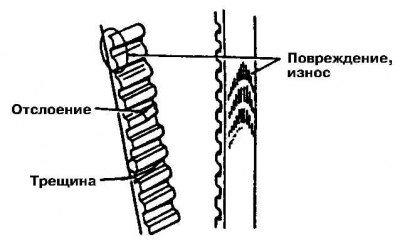
Timing belt wear


Timing belt wear


Setting the valve timing should usually be done after repair work that involved removing the timing belt or disassembling the engine. When checking the valve timing, all steps must be completed except replacing the timing belt.

Removal


1. Disconnect the negative ground cable from the battery.

Caution! This will erase the contents of electronic memory devices, such as the engine fault memory or the radio code. Before disconnecting the battery, please read subsection 2.11.


2. Raise the vehicle and remove the right front wheel.

3. Remove the lower engine cover in the right wheel arch.

4. Remove the V-belt.


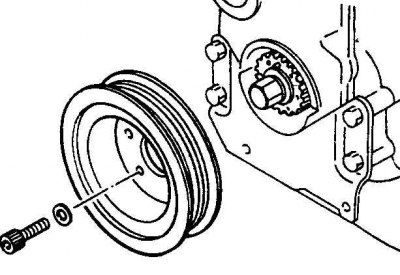
5. Block the engine. To lock the engine, engage 5th gear and have an assistant press the brake pedal. Loosen the crankshaft belt pulley mounting bolts.

5. Block the engine. To lock the engine, engage 5th gear and have an assistant press the brake…


6. Remove the crankshaft pulley.

7. Remove the glow plugs.

8. To turn the engine crankshaft, apply the handbrake and set the gearbox to neutral. Using a ratchet and socket, turn the crankshaft from the right wheel arch side.

Caution! Never turn the crankshaft using the camshaft sprocket via the timing belt drive.


Caution! Never turn the crankshaft using the camshaft sprocket via the timing belt drive.


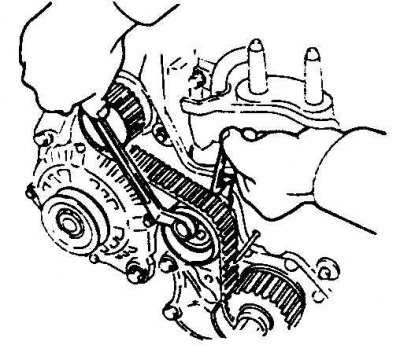
9. Loosen the tension roller bolt and use a screwdriver to push the tension roller away from the timing belt until the timing belt tension is released. Retighten the tensioner roller bolt.

10. Remove the right and left timing belt covers.

(The article is based on website data: MAZbook.ru)


11. Remove the timing belt. After this, do not turn the gears.

Caution! Before removing, double-check that the mark on the camshaft gear matches the edge of the cylinder head; adjust if necessary.


Caution! If the camshaft needs to be rotated with the timing belt removed, make sure none of the pistons are at TDC. Otherwise, serious damage to the pistons and valves may occur.


12. If it is necessary to turn the camshaft, set all pistons to half their stroke in advance. To do this, use chalk to mark the top of the crankshaft wheel.

12. If it is necessary to turn the camshaft, set all pistons to half their stroke in advance. To do…


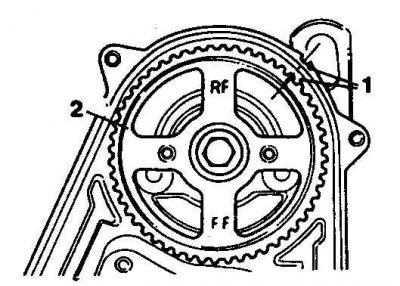
13. Before applying the mark, set cylinder 1 to the TDC position. To do this, rotate the crankshaft until the mark (1) on the camshaft gear (2) aligns with the mark on the front plate. Then turn the crankshaft wheel 1/4 turn (90°) left or right. The mark should now be facing left or right.

Installation


Caution! Do not bend or twist the timing belt. Be sure to replace belts that are dirty, damaged or worn. Check that the tension roller moves smoothly and easily.


1. Check the belt wear.

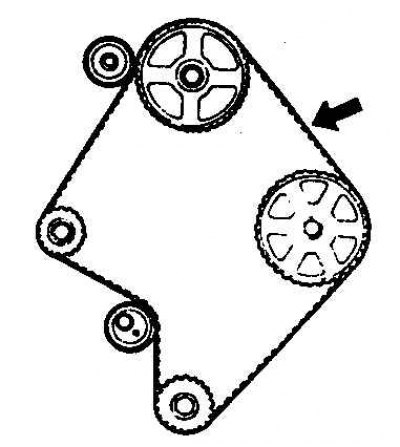
2. Apply the timing belt. When applying the old belt, apply it in accordance with the arrow marked in the direction of rotation.


Caution: Make sure the belt grips the rollers securely and does not sag.


Tension


1. Loosen the tension roller bolt enough to allow the roller to move toward the timing belt under spring force.

2. Turn the crankshaft two turns clockwise until the marks on the camshaft and front plate align. Double check that all the marks match.

3. Tighten the tension roller bolt to 45 Nm.

4. Turn the crankshaft two revolutions in the direction of engine rotation and check the adjustment again.

4. Turn the crankshaft two revolutions in the direction of engine rotation and check the adjustment…


5. The section of the belt between the water pump and camshaft rollers should deflect by 10.5–12.0 mm under a force of 10 kg (strong finger pressure), if this is not the case, loosen the tension roller bolt and tighten the belt again.

6. Install and tighten the right and left timing belt covers to 10 Nm.

7. Install and secure the engine shock absorber.

8. Install the crankshaft pulley with the washer and tighten the mounting bolts to 30 Nm.

9. Install glow plugs.

10. Install and tension the V-belt.

11. Install the cover in the right wheel arch.

12. Connect the negative ground cable to the battery.

13. If you have a clock, set the time and enter the security code into the radio.
This article is available at: russian, bulgarian, belarusian, ukrainian, serbian, croatian, romanian, polish, slovak, hungarian
This text was checked by: Evgeny Mereshnikov
Share with friends on social networks:

Previous
Capella 5 » Diesel engine 2.0
Next

How a diesel engine works
Diesel maintenance and repair
Technical specifications
Rear Timing Belt — removal and installation (rf engine)
Timing belt, valve timing adjustment (RF-N engine)
Preheating system
Checking the preheating device
Removal air from the fuel system
More articles on repairing other Mazda models
Technical characteristics of the valve timing mechanism Mazda Familia 5 (1985-1989)
Variable valve timing mechanism Mazda3 BK (2003-2009)
Variable valve timing mechanism Mazda6 GG (2002-2008)
Hydraulic valve timing controller Mazda CX-5KE (2012-2017)
Replacing the timing belt Mazda 121 (3) (1996-2003)
Link in different formats to this article
Comments and feedback from visitors
No comments yet


How much will 11 + 25 ?


Capella 6 (1997-2005, petrol) 
  • General information
  • Introduction to guide
  • User manual
  • Troubleshooting
  • Maintenance
  • Power unit
  • 4-cylinder engines
  • 6-cylinder engines
  • Engine overhaul
  • Cooling and ventilation
  • Power and exhaust systems
  • Engine electrics
  • Control system
  • Transmission
  • Mechanical gearbox
  • Automatic gearbox
  • Clutch and drive shafts
  • Chassis
  • Brake system
  • Car suspension
  • Steering
  • Body
  • Exterior (external elements)
  • Interior (internal elements)
  • Doors, windows and locks
  • Electrical equipment
  • Equipment and devices
  • Electrical circuits
Capella 5 (1991-1997) 
  • General information
  • User manual
  • Maintenance
  • Helpful hints
  • Power unit
  • Petrol engines 1.6 and 1.8
  • Petrol engines 2.0
  • 2.5 petrol engines
  • Overhaul engines 1.6 and 1.8
  • Overhaul engines 2.0 and 2.5
  • Diesel engine 2.0
  • Engine electrics
  • Cooling system
  • Air conditioner
  • Carburetor Nikki 30/34
  • Power system (1.6 and 1.8)
  • Power system (2.0 and 2.5)
  • Control system
  • Transmission
  • Mechanical gearbox
  • Automatic gearbox
  • Clutch and axles
  • Chassis
  • Brake system
  • Suspension and wheels
  • Steering
  • Body
  • Exterior (external elements)
  • Interior (internal elements)
  • Doors and windows
  • Electrical equipment
  • Equipment and devices
  • Electrical circuits
Capella 4 (1987-1992) 
  • General information
  • Introduction to manual
  • Vehicle specifications
  • Power unit
  • Engine repair
  • Lubrication system
  • Cooling system
  • Fuel system (carburetor)
  • Fuel injection (FE)
  • Fuel injection (DOHC)
  • Fuel system (diesel)
  • Ignition system
  • Transmission
  • Clutch
  • Gearbox
  • Drive shafts
  • Chassis
  • Front suspension
  • Rear suspension
  • Steering system
  • Brake system
  • Electrical equipment
  • Equipment and devices
  • Electrical circuits
Capella 3 and 4 (1982-1992) 
  • General information
  • User manual
  • Maintenance
  • Power unit
  • Gasoline engine
  • Engine overhaul (gasoline)
  • Diesel engine
  • Cooling and heating
  • Supply system
  • Ignition system
  • Emission reduction
  • Transmission
  • Clutch
  • Mechanical gearbox
  • Automatic gearbox
  • Drive shafts
  • Chassis
  • Brake system
  • Suspension and wheels
  • Steering
  • Body
  • Exterior (external elements)
  • Interior (internal elements)
  • Electrical equipment
  • Equipment and devices
  • Power devices
  • Electrical circuits
Capella 3 (1982-1992, petrol) 
  • General information
  • User manual
  • Maintenance
  • Troubleshooting
  • Late models
  • Power unit
  • Engine in car
  • Engine overhaul
  • Cooling and heating system
  • Fuel and exhaust system
  • Engine electrical system
  • Emission control system
  • Transmission
  • Mechanical gearbox
  • Automatic gearbox
  • Clutch and drive shafts
  • Chassis
  • Brake system
  • Suspension and wheels
  • Steering
  • Body
  • Exterior (external elements)
  • Interior (internal elements)
  • Electrical equipment
  • Equipment and devices
  • Lighting and lamps
  • Electrical circuits
MazBook.ru © 2018–2026 · Mobile version · Articles and news · Sitemap: EN BG BY UA RS HR RO PL SK HU · Feedback · Site search · Add to bookmarks Familia 5 (BF) · Familia 6 (BG) · Capella 3 (GC) · Capella 3 and 4 (GC) · Capella 4 (GD) · Capella 5 (GE) · Capella 6 (GF) · Mazda3 BK · Mazda6 GG · CX-5KE · Mazda 121 (3) · Mazda BT-50 (1) ·
By continuing to use the site, you agree to the use of cookies 🔐