
MazBook.ru
English Русский
Български
Беларускі
Український
Српски
Hrvatski
Română
Polski
Slovenský
Magyar
• Bookmark • Sitemap • Contacts •   
Cars Opel Cars Ford Cars Volkswagen Cars Audi Cars Kia Cars Renault Cars Peugeot


Familia Capella Mazda3 Mazda6 CX-? Others Articles
Capella 3 (1982-1992, petrol) Capella 3 and 4 (1982-1992) Capella 4 (1987-1992) Capella 5 (1991-1997) Capella 6 (1997-2005, petrol)

Crankshaft — installation and control of main bearing clearance (Mazda Capella GC)

  • Home
  • Mazda Capella
  • Capella GC (1982-1992)
  • Power unit
  • Engine overhaul
  • Crankshaft — installation and control of main bearing clearance
0
1. Installing the crankshaft is the first step in engine assembly.

2. Install the engine with the head facing up.

3. Remove the main bearing cap bolts and lift the caps. Place them in the correct order and check that they are installed correctly.

4. If they are installed in place, remove the old bearing shells from the block and main bearing cap. Wipe the main bearing surfaces of the block and caps with a clean cotton cloth. They must be kept spotlessly clean.

5. Clean the backs of the new main bearing shells and place the halves on the main bearing seats on the block. Make sure the key on the bearing shell fits into the recess in the block or cover. Also make sure that the oil holes in the block are aligned with the oil holes in the bearing shell. No lubricant is used during this time.
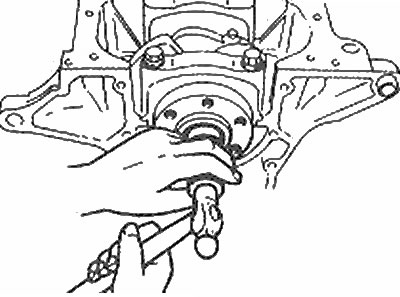
Install the gearbox input shaft bearing into the crankshaft (models with manual transmission)

Install the gearbox input shaft bearing into the crankshaft (models with manual transmission)


6. The thrust bearing must be installed on seat No. 3.

7. Clean the bearing surfaces in the block and the crankshaft main bearing journals with a clean cotton cloth. Check and clean the oil holes in the crankshaft.

8. If you are sure that the crankshaft is clean, carefully place it in the main bearings.


9. Before the crankshaft is finally installed, check the main bearing clearance.

10. Install Plastigage (tool for measuring clearances in plain bearings) on each main journal, parallel to its axis.

11. Clean the bearing shell surfaces in the caps and install the caps on the corresponding connecting rods (don't confuse them), so that the arrows on them point towards the front of the engine. Do not move the Plastigage.

12. Starting at the center main bearing and working toward the ends of the crankshaft, tighten the main bearing cap bolts in three stages to the specified torque. Do not turn the crankshaft during this action.

13. Unscrew the bolts and carefully remove the main bearing caps. Do not mix Plastigage or rotate the crankshaft. If any of the caps are difficult to remove, gently tap them with a mallet.

14. Compare the width of the Plastigage with the scale shown on the tool packaging to calculate the main bearing running clearance. Compare the obtained value with the data given in Specifications.

15. If the clearance is not correct, double-check that the bearings are fitted with the correct size liners. Also make sure that no dirt or oil gets in when measuring the clearance between the bearing shells and the main bearing surface.

16. Carefully clean all traces of Plastigage from the journals and/or bearing shell surfaces. Do not damage the surfaces.

17. Carefully lift the crankshaft from the engine. Clean the bearing surfaces in the block, then apply a thin, uniform coat of clean, high-quality molybdenum grease or special engine assembly oil to each of the bearing running surfaces.


18. Make sure the crankshaft journals are clean, then install the crankshaft. Clean the bearing thrust surfaces in the caps, then apply a thin, uniform coat of clean molybdenum grease to them. Install the covers in the appropriate positions so that the arrows on them point towards the front of the engine. Install the bolts and tighten them to the specified tightening torque Specifications, starting from the central main bearing and moving towards the ends of the crankshaft.

19. On manual transmission models, install a new transmission input shaft bearing into the end of the crankshaft. Lubricate the crankshaft recess and the outer periphery of the bearing with clean engine oil and install the bearing. Gently tap it into place with a mallet using a piece of pipe of the appropriate size. Lubricate the inner surface of the bearing.

20. Turn the crankshaft by hand several times to make sure it rotates freely.

21. Finally, check the crankshaft axial clearance with a micrometer as described in Chapter 12.
This article is available at: russian, bulgarian, belarusian, ukrainian, serbian, croatian, romanian, polish, slovak, hungarian
This text was checked by: Evdokia Filimonova
Share with friends on social networks:

Previous
Capella 3 » Engine overhaul
Next

Piston rings — installation
Main and connecting rod bearings — inspection
Crankshaft — inspection
Piston/connecting rod assembly — inspection
Camshaft — inspection
Piston/connecting rod assembly — installation and checking of bearing…
Rear cover and oil seal — installation
Engine overhaul — assembly sequence
Starting and running-in after overhaul
More articles on repairing other Mazda models
Main technical characteristics of the engine Mazda Familia 5 (1985-1989)
Crankshaft and main bearing — description Mazda3 BK (2003-2009)
Crankshaft and main bearing Mazda6 GG (2002-2008)
Lighting control Mazda CX-5KE (2012-2017)
Removal and installation the main window control switch Mazda BT-50 (1) (2006-2011)
Link in different formats to this article
Comments and feedback from visitors
No comments yet


How much will 15 + 22 ?


Capella 6 (1997-2005, petrol) 
  • General information
  • Introduction to guide
  • User manual
  • Troubleshooting
  • Maintenance
  • Power unit
  • 4-cylinder engines
  • 6-cylinder engines
  • Engine overhaul
  • Cooling and ventilation
  • Power and exhaust systems
  • Engine electrics
  • Control system
  • Transmission
  • Mechanical gearbox
  • Automatic gearbox
  • Clutch and drive shafts
  • Chassis
  • Brake system
  • Car suspension
  • Steering
  • Body
  • Exterior (external elements)
  • Interior (internal elements)
  • Doors, windows and locks
  • Electrical equipment
  • Equipment and devices
  • Electrical circuits
Capella 5 (1991-1997) 
  • General information
  • User manual
  • Maintenance
  • Helpful hints
  • Power unit
  • Petrol engines 1.6 and 1.8
  • Petrol engines 2.0
  • 2.5 petrol engines
  • Overhaul engines 1.6 and 1.8
  • Overhaul engines 2.0 and 2.5
  • Diesel engine 2.0
  • Engine electrics
  • Cooling system
  • Air conditioner
  • Carburetor Nikki 30/34
  • Power system (1.6 and 1.8)
  • Power system (2.0 and 2.5)
  • Control system
  • Transmission
  • Mechanical gearbox
  • Automatic gearbox
  • Clutch and axles
  • Chassis
  • Brake system
  • Suspension and wheels
  • Steering
  • Body
  • Exterior (external elements)
  • Interior (internal elements)
  • Doors and windows
  • Electrical equipment
  • Equipment and devices
  • Electrical circuits
Capella 4 (1987-1992) 
  • General information
  • Introduction to manual
  • Vehicle specifications
  • Power unit
  • Engine repair
  • Lubrication system
  • Cooling system
  • Fuel system (carburetor)
  • Fuel injection (FE)
  • Fuel injection (DOHC)
  • Fuel system (diesel)
  • Ignition system
  • Transmission
  • Clutch
  • Gearbox
  • Drive shafts
  • Chassis
  • Front suspension
  • Rear suspension
  • Steering system
  • Brake system
  • Electrical equipment
  • Equipment and devices
  • Electrical circuits
Capella 3 and 4 (1982-1992) 
  • General information
  • User manual
  • Maintenance
  • Power unit
  • Gasoline engine
  • Engine overhaul (gasoline)
  • Diesel engine
  • Cooling and heating
  • Supply system
  • Ignition system
  • Emission reduction
  • Transmission
  • Clutch
  • Mechanical gearbox
  • Automatic gearbox
  • Drive shafts
  • Chassis
  • Brake system
  • Suspension and wheels
  • Steering
  • Body
  • Exterior (external elements)
  • Interior (internal elements)
  • Electrical equipment
  • Equipment and devices
  • Power devices
  • Electrical circuits
Capella 3 (1982-1992, petrol) 
  • General information
  • User manual
  • Maintenance
  • Troubleshooting
  • Late models
  • Power unit
  • Engine in car
  • Engine overhaul
  • Cooling and heating system
  • Fuel and exhaust system
  • Engine electrical system
  • Emission control system
  • Transmission
  • Mechanical gearbox
  • Automatic gearbox
  • Clutch and drive shafts
  • Chassis
  • Brake system
  • Suspension and wheels
  • Steering
  • Body
  • Exterior (external elements)
  • Interior (internal elements)
  • Electrical equipment
  • Equipment and devices
  • Lighting and lamps
  • Electrical circuits
MazBook.ru © 2018–2026 · Mobile version · Articles and news · Sitemap: EN BG BY UA RS HR RO PL SK HU · Feedback · Site search · Add to bookmarks Familia 5 (BF) · Familia 6 (BG) · Capella 3 (GC) · Capella 3 and 4 (GC) · Capella 4 (GD) · Capella 5 (GE) · Capella 6 (GF) · Mazda3 BK · Mazda6 GG · CX-5KE · Mazda 121 (3) · Mazda BT-50 (1) ·
By continuing to use the site, you agree to the use of cookies 🔐