


Removal
Remove the timing belt covers.
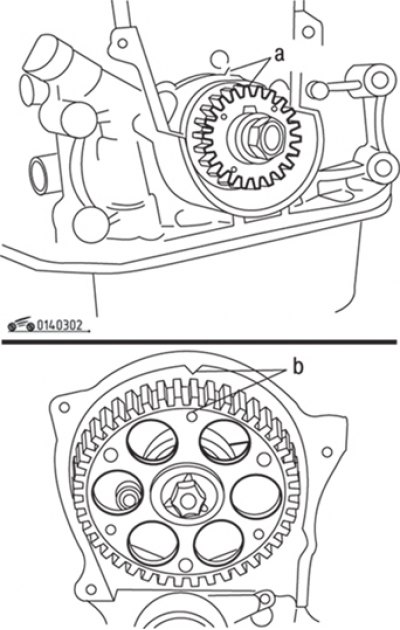
Figure 3.2. When setting the piston of the first cylinder to TDC, the marks (a) on the crankshaft pulley and front cover, as well as the mark "A" on the camshaft pulley with the mark (b) on the rear toothed belt cover, must be aligned
Remove the spark plugs and use a wrench to turn the crankshaft by the head of the pulley mounting bolt until the mark on the pulley aligns with the "TDC" (0°) mark on the pointer scale and the "A" mark (for 2.0 l engine) on the camshaft pulley with a mark on the rear cover (figure 3.2). On a 1.6L engine, the mark on the casing aligns with the "B" mark on the pulley.
The original article is posted on MazBook.ru
Remove the bolts and remove the crankshaft drive belt pulley from the timing belt pulley. Due to lack of space, the pulley is difficult to remove from the vehicle, but this is not necessary for the procedure in question. You just need to remove the drive belt pulley from the timing belt pulley.
Caution: If the belt is to be used again, mark the direction of rotation with an arrow before loosening the belt tension.
Loosen the belt tensioner fixing bolt.
Remove the belt from the pulleys.
Inspect the belt. Replace it with a new one if any of the following damages are present: tears, delamination, wear, cracks, hardening, bending, traces of oil or other liquids. The belt should also be replaced when the service life specified in the instructions is exhausted.
Installation
Make sure the pulley marks on the crankshaft and camshaft are aligned (see figure 3.2).
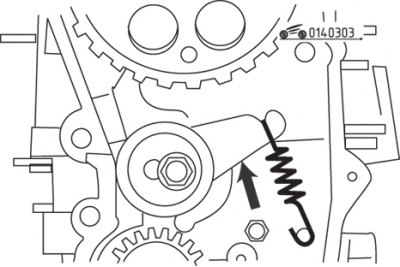
Figure 3.3. Before installing the timing belt, stretch the spring as much as possible in the direction indicated by the arrow, then tighten the lock bolt without applying much force
Hook the spring onto the tensioner and pull the tensioner back using maximum force. Tighten the tensioner bolt to secure it in the position shown in the figure 3.3.
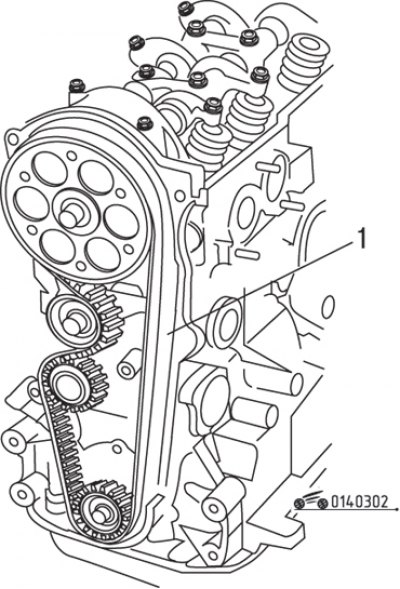
Figure 3.4. Branch (1) of the toothed belt from which it is necessary to start installing the toothed belt
Place the belt on the drive and driven pulleys on the side opposite the water pump and tensioner, as this will ensure the required belt tension (figure 3.4). If installing an old belt, make sure that the direction of the pre-marked arrow matches the direction of rotation of the belt.
Tension adjustment
Loosen the tensioner locking bolt, so that the force on the belt is transmitted only from the spring.
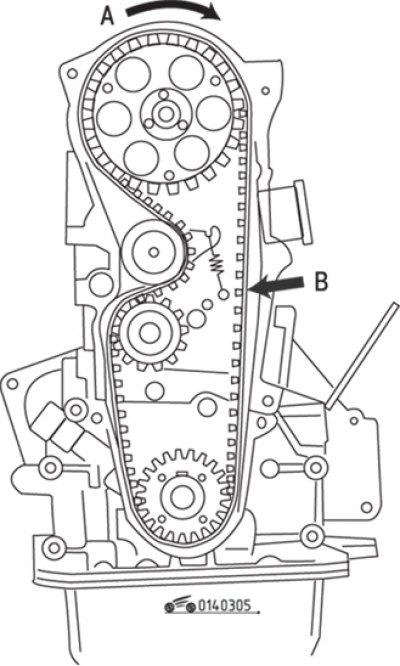
Figure 3.5. Direction (A) of rotation of the toothed belt and location (B) of measuring the deflection when checking its tension
Turn the crankshaft two turns clockwise (in this case, equal forces are applied on both sides of the belt), then tighten the lock bolt (figure 3.5).
Check that the timing belt pulley marks are aligned correctly.
Check the belt tension by pressing midway between the drive and driven pulleys from the outside. Measure the deflection and compare it with the specifications.
If the tension does not correspond to this value, repeat the tensioning operations.
Install the belt covers, crankshaft pulley and spark plugs.