
MazBook.ru
English Русский
Български
Беларускі
Український
Српски
Hrvatski
Română
Polski
Slovenský
Magyar
• Bookmark • Sitemap • Contacts •   
Cars Opel Cars Ford Cars Volkswagen Cars Audi Cars Kia Cars Renault Cars Peugeot


Familia Capella Mazda3 Mazda6 CX-? Others Articles
Capella 3 (1982-1992, petrol) Capella 3 and 4 (1982-1992) Capella 4 (1987-1992) Capella 5 (1991-1997) Capella 6 (1997-2005, petrol)

Water pump (Mazda Capella GD)

  • Home
  • Mazda Capella
  • Capella GD (1987-1992)
  • Power unit
  • Cooling system
  • Water pump
0
Contents: 4.3.1. Removing and installing the…⇓ 4.3.2. Setting the V-belt tension ⇓
The water pump cannot be repaired and if it fails or becomes damaged, it must be replaced. To check, you need to check the water pump shaft in the bearings and, if the bearing has deviations, install a new or replacement water pump.

4.3.1. Removing and installing the pump


Remove the timing belt to disconnect the water pump from the cylinder block. If the engine is removed, you can follow the instructions for disassembling it. To remove the pump with the engine installed, you need to perform the following work, using the installation drawings of the drive parts of the different engines:

For gasoline engines


  • Drain the cooling system as described in chapter 4.1.
  • Turn the engine until the pistons of the first cylinder reach top dead center during compression. Engage first gear and apply the handbrake.
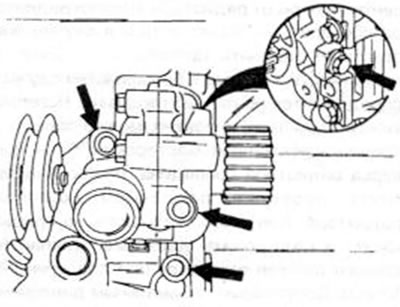
Figure 124. Screwing in the water pump of a diesel engine (see text).

Figure 124. Screwing in the water pump of a diesel engine (see text).


Raise the front of the vehicle on jack stands to improve access to certain components.

Loosen the brushless alternator mounting bolts and nuts on the machine and mounting clamp and remove the V-belt.


Unscrew the right front wheel and the mudguard on the inside of the wheel arch. After this, the control mechanism is removed as described in chapters 2.8.1, however, differences should be observed.

In a standard engine, in addition to the toothed belt, the V-belt drive roller is removed, after which the pump can be unscrewed. Remove the "O"-shaped sealing ring.

For a DOHC engine, in addition to the timing belt, both camshaft drive gears are removed and the shield behind the gears is unscrewed. Remove the timing belt drive roller and then unscrew the pump. Remove the "O"-shaped sealing ring. Install in the reverse order of removal. Always use new seals. Installation of the timing belt and tensioner belt is described when installing the cylinder head. Set the tension of the brushless generator V-belt as described later in this chapter. Finally, you need to fill the cooling system and check for leaks.

Diesel engine


Drain the cooling system as described in chapter 4.1.

Crank the engine until the piston of the first cylinder reaches the dead center during compression. Engage first gear and apply the handbrake.

Raise the front of the vehicle and place it on jack stands to improve access to certain parts.

After this, the control mechanism is removed as described in chapter 2.8.3, however, the following differences must be observed:
  • Remove the camshaft drive gear and the high pressure fuel pump drive gear as described earlier in the text and unscrew the large sealing sheet from the end face of the engine.
  • Remove the brushless alternator.
  • Disconnect the water hoses from the water pump and remove them.
  • Unscrew the water pump from the cylinder block and remove the seal. If necessary.
  • Unscrew the water pump cover (where the hose connects).

The water pump is installed in the reverse order of removal. Always use a new seal located on the marked side of the water pump. When fixing the pump, use the drawing 124 to achieve proper tightening. Tighten bolts A to 30-40 Nm, bolts B to 8-11 Nm. Timing belt installation, timing gear installation, and timing belt tensioning are described in the cylinder head installation section. Set the tension of the toothed belt of the brushless generator as described later in this chapter. Finally, fill the cooling system again and check for leaks.


4.3.2. Setting the V-belt tension


The V-belt must be tensioned so that it is in the position shown in the figure At 125, the V-belt could be compressed inward by 6-8 mm when pressed with a force of 10 kg. This value is valid for a new V-belt. A used belt is installed at 7-9 mm. These values are valid for a gasoline engine. For a diesel engine, the dimensions are 8-10 mm (new belt) and 9-11 mm (used belt). The measurement is made between the belt tensioner roller and the belt drive pulley of the brushless generator (see figure 126). To set the V-belt tension on a gasoline engine, loosen the mounting bolts of the brushless alternator and the mounting clamp and use a simple screwdriver to push the alternator outward until the specified tension is achieved. Tighten the bolts securely after installation. The tightening torque of the mounting clamp is 12-16 Nm; tighten the bolts on the bottom to 20-25 Nm. For a diesel engine, install a tensioner. To install, loosen the nuts in the middle of the tensioner and move the bolts until the desired tension is achieved. After this, tighten the nuts to 37-53 Nm.
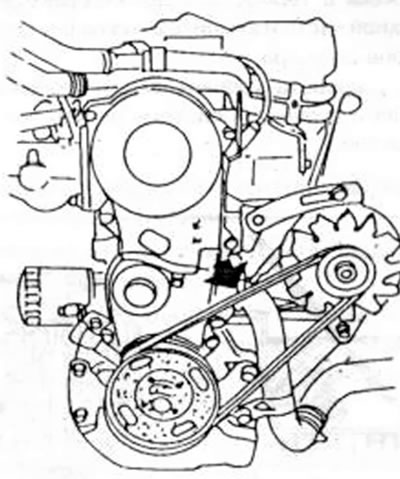
Figure 125. Checking the tension of the V-belt of a brushless alternator of a gasoline engine. If…

Figure 125. Checking the tension of the V-belt of a brushless alternator of a gasoline engine. If servo control is installed, a link to the appropriate section is made
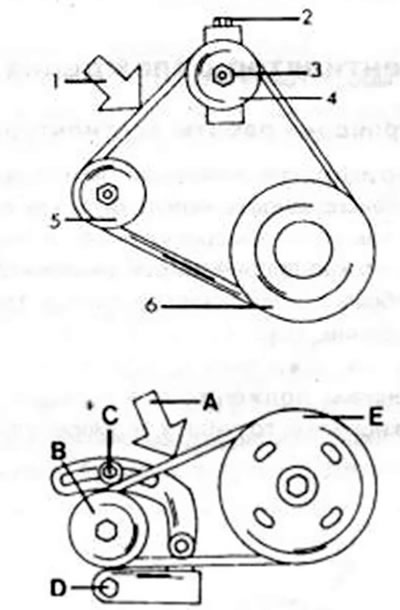


Figure 126. Checking the belt tension of a brushless alternator of a diesel engine with…

Figure 126. Checking the belt tension of a brushless alternator of a diesel engine with installation positions. If servo control is installed, a link to the appropriate section is provided: 1. Tension control point; 2. Set bolt; 3. Fastening nut; 4. Drive roller; 5. Brushless AC generator; 6. Crankshaft timing belt pulley; A. Tension control point; B. Belt tensioner; S. Bolt; D. Bolt; E. Belt pulley
This article is available at: russian, bulgarian, belarusian, ukrainian, serbian, croatian, romanian, polish, slovak, hungarian
This text was checked by: Georgy Afanasyev
Share with friends on social networks:

Previous
Capella 4 » Cooling system
Next

Radiator — removal and installation
Emptying and filling the cooling system
Checking the Thermostat
Cooling fan
More articles on repairing other Mazda models
Water pump — removal and installation Mazda Familia 5 (1985-1989)
Oil pump — description Mazda3 BK (2003-2009)
Oil pump — general information Mazda6 GG (2002-2008)
Removal and installation the water pump Mazda CX-5KE (2012-2017)
Removal and installation the water pump (petrol 1.3 l) Mazda 121 (3) (1996-2003)
Link in different formats to this article
Comments and feedback from visitors
No comments yet


How much will 20 + 34 ?


Capella 6 (1997-2005, petrol) 
  • General information
  • Introduction to guide
  • User manual
  • Troubleshooting
  • Maintenance
  • Power unit
  • 4-cylinder engines
  • 6-cylinder engines
  • Engine overhaul
  • Cooling and ventilation
  • Power and exhaust systems
  • Engine electrics
  • Control system
  • Transmission
  • Mechanical gearbox
  • Automatic gearbox
  • Clutch and drive shafts
  • Chassis
  • Brake system
  • Car suspension
  • Steering
  • Body
  • Exterior (external elements)
  • Interior (internal elements)
  • Doors, windows and locks
  • Electrical equipment
  • Equipment and devices
  • Electrical circuits
Capella 5 (1991-1997) 
  • General information
  • User manual
  • Maintenance
  • Helpful hints
  • Power unit
  • Petrol engines 1.6 and 1.8
  • Petrol engines 2.0
  • 2.5 petrol engines
  • Overhaul engines 1.6 and 1.8
  • Overhaul engines 2.0 and 2.5
  • Diesel engine 2.0
  • Engine electrics
  • Cooling system
  • Air conditioner
  • Carburetor Nikki 30/34
  • Power system (1.6 and 1.8)
  • Power system (2.0 and 2.5)
  • Control system
  • Transmission
  • Mechanical gearbox
  • Automatic gearbox
  • Clutch and axles
  • Chassis
  • Brake system
  • Suspension and wheels
  • Steering
  • Body
  • Exterior (external elements)
  • Interior (internal elements)
  • Doors and windows
  • Electrical equipment
  • Equipment and devices
  • Electrical circuits
Capella 4 (1987-1992) 
  • General information
  • Introduction to manual
  • Vehicle specifications
  • Power unit
  • Engine repair
  • Lubrication system
  • Cooling system
  • Fuel system (carburetor)
  • Fuel injection (FE)
  • Fuel injection (DOHC)
  • Fuel system (diesel)
  • Ignition system
  • Transmission
  • Clutch
  • Gearbox
  • Drive shafts
  • Chassis
  • Front suspension
  • Rear suspension
  • Steering system
  • Brake system
  • Electrical equipment
  • Equipment and devices
  • Electrical circuits
Capella 3 and 4 (1982-1992) 
  • General information
  • User manual
  • Maintenance
  • Power unit
  • Gasoline engine
  • Engine overhaul (gasoline)
  • Diesel engine
  • Cooling and heating
  • Supply system
  • Ignition system
  • Emission reduction
  • Transmission
  • Clutch
  • Mechanical gearbox
  • Automatic gearbox
  • Drive shafts
  • Chassis
  • Brake system
  • Suspension and wheels
  • Steering
  • Body
  • Exterior (external elements)
  • Interior (internal elements)
  • Electrical equipment
  • Equipment and devices
  • Power devices
  • Electrical circuits
Capella 3 (1982-1992, petrol) 
  • General information
  • User manual
  • Maintenance
  • Troubleshooting
  • Late models
  • Power unit
  • Engine in car
  • Engine overhaul
  • Cooling and heating system
  • Fuel and exhaust system
  • Engine electrical system
  • Emission control system
  • Transmission
  • Mechanical gearbox
  • Automatic gearbox
  • Clutch and drive shafts
  • Chassis
  • Brake system
  • Suspension and wheels
  • Steering
  • Body
  • Exterior (external elements)
  • Interior (internal elements)
  • Electrical equipment
  • Equipment and devices
  • Lighting and lamps
  • Electrical circuits
MazBook.ru © 2018–2026 · Mobile version · Articles and news · Sitemap: EN BG BY UA RS HR RO PL SK HU · Feedback · Site search · Add to bookmarks Familia 5 (BF) · Familia 6 (BG) · Capella 3 (GC) · Capella 3 and 4 (GC) · Capella 4 (GD) · Capella 5 (GE) · Capella 6 (GF) · Mazda3 BK · Mazda6 GG · CX-5KE · Mazda 121 (3) · Mazda BT-50 (1) ·
By continuing to use the site, you agree to the use of cookies 🔐