MazBook.ru
English Русский
Български
Беларускі
Український
Српски
Hrvatski
Română
Polski
Slovenský
Magyar
• Bookmark • Sitemap • Contacts •   
Cars Opel Cars Ford Cars Volkswagen Cars Audi Cars Kia Cars Renault Cars Peugeot


Familia Capella Mazda3 Mazda6 CX-? Others Articles
Capella 3 (1982-1992, petrol) Capella 3 and 4 (1982-1992) Capella 4 (1987-1992) Capella 5 (1991-1997) Capella 6 (1997-2005, petrol)

Removal and installation injectors (Mazda Capella GE)

  • Home
  • Mazda Capella
  • Capella GE (1991-1997)
  • Power unit
  • Diesel engine 2.0
  • Removal and installation injectors
0
Contents: Removal ⇓ Installation ⇓
Defective injectors can cause severe engine detonation and, as a result, damage to bearings. If such symptoms occur, let the engine idle and loosen the fuel injection line union nuts one by one. If the detonation disappears when any of the union nut is loosened, this indicates that the corresponding injector is defective.

A faulty injector can be identified by successively loosening the union nuts and at high speed (when warming up the engine). If the number of revolutions does not change after loosening the union nut, this indicates that the corresponding injector is defective. The injector can be checked using a pressure gauge. (Work in the workshop; required injection pressure: 135 bar).

The first signs of injector malfunction appear as follows:
  • false ignitions;
  • detonation in one or more cylinders;
  • engine overheating;
  • decrease in engine power;
  • excessively strong black exhaust;
  • increased fuel consumption.

Removal


1. Disconnect the negative ground cable from the battery.

Caution! This will erase the contents of electronic memory devices, such as the engine fault memory or radio code. Before disconnecting the battery, please read subsection 2.11.


2. Carefully clean the outside of the injection pipes and fuel return pipes with cleaner or diesel fuel.

2. Carefully clean the outside of the injection pipes and fuel return pipes with cleaner or diesel…


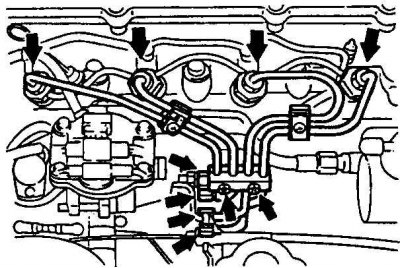
3. Remove the injection tubes as a set by loosening the union nuts (indicated by arrows) on the pump and on the injectors.


Caution! Do not disturb the bending shape of the tubes.


4. Remove the injectors and set them aside in the same order as they will be installed.

Caution! No dirt should enter the combustion chamber through the injector openings.


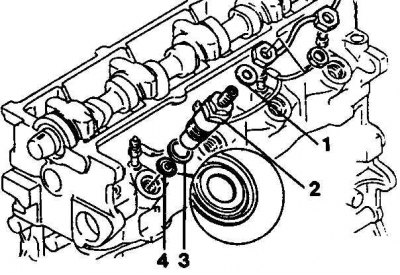
5. Each hole contains a wave gasket and washer that are replaceable.

6. The injector needles must not have knocked out or rough seating areas. Remove carbon deposits from the injectors with a wooden spatula.

Caution! Never use wire, a file, or sandpaper to clean the injector or needle. Do not confuse parts of different shapes.


[The article is reprinted from the portal mazbook]

Installation


Attention! Observe the installation position.


Caution! Overtightening the injectors may cause them to become deformed, leading to needle sticking or other damage.


Caution! Overtightening the injectors may cause them to become deformed, leading to needle sticking…


1. Install the injectors (2) and tighten to 65 Nm. Install 4 new wave gaskets (4) and washers (3).

1. Install the injectors (2) and tighten to 65 Nm. Install 4 new wave gaskets (4) and washers (3).


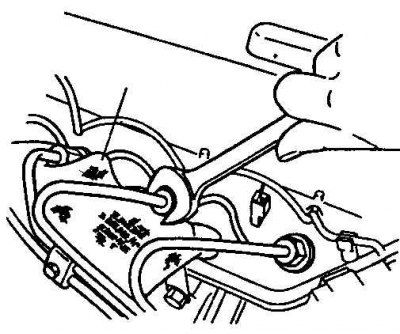
2. Install the injection pipes and tighten the union nuts to 25 Nm.


3. Install the fuel return pipes with new gaskets and tighten the nuts to 30 Nm.

4. On all injectors, slightly loosen the union nuts of the injection pipes.

5. Turn the engine over with the starter until fuel comes out of the injection pipes. Tighten the injection pipes to the specified tightening torque.

6. Install the air intake muffler and resonator duct.

7. Connect the negative ground cable to the battery.

8. If you have a clock, set the time and set the security code for the radio.
This article is available at: russian, bulgarian, belarusian, ukrainian, serbian, croatian, romanian, polish, slovak, hungarian
This text was checked by: Evgeny Mereshnikov
Share with friends on social networks:

Previous
Capella 5 » Diesel engine 2.0
Next

Checking and adjusting idle speed
Checking and replacing the fuel shut-off solenoid valve
Removal air from the fuel system
Checking the preheating device
Preheating system
Removal the vacuum pump (RF engine)
Diagnostics of diesel engine fuel system faults
More articles on repairing other Mazda models
Removal and installation injectors Mazda Familia 6 (1989-1994)
Diagnostics and cleaning of fuel injectors Mazda CX-5KE (2012-2017)
Checking fuel injectors Mazda 121 (3) (1996-2003)
Link in different formats to this article
Comments and feedback from visitors
No comments yet


How much will 45 + 19 ?


Capella 6 (1997-2005, petrol) 
  • General information
  • Introduction to guide
  • User manual
  • Troubleshooting
  • Maintenance
  • Power unit
  • 4-cylinder engines
  • 6-cylinder engines
  • Engine overhaul
  • Cooling and ventilation
  • Power and exhaust systems
  • Engine electrics
  • Control system
  • Transmission
  • Mechanical gearbox
  • Automatic gearbox
  • Clutch and drive shafts
  • Chassis
  • Brake system
  • Car suspension
  • Steering
  • Body
  • Exterior (external elements)
  • Interior (internal elements)
  • Doors, windows and locks
  • Electrical equipment
  • Equipment and devices
  • Electrical circuits
Capella 5 (1991-1997) 
  • General information
  • User manual
  • Maintenance
  • Helpful hints
  • Power unit
  • Petrol engines 1.6 and 1.8
  • Petrol engines 2.0
  • 2.5 petrol engines
  • Overhaul engines 1.6 and 1.8
  • Overhaul engines 2.0 and 2.5
  • Diesel engine 2.0
  • Engine electrics
  • Cooling system
  • Air conditioner
  • Carburetor Nikki 30/34
  • Power system (1.6 and 1.8)
  • Power system (2.0 and 2.5)
  • Control system
  • Transmission
  • Mechanical gearbox
  • Automatic gearbox
  • Clutch and axles
  • Chassis
  • Brake system
  • Suspension and wheels
  • Steering
  • Body
  • Exterior (external elements)
  • Interior (internal elements)
  • Doors and windows
  • Electrical equipment
  • Equipment and devices
  • Electrical circuits
Capella 4 (1987-1992) 
  • General information
  • Introduction to manual
  • Vehicle specifications
  • Power unit
  • Engine repair
  • Lubrication system
  • Cooling system
  • Fuel system (carburetor)
  • Fuel injection (FE)
  • Fuel injection (DOHC)
  • Fuel system (diesel)
  • Ignition system
  • Transmission
  • Clutch
  • Gearbox
  • Drive shafts
  • Chassis
  • Front suspension
  • Rear suspension
  • Steering system
  • Brake system
  • Electrical equipment
  • Equipment and devices
  • Electrical circuits
Capella 3 and 4 (1982-1992) 
  • General information
  • User manual
  • Maintenance
  • Power unit
  • Gasoline engine
  • Engine overhaul (gasoline)
  • Diesel engine
  • Cooling and heating
  • Supply system
  • Ignition system
  • Emission reduction
  • Transmission
  • Clutch
  • Mechanical gearbox
  • Automatic gearbox
  • Drive shafts
  • Chassis
  • Brake system
  • Suspension and wheels
  • Steering
  • Body
  • Exterior (external elements)
  • Interior (internal elements)
  • Electrical equipment
  • Equipment and devices
  • Power devices
  • Electrical circuits
Capella 3 (1982-1992, petrol) 
  • General information
  • User manual
  • Maintenance
  • Troubleshooting
  • Late models
  • Power unit
  • Engine in car
  • Engine overhaul
  • Cooling and heating system
  • Fuel and exhaust system
  • Engine electrical system
  • Emission control system
  • Transmission
  • Mechanical gearbox
  • Automatic gearbox
  • Clutch and drive shafts
  • Chassis
  • Brake system
  • Suspension and wheels
  • Steering
  • Body
  • Exterior (external elements)
  • Interior (internal elements)
  • Electrical equipment
  • Equipment and devices
  • Lighting and lamps
  • Electrical circuits
MazBook.ru © 2018–2026 · Mobile version · Articles and news · Sitemap: EN BG BY UA RS HR RO PL SK HU · Feedback · Site search · Add to bookmarks Familia 5 (BF) · Familia 6 (BG) · Capella 3 (GC) · Capella 3 and 4 (GC) · Capella 4 (GD) · Capella 5 (GE) · Capella 6 (GF) · Mazda3 BK · Mazda6 GG · CX-5KE · Mazda 121 (3) · Mazda BT-50 (1) ·
By continuing to use the site, you agree to the use of cookies 🔐