
MazBook.ru
English Русский
Български
Беларускі
Український
Српски
Hrvatski
Română
Polski
Slovenský
Magyar
• Bookmark • Sitemap • Contacts •   
Cars Opel Cars Ford Cars Volkswagen Cars Audi Cars Kia Cars Renault Cars Peugeot


Familia Capella Mazda3 Mazda6 CX-? Others Articles
Capella 3 (1982-1992, petrol) Capella 3 and 4 (1982-1992) Capella 4 (1987-1992) Capella 5 (1991-1997) Capella 6 (1997-2005, petrol)

Diagnostics using a vacuum gauge (Mazda Capella GF)

  • Home
  • Mazda Capella
  • Capella GF (1997-2005)
  • Power unit
  • Engine overhaul
  • Diagnostics using a vacuum gauge
0
A vacuum gauge can provide valuable information about that. what happens in the engine. It can be used to detect worn rings or cylinders, leaking cylinder head or intake manifold gaskets, incorrect fuel injection system adjustments, clogged exhaust systems, faulty valves, incorrect ignition timing or valve timing.

Unfortunately, vacuum gauge readings can be interpreted in different ways, so it must be used in combination with other testing methods to confirm a diagnosis.

To make a correct diagnosis, both the vacuum gauge reading itself and the rate of its change are important. Most vacuum gauges are calibrated in millimeters of mercury (mmHg). It should be noted that atmospheric pressure and the associated altitude can affect vacuum gauge readings. When you rise 1 km above sea level, the pressure decreases by approximately 75 mm Hg.

Connect a vacuum gauge to the intake manifold (figure 4.0,a). Make sure that no vacuum hose is disconnected from the manifold, otherwise an incorrect result may be obtained.
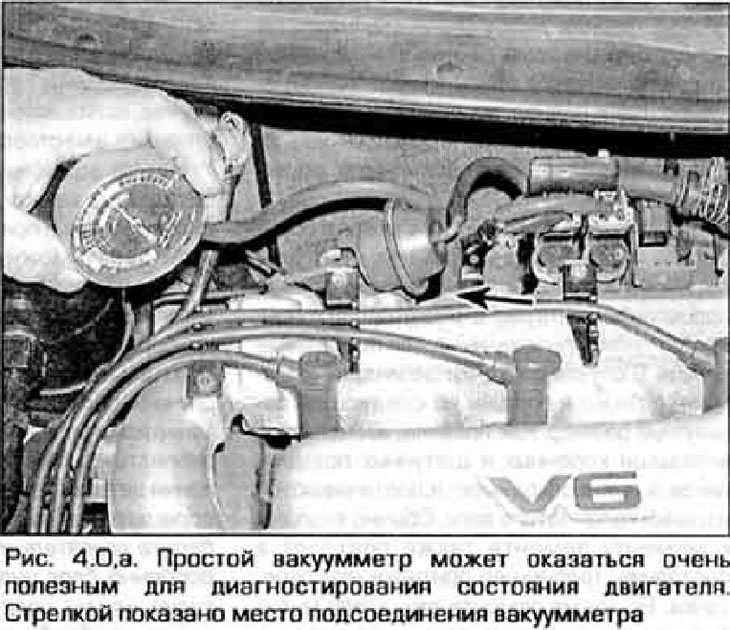
Connect a vacuum gauge to the intake manifold (figure 4.0,a). Make sure that no vacuum hose is…


Before starting the test, warm up the engine to operating temperature. Place chocks under the wheels and apply the handbrake. Set the transmission to neutral (or PARK in automatic transmission), start the engine and let it idle.


Caution: Keep your hands and vacuum gauge away from the fan.


Read the vacuum gauge reading. In a working engine, the average vacuum value should be between 400 and 550 mm Hg, and the instrument needle should hardly fluctuate (see Figure 4.0.b).
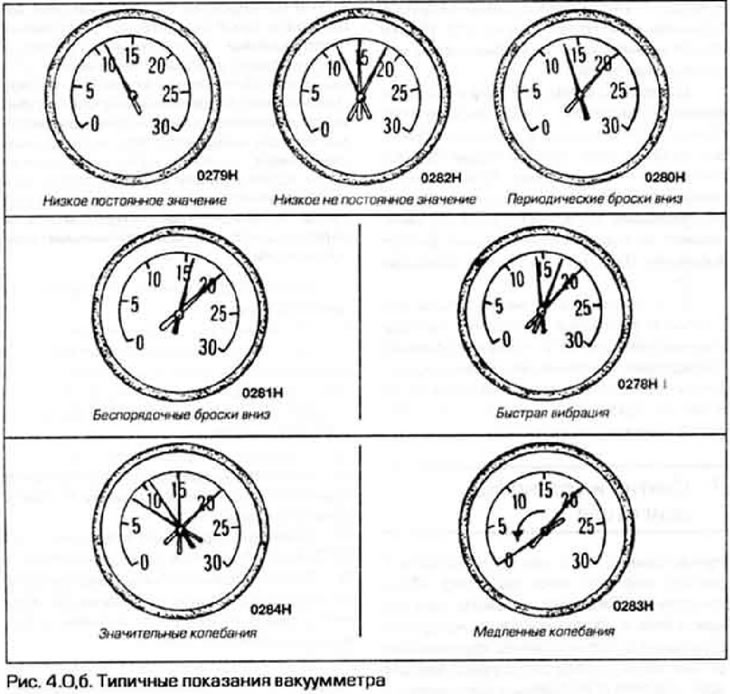
Read the vacuum gauge reading. In a working engine, the average vacuum value should be between 400…


Other vacuum gauge readings mean the following:

1. A low constant vacuum reading usually indicates a loose intake manifold gasket to the cylinder head or throttle body, a leaking vacuum hose, retarded ignition timing, or poor valve timing. Check the ignition timing with a timing light and repair any vacuum leaks, and if that doesn't help, remove the timing chain cover and check the timing marks for alignment.

Original material on the website MazBook.ru

2. If the instrument shows 100-200 mm less than the norm and the readings fluctuate greatly around this value, then there is reason to suspect a breakdown of the manifold gasket with the cylinder head or a malfunction of the fuel injector.

3. If the instrument arrow periodically twitches downwards by approximately 50-100 mm from the stable level, this may be due to a loose fit of one of the valves. To confirm, measure the compression in the cylinders or perform a cylinder leak test.


4. If the instrument needle makes erratic downward movements, this may be caused by a stuck valve stem or ignition failure. Check the compression or perform a cylinder leak test, check the spark plugs.

5. Rapid vibration of the vacuum gauge needle combined with smoky exhaust may indicate worn valve guides. To confirm this assumption, perform a cylinder leak test. If the needle vibrates when the engine speed increases, this may be caused by leaks through the intake manifold gasket or cylinder head gasket, or settling of the valve springs. burnt-out valves or ignition system failures.

6. Small fluctuations in vacuum of about 25 mm Hg up and down from the normal value may indicate a malfunction in the ignition system. Perform all normal ignition checks and if no fault is found, have the engine checked on a service station diagnostic stand.

7. If significant vacuum fluctuations are observed, perform a compression test and a cylinder leak test. It is possible that the cylinder-piston group is worn out or the cylinder head gasket is broken.

8. If the instrument needle fluctuates slowly over a wide range, the causes may be a blockage in the crankcase ventilation system, an incorrect composition of the working mixture, leaks in the intake manifold gaskets or throttle body.

9. Check the change in vacuum in transient mode. To do this, sharply open the throttle valve and when the engine reaches 2500 rpm, sharply close it. In this case, the instrument needle should drop almost to zero, then return to the idle level, exceed this level by approximately 75 mm Hg, then smoothly return to the idle level and stop. If the vacuum is restored slowly and does not rise above the steady state level, this may indicate worn piston rings. If the delay is too long, check that the exhaust system is not clogged (most often a catalytic converter or muffler). The easiest way to do this is to disconnect the exhaust system connection before the suspect component and repeat the test.
This article is available at: russian, bulgarian, belarusian, ukrainian, serbian, croatian, romanian, polish, slovak, hungarian
This text was checked by: German Vorobyov
Share with friends on social networks:

Previous
Capella 6 » Engine overhaul
Next

Checking the compression in the cylinders
Checking oil pressure
General information about engine repair
Technical data for overhaul of 6-cylinder engines
Technical data for overhaul of 4-cylinder engines
Engine restoration options
Engine Removal — methods and precautions
Removal and installation the engine
Engine repair — disassembly procedure
Cylinder head — disassembly
More articles on repairing other Mazda models
Checking the characteristics of the vacuum regulator of ignition… Mazda Familia 5 (1985-1989)
Coolant temperature gauge Mazda3 BK (2003-2009)
Coolant temperature gauge Mazda6 GG (2002-2008)
Diagnostics and cleaning of fuel injectors Mazda CX-5KE (2012-2017)
Removal and installation a vacuum pump Mazda 121 (3) (1996-2003)
Link in different formats to this article
Comments and feedback from visitors
No comments yet


How much will 10 + 16 ?


Capella 6 (1997-2005, petrol) 
  • General information
  • Introduction to guide
  • User manual
  • Troubleshooting
  • Maintenance
  • Power unit
  • 4-cylinder engines
  • 6-cylinder engines
  • Engine overhaul
  • Cooling and ventilation
  • Power and exhaust systems
  • Engine electrics
  • Control system
  • Transmission
  • Mechanical gearbox
  • Automatic gearbox
  • Clutch and drive shafts
  • Chassis
  • Brake system
  • Car suspension
  • Steering
  • Body
  • Exterior (external elements)
  • Interior (internal elements)
  • Doors, windows and locks
  • Electrical equipment
  • Equipment and devices
  • Electrical circuits
Capella 5 (1991-1997) 
  • General information
  • User manual
  • Maintenance
  • Helpful hints
  • Power unit
  • Petrol engines 1.6 and 1.8
  • Petrol engines 2.0
  • 2.5 petrol engines
  • Overhaul engines 1.6 and 1.8
  • Overhaul engines 2.0 and 2.5
  • Diesel engine 2.0
  • Engine electrics
  • Cooling system
  • Air conditioner
  • Carburetor Nikki 30/34
  • Power system (1.6 and 1.8)
  • Power system (2.0 and 2.5)
  • Control system
  • Transmission
  • Mechanical gearbox
  • Automatic gearbox
  • Clutch and axles
  • Chassis
  • Brake system
  • Suspension and wheels
  • Steering
  • Body
  • Exterior (external elements)
  • Interior (internal elements)
  • Doors and windows
  • Electrical equipment
  • Equipment and devices
  • Electrical circuits
Capella 4 (1987-1992) 
  • General information
  • Introduction to manual
  • Vehicle specifications
  • Power unit
  • Engine repair
  • Lubrication system
  • Cooling system
  • Fuel system (carburetor)
  • Fuel injection (FE)
  • Fuel injection (DOHC)
  • Fuel system (diesel)
  • Ignition system
  • Transmission
  • Clutch
  • Gearbox
  • Drive shafts
  • Chassis
  • Front suspension
  • Rear suspension
  • Steering system
  • Brake system
  • Electrical equipment
  • Equipment and devices
  • Electrical circuits
Capella 3 and 4 (1982-1992) 
  • General information
  • User manual
  • Maintenance
  • Power unit
  • Gasoline engine
  • Engine overhaul (gasoline)
  • Diesel engine
  • Cooling and heating
  • Supply system
  • Ignition system
  • Emission reduction
  • Transmission
  • Clutch
  • Mechanical gearbox
  • Automatic gearbox
  • Drive shafts
  • Chassis
  • Brake system
  • Suspension and wheels
  • Steering
  • Body
  • Exterior (external elements)
  • Interior (internal elements)
  • Electrical equipment
  • Equipment and devices
  • Power devices
  • Electrical circuits
Capella 3 (1982-1992, petrol) 
  • General information
  • User manual
  • Maintenance
  • Troubleshooting
  • Late models
  • Power unit
  • Engine in car
  • Engine overhaul
  • Cooling and heating system
  • Fuel and exhaust system
  • Engine electrical system
  • Emission control system
  • Transmission
  • Mechanical gearbox
  • Automatic gearbox
  • Clutch and drive shafts
  • Chassis
  • Brake system
  • Suspension and wheels
  • Steering
  • Body
  • Exterior (external elements)
  • Interior (internal elements)
  • Electrical equipment
  • Equipment and devices
  • Lighting and lamps
  • Electrical circuits
MazBook.ru © 2018–2026 · Mobile version · Articles and news · Sitemap: EN BG BY UA RS HR RO PL SK HU · Feedback · Site search · Add to bookmarks Familia 5 (BF) · Familia 6 (BG) · Capella 3 (GC) · Capella 3 and 4 (GC) · Capella 4 (GD) · Capella 5 (GE) · Capella 6 (GF) · Mazda3 BK · Mazda6 GG · CX-5KE · Mazda 121 (3) · Mazda BT-50 (1) ·
By continuing to use the site, you agree to the use of cookies 🔐