
MazBook.ru
English Русский
Български
Беларускі
Український
Српски
Hrvatski
Română
Polski
Slovenský
Magyar
• Bookmark • Sitemap • Contacts •   
Cars Opel Cars Ford Cars Volkswagen Cars Audi Cars Kia Cars Renault Cars Peugeot


Familia Capella Mazda3 Mazda6 CX-? Others Articles
Capella 3 (1982-1992, petrol) Capella 3 and 4 (1982-1992) Capella 4 (1987-1992) Capella 5 (1991-1997) Capella 6 (1997-2005, petrol)

Brake pedal — removal, inspection and installation (Mazda Capella GC)

  • Home
  • Mazda Capella
  • Capella GC (1982-1992)
  • Chassis
  • Brake system
  • Brake pedal — removal, inspection and installation
0
To improve access, remove the air duct under the instrument panel.

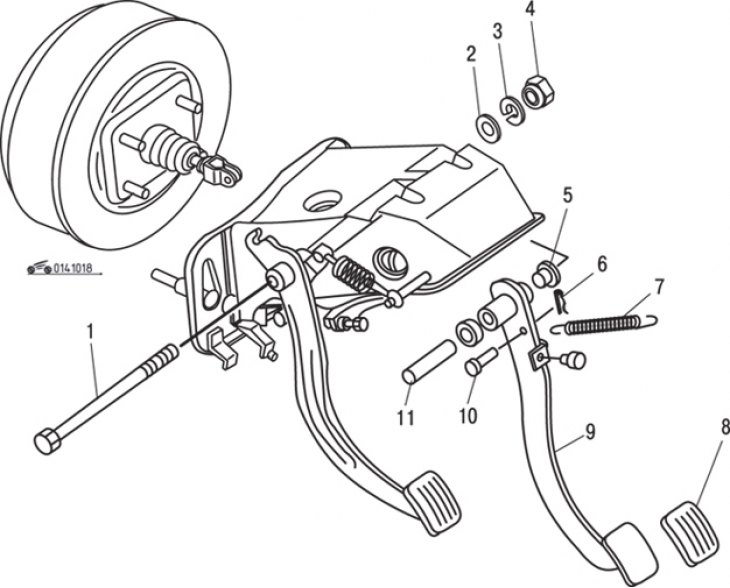
Figure 10.18. Brake pedal fastening elements: 1 – bolt; 2 – flat washer; 3 – spring washer; 4 –…

Figure 10.18. Brake pedal fastening elements: 1 – bolt; 2 – flat washer; 3 – spring washer; 4 – nut; 5 – bushings; 6 – cotter pin; 7 – return spring; 8 – pedal cover; 9 – brake pedal; 10 – pin with a head and a hole for a cotter pin; 11 – axis


Remove the cotter pin and take out the pin with the hole for the cotter pin (figure 10.18).

Remove the tie bolt, nut and washers.

Disconnect the return spring and remove the brake pedal.

Inspect components for worn bushings, bent or damaged pedal, worn or deteriorated pedal pad, warped pinch bolt, and damaged or weakened return spring.

Before installation, lubricate the contact surfaces of the tie bolt, bushings and pin with a white lithium-based lubricant.

Installation is carried out in the reverse order of removal

After installation, adjust the brake pedal position and free play as follows.

Measure the brake pedal installation height, which should be between 21.41 and 21.51 mm.
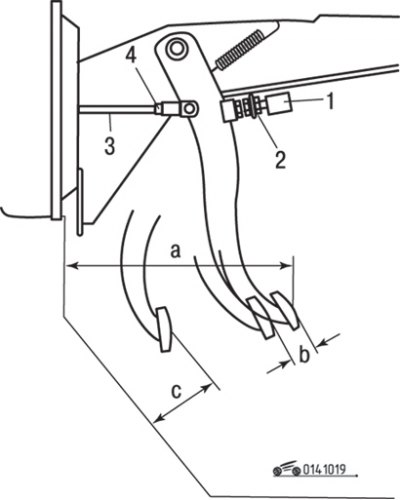
Figure 10.19. Brake pedal positions: a – pedal installation height; b – free travel of the pedal; c…

Figure 10.19. Brake pedal positions: a – pedal installation height; b – free travel of the pedal; c – distance of the pedal from the floor; 1 – brake light switch; 2 – brake light switch lock nut; 3 – pusher; 4 – pusher lock nut


(The original article is available on MAZbook.ru)

If adjustment is necessary, disconnect the connector from the brake light switch, loosen the lock nut of the switch and rotate the switch housing so that the pedal installation height (figure 10.19) corresponded to the required. Tighten the lock nut and connect the connector to the switch.

With the engine off, press the brake pedal several times to relieve the vacuum in the brake booster, then check the brake pedal free play; it should be between 71.12 and 88.9 mm. If adjustment is necessary, loosen the lock nut and rotate the push rod. Tighten the locknut when the required free play is reached.

With the engine off, press the pedal as far as possible and measure the distance between the pedal and the floor. When the load is 53 kgf, the distance should be at least 11.5 cm. If the distance is less, first bleed the air from the hydraulic brake system, then check the condition of the rear drum brake shoes and the automatic adjuster. Make sure the brake hoses do not bulge under pressure.
This article is available at: russian, bulgarian, belarusian, ukrainian, serbian, croatian, romanian, polish, slovak, hungarian
This text was checked by: Georgy Afanasyev
Share with friends on social networks:

Previous
Capella 3 and 4 » Brake system
Next

Parking brake — removal, inspection and installation
Brake hoses and pipes
Brake Master Cylinder — removal, repair, and installation
Wheel brake cylinder for drum brakes
Replacing drum brake pads
Vacuum brake booster
Bleeding air from the hydraulic brake system
Checking the brake fluid level sensor
Brake pressure regulator
Replacing brake pads on rear disc brakes (since 1984)
More articles on repairing other Mazda models
Detailed technical characteristics of the brake system Mazda Familia 5 (1985-1989)
Trauma-safe brake pedal Mazda3 BK (2003-2009)
Checking the brake pedal height Mazda6 GG (2002-2008)
Checking the brake pedal Mazda CX-5KE (2012-2017)
Brake pedal — checking and adjustment Mazda BT-50 (1) (2006-2011)
Link in different formats to this article
Comments and feedback from visitors
No comments yet


How much will 33 + 48 ?


Capella 6 (1997-2005, petrol) 
  • General information
  • Introduction to guide
  • User manual
  • Troubleshooting
  • Maintenance
  • Power unit
  • 4-cylinder engines
  • 6-cylinder engines
  • Engine overhaul
  • Cooling and ventilation
  • Power and exhaust systems
  • Engine electrics
  • Control system
  • Transmission
  • Mechanical gearbox
  • Automatic gearbox
  • Clutch and drive shafts
  • Chassis
  • Brake system
  • Car suspension
  • Steering
  • Body
  • Exterior (external elements)
  • Interior (internal elements)
  • Doors, windows and locks
  • Electrical equipment
  • Equipment and devices
  • Electrical circuits
Capella 5 (1991-1997) 
  • General information
  • User manual
  • Maintenance
  • Helpful hints
  • Power unit
  • Petrol engines 1.6 and 1.8
  • Petrol engines 2.0
  • 2.5 petrol engines
  • Overhaul engines 1.6 and 1.8
  • Overhaul engines 2.0 and 2.5
  • Diesel engine 2.0
  • Engine electrics
  • Cooling system
  • Air conditioner
  • Carburetor Nikki 30/34
  • Power system (1.6 and 1.8)
  • Power system (2.0 and 2.5)
  • Control system
  • Transmission
  • Mechanical gearbox
  • Automatic gearbox
  • Clutch and axles
  • Chassis
  • Brake system
  • Suspension and wheels
  • Steering
  • Body
  • Exterior (external elements)
  • Interior (internal elements)
  • Doors and windows
  • Electrical equipment
  • Equipment and devices
  • Electrical circuits
Capella 4 (1987-1992) 
  • General information
  • Introduction to manual
  • Vehicle specifications
  • Power unit
  • Engine repair
  • Lubrication system
  • Cooling system
  • Fuel system (carburetor)
  • Fuel injection (FE)
  • Fuel injection (DOHC)
  • Fuel system (diesel)
  • Ignition system
  • Transmission
  • Clutch
  • Gearbox
  • Drive shafts
  • Chassis
  • Front suspension
  • Rear suspension
  • Steering system
  • Brake system
  • Electrical equipment
  • Equipment and devices
  • Electrical circuits
Capella 3 and 4 (1982-1992) 
  • General information
  • User manual
  • Maintenance
  • Power unit
  • Gasoline engine
  • Engine overhaul (gasoline)
  • Diesel engine
  • Cooling and heating
  • Supply system
  • Ignition system
  • Emission reduction
  • Transmission
  • Clutch
  • Mechanical gearbox
  • Automatic gearbox
  • Drive shafts
  • Chassis
  • Brake system
  • Suspension and wheels
  • Steering
  • Body
  • Exterior (external elements)
  • Interior (internal elements)
  • Electrical equipment
  • Equipment and devices
  • Power devices
  • Electrical circuits
Capella 3 (1982-1992, petrol) 
  • General information
  • User manual
  • Maintenance
  • Troubleshooting
  • Late models
  • Power unit
  • Engine in car
  • Engine overhaul
  • Cooling and heating system
  • Fuel and exhaust system
  • Engine electrical system
  • Emission control system
  • Transmission
  • Mechanical gearbox
  • Automatic gearbox
  • Clutch and drive shafts
  • Chassis
  • Brake system
  • Suspension and wheels
  • Steering
  • Body
  • Exterior (external elements)
  • Interior (internal elements)
  • Electrical equipment
  • Equipment and devices
  • Lighting and lamps
  • Electrical circuits
MazBook.ru © 2018–2026 · Mobile version · Articles and news · Sitemap: EN BG BY UA RS HR RO PL SK HU · Feedback · Site search · Add to bookmarks Familia 5 (BF) · Familia 6 (BG) · Capella 3 (GC) · Capella 3 and 4 (GC) · Capella 4 (GD) · Capella 5 (GE) · Capella 6 (GF) · Mazda3 BK · Mazda6 GG · CX-5KE · Mazda 121 (3) · Mazda BT-50 (1) ·
By continuing to use the site, you agree to the use of cookies 🔐