
MazBook.ru
English Русский
Български
Беларускі
Український
Српски
Hrvatski
Română
Polski
Slovenský
Magyar
• Bookmark • Sitemap • Contacts •   
Cars Opel Cars Ford Cars Volkswagen Cars Audi Cars Kia Cars Renault Cars Peugeot


Familia Capella Mazda3 Mazda6 CX-? Others Articles
Capella 3 (1982-1992, petrol) Capella 3 and 4 (1982-1992) Capella 4 (1987-1992) Capella 5 (1991-1997) Capella 6 (1997-2005, petrol)

Brake hoses and pipes (Mazda Capella GC)

  • Home
  • Mazda Capella
  • Capella GC (1982-1992)
  • Chassis
  • Brake system
  • Brake hoses and pipes
0
Contents: Front brake hose ⇓ Rear brake hose ⇓ Steel brake pipes ⇓
Every six months, with the vehicle raised and supported on stands, check the brake hoses that connect the steel brake lines to the front and rear brakes for cracks, wear on the outer coating, leaks, swelling, and other damage. These are important and most susceptible to damage elements of the braking system, so the inspection must be comprehensive. Lighting and mirrors will help you carry out checks. If any signs of damage are found on the hose, replace it.

Front brake hose


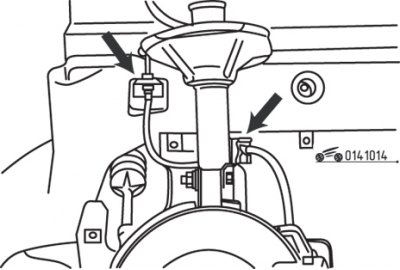
Figure 10.14. Location of front brake hose support brackets

Figure 10.14. Location of front brake hose support brackets


When disconnecting the brake hose, use a gas wrench. Loosen the flange nut and remove the brake hose support bracket (figure 10.14). When connecting, install the bracket, then tighten the flange fastening nut.

When installing, check the cleanliness of the hollow bolt threads.

After installing the brake hose, make sure the hose is not kinked or kinked. Make sure that when turning the front wheel from one extreme position to another, the brake hose does not come into contact with the front suspension elements and the body.


Remove air from the hydraulic drive of the brake system.

Rear brake hose


Using a gas wrench, disconnect the hose from both ends, being careful not to bend the fasteners or steel tubes.

Using pliers, remove all clamps and pull the tapered ends of the hose out of the hanger.

Loosen the hose hanger mounting bolt and remove the hose.

Without twisting the hose, install its tapered ends into the frame hangers.

Install the tapered end hose retaining clips onto the hanger.

Using a gas wrench, attach the steel tubes to the hose end fittings. Be careful not to bend the fasteners or steel tubes.

Make sure that the suspension on the frame is not loosened when installing the hose. Tighten the suspension if necessary.

Fill the reservoir and bleed air from the hydraulic drive of the brake system.

Steel brake pipes


If replacement tubing is necessary, use only double-wall steel tubing or other approved material. If copper tubing is used, strictly follow the manufacturer's instructions for the use of additional support clamps.

Pre-formed brake lines are available in various lengths.

If preformed tubing is not available, purchase the recommended replacement tubing system and connectors. Determine the exact length of the old brake pipe and cut the new pipe to the measured length, leaving about 1 cm extra for tapered expansion at the ends.

Install the connectors onto the tubes and form the cones according to ISO standards.

Using a tube bending tool, bend the tube to the shape of the old brake line.

Conical tube expansion and bending can be performed in any auto repair shop.


When installing the brake line, leave at least 75mm of clearance between the line and any moving parts.

Remove air from the hydraulic drive of the brake system.
This article is available at: russian, bulgarian, belarusian, ukrainian, serbian, croatian, romanian, polish, slovak, hungarian
This text was checked by: Georgy Afanasyev
Share with friends on social networks:

Previous
Capella 3 and 4 » Brake system
Next

Brake Master Cylinder — removal, repair, and installation
Wheel brake cylinder for drum brakes
Replacing drum brake pads
Brake disc — inspection and replacement
Disc brake caliper repair
Parking brake — removal, inspection and installation
Brake pedal — removal, inspection and installation
Vacuum brake booster
Bleeding air from the hydraulic brake system
Checking the brake fluid level sensor
More articles on repairing other Mazda models
Replacement of brake lines and hoses Mazda Familia 6 (1989-1994)
Parking brake system actuator lever Mazda3 BK (2003-2009)
Brake hoses — checking Mazda6 GG (2002-2008)
Brake discs Mazda CX-5KE (2012-2017)
Checking the brake fluid level Mazda 121 (3) (1996-2003)
Link in different formats to this article
Comments and feedback from visitors
No comments yet


How much will 48 + 21 ?


Capella 6 (1997-2005, petrol) 
  • General information
  • Introduction to guide
  • User manual
  • Troubleshooting
  • Maintenance
  • Power unit
  • 4-cylinder engines
  • 6-cylinder engines
  • Engine overhaul
  • Cooling and ventilation
  • Power and exhaust systems
  • Engine electrics
  • Control system
  • Transmission
  • Mechanical gearbox
  • Automatic gearbox
  • Clutch and drive shafts
  • Chassis
  • Brake system
  • Car suspension
  • Steering
  • Body
  • Exterior (external elements)
  • Interior (internal elements)
  • Doors, windows and locks
  • Electrical equipment
  • Equipment and devices
  • Electrical circuits
Capella 5 (1991-1997) 
  • General information
  • User manual
  • Maintenance
  • Helpful hints
  • Power unit
  • Petrol engines 1.6 and 1.8
  • Petrol engines 2.0
  • 2.5 petrol engines
  • Overhaul engines 1.6 and 1.8
  • Overhaul engines 2.0 and 2.5
  • Diesel engine 2.0
  • Engine electrics
  • Cooling system
  • Air conditioner
  • Carburetor Nikki 30/34
  • Power system (1.6 and 1.8)
  • Power system (2.0 and 2.5)
  • Control system
  • Transmission
  • Mechanical gearbox
  • Automatic gearbox
  • Clutch and axles
  • Chassis
  • Brake system
  • Suspension and wheels
  • Steering
  • Body
  • Exterior (external elements)
  • Interior (internal elements)
  • Doors and windows
  • Electrical equipment
  • Equipment and devices
  • Electrical circuits
Capella 4 (1987-1992) 
  • General information
  • Introduction to manual
  • Vehicle specifications
  • Power unit
  • Engine repair
  • Lubrication system
  • Cooling system
  • Fuel system (carburetor)
  • Fuel injection (FE)
  • Fuel injection (DOHC)
  • Fuel system (diesel)
  • Ignition system
  • Transmission
  • Clutch
  • Gearbox
  • Drive shafts
  • Chassis
  • Front suspension
  • Rear suspension
  • Steering system
  • Brake system
  • Electrical equipment
  • Equipment and devices
  • Electrical circuits
Capella 3 and 4 (1982-1992) 
  • General information
  • User manual
  • Maintenance
  • Power unit
  • Gasoline engine
  • Engine overhaul (gasoline)
  • Diesel engine
  • Cooling and heating
  • Supply system
  • Ignition system
  • Emission reduction
  • Transmission
  • Clutch
  • Mechanical gearbox
  • Automatic gearbox
  • Drive shafts
  • Chassis
  • Brake system
  • Suspension and wheels
  • Steering
  • Body
  • Exterior (external elements)
  • Interior (internal elements)
  • Electrical equipment
  • Equipment and devices
  • Power devices
  • Electrical circuits
Capella 3 (1982-1992, petrol) 
  • General information
  • User manual
  • Maintenance
  • Troubleshooting
  • Late models
  • Power unit
  • Engine in car
  • Engine overhaul
  • Cooling and heating system
  • Fuel and exhaust system
  • Engine electrical system
  • Emission control system
  • Transmission
  • Mechanical gearbox
  • Automatic gearbox
  • Clutch and drive shafts
  • Chassis
  • Brake system
  • Suspension and wheels
  • Steering
  • Body
  • Exterior (external elements)
  • Interior (internal elements)
  • Electrical equipment
  • Equipment and devices
  • Lighting and lamps
  • Electrical circuits
MazBook.ru © 2018–2026 · Mobile version · Articles and news · Sitemap: EN BG BY UA RS HR RO PL SK HU · Feedback · Site search · Add to bookmarks Familia 5 (BF) · Familia 6 (BG) · Capella 3 (GC) · Capella 3 and 4 (GC) · Capella 4 (GD) · Capella 5 (GE) · Capella 6 (GF) · Mazda3 BK · Mazda6 GG · CX-5KE · Mazda 121 (3) · Mazda BT-50 (1) ·
By continuing to use the site, you agree to the use of cookies 🔐