
MazBook.ru
English Русский
Български
Беларускі
Український
Српски
Hrvatski
Română
Polski
Slovenský
Magyar
• Bookmark • Sitemap • Contacts •   
Cars Opel Cars Ford Cars Volkswagen Cars Audi Cars Kia Cars Renault Cars Peugeot


Familia Capella Mazda3 Mazda6 CX-? Others Articles
Capella 3 (1982-1992, petrol) Capella 3 and 4 (1982-1992) Capella 4 (1987-1992) Capella 5 (1991-1997) Capella 6 (1997-2005, petrol)

Brake disc — inspection and replacement (Mazda Capella GC)

  • Home
  • Mazda Capella
  • Capella GC (1982-1992)
  • Chassis
  • Brake system
  • Brake disc — inspection and replacement
0
Raise the vehicle and support it securely on stands.

Remove the wheel.

Remove the brake caliper assembly.

Important! There is no need to remove the caliper from the vehicle, so after removing the caliper mounting bolts, secure it to the suspension strut with twine or wire. Do not hang the caliper on the brake hose as this may cause damage to the hose.


Caution: If a brake disc needs to be replaced, replace both to ensure uniform braking. When replacing brake discs, it is necessary to replace the brake pads as well.


Slowly turn the brake disc and visually inspect its condition on both sides. Brake disc wear from the pads must be within acceptable limits. If there are cracks on the disc, replace the disc.
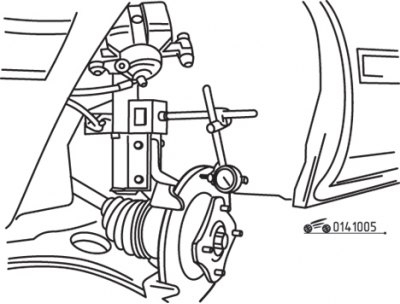
Figure 10.5. Using a dial indicator to measure brake disc runout

Figure 10.5. Using a dial indicator to measure brake disc runout


Use a dial indicator to check the brake disc runout (figure 10.5). Attach the indicator to any convenient location and, by rotating the brake disc, determine its runout at a small distance from the outer edge. Before checking the brake disc runout, make sure the wheel bearing is in good technical condition. If the runout exceeds the maximum allowable and the bearing is in good condition, remove and regrind the brake disc. Some shops can resurface a brake disc without removing it from the vehicle.


Check the brake disc for cracks, especially around the wheel bolt holes, and for wear or mechanical damage; replace if necessary.

Measure the thickness of the brake disc at several points. Since there is a step around the perimeter of the brake disc, when measuring the thickness of the brake disc using a caliper, place two coins under its jaws. To determine the true thickness of the brake disc, subtract the thickness of two coins from the caliper reading.
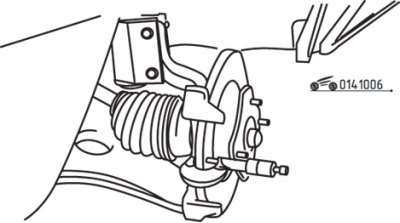
Figure 10.6. Measuring brake disc thickness using a micrometer

Figure 10.6. Measuring brake disc thickness using a micrometer


A more accurate way to measure the thickness of a brake disc is to use a micrometer (figure 10.6).

If the thickness variations of the brake disc exceed 0.127 mm, pulsation may occur during braking. If the brake disc thickness is still sufficient, remove and regrind the brake disc.

Removing the brake disc from the hub requires the use of special tools and techniques, so it is necessary to remove the hub with the brake disc and deliver it to a service station for processing or replacement.
This article is available at: russian, bulgarian, belarusian, ukrainian, serbian, croatian, romanian, polish, slovak, hungarian
This text was checked by: Georgy Afanasyev
Share with friends on social networks:

Previous
Capella 3 and 4 » Brake system
Next

Disc brake caliper repair
Removal and installation disc brake calipers
Replacing disc brake pads
General information about the braking system
Replacing drum brake pads
Wheel brake cylinder for drum brakes
Brake Master Cylinder — removal, repair, and installation
Brake hoses and pipes
Parking brake — removal, inspection and installation
More articles on repairing other Mazda models
Removal and installation the front brake caliper and brake disc Mazda Familia 5 (1985-1989)
Removal and installation the front brake disc Mazda3 BK (2003-2009)
Removal and installation the front brake disc Mazda6 GG (2002-2008)
Brake discs Mazda CX-5KE (2012-2017)
Removal and installation the brake caliper/brake disc Mazda 121 (3) (1996-2003)
Link in different formats to this article
Comments and feedback from visitors
No comments yet


How much will 18 + 21 ?


Capella 6 (1997-2005, petrol) 
  • General information
  • Introduction to guide
  • User manual
  • Troubleshooting
  • Maintenance
  • Power unit
  • 4-cylinder engines
  • 6-cylinder engines
  • Engine overhaul
  • Cooling and ventilation
  • Power and exhaust systems
  • Engine electrics
  • Control system
  • Transmission
  • Mechanical gearbox
  • Automatic gearbox
  • Clutch and drive shafts
  • Chassis
  • Brake system
  • Car suspension
  • Steering
  • Body
  • Exterior (external elements)
  • Interior (internal elements)
  • Doors, windows and locks
  • Electrical equipment
  • Equipment and devices
  • Electrical circuits
Capella 5 (1991-1997) 
  • General information
  • User manual
  • Maintenance
  • Helpful hints
  • Power unit
  • Petrol engines 1.6 and 1.8
  • Petrol engines 2.0
  • 2.5 petrol engines
  • Overhaul engines 1.6 and 1.8
  • Overhaul engines 2.0 and 2.5
  • Diesel engine 2.0
  • Engine electrics
  • Cooling system
  • Air conditioner
  • Carburetor Nikki 30/34
  • Power system (1.6 and 1.8)
  • Power system (2.0 and 2.5)
  • Control system
  • Transmission
  • Mechanical gearbox
  • Automatic gearbox
  • Clutch and axles
  • Chassis
  • Brake system
  • Suspension and wheels
  • Steering
  • Body
  • Exterior (external elements)
  • Interior (internal elements)
  • Doors and windows
  • Electrical equipment
  • Equipment and devices
  • Electrical circuits
Capella 4 (1987-1992) 
  • General information
  • Introduction to manual
  • Vehicle specifications
  • Power unit
  • Engine repair
  • Lubrication system
  • Cooling system
  • Fuel system (carburetor)
  • Fuel injection (FE)
  • Fuel injection (DOHC)
  • Fuel system (diesel)
  • Ignition system
  • Transmission
  • Clutch
  • Gearbox
  • Drive shafts
  • Chassis
  • Front suspension
  • Rear suspension
  • Steering system
  • Brake system
  • Electrical equipment
  • Equipment and devices
  • Electrical circuits
Capella 3 and 4 (1982-1992) 
  • General information
  • User manual
  • Maintenance
  • Power unit
  • Gasoline engine
  • Engine overhaul (gasoline)
  • Diesel engine
  • Cooling and heating
  • Supply system
  • Ignition system
  • Emission reduction
  • Transmission
  • Clutch
  • Mechanical gearbox
  • Automatic gearbox
  • Drive shafts
  • Chassis
  • Brake system
  • Suspension and wheels
  • Steering
  • Body
  • Exterior (external elements)
  • Interior (internal elements)
  • Electrical equipment
  • Equipment and devices
  • Power devices
  • Electrical circuits
Capella 3 (1982-1992, petrol) 
  • General information
  • User manual
  • Maintenance
  • Troubleshooting
  • Late models
  • Power unit
  • Engine in car
  • Engine overhaul
  • Cooling and heating system
  • Fuel and exhaust system
  • Engine electrical system
  • Emission control system
  • Transmission
  • Mechanical gearbox
  • Automatic gearbox
  • Clutch and drive shafts
  • Chassis
  • Brake system
  • Suspension and wheels
  • Steering
  • Body
  • Exterior (external elements)
  • Interior (internal elements)
  • Electrical equipment
  • Equipment and devices
  • Lighting and lamps
  • Electrical circuits
MazBook.ru © 2018–2026 · Mobile version · Articles and news · Sitemap: EN BG BY UA RS HR RO PL SK HU · Feedback · Site search · Add to bookmarks Familia 5 (BF) · Familia 6 (BG) · Capella 3 (GC) · Capella 3 and 4 (GC) · Capella 4 (GD) · Capella 5 (GE) · Capella 6 (GF) · Mazda3 BK · Mazda6 GG · CX-5KE · Mazda 121 (3) · Mazda BT-50 (1) ·
By continuing to use the site, you agree to the use of cookies 🔐