
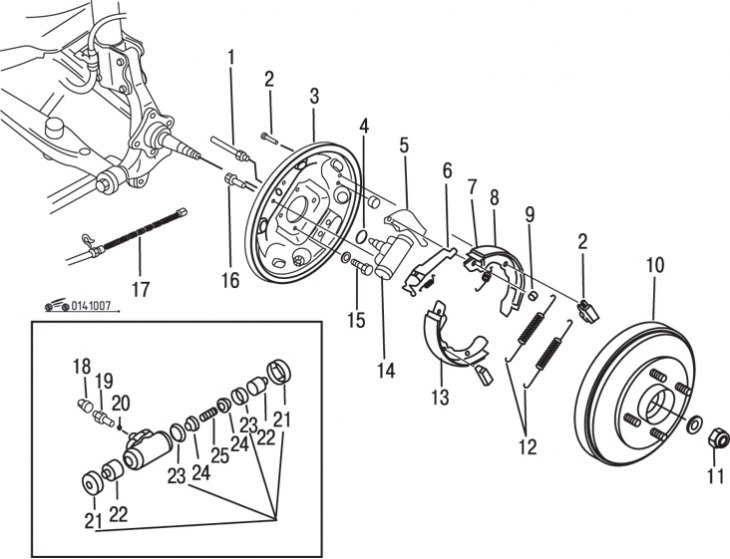
Pic. 10.7. Rear drum brake: 1 – a tube of brake system; 2 - holding pins and springs; 3 – a protective casing of a back brake; 4 - gasket; 5 - adjusting lever; 6 - adjusting bar; 7 - anti-creak springs; 8 - secondary brake shoe; 9 - bracket; 10 – brake drum; 11 - hub nut; 12 - return spring; 13 - primary brake shoe; 14 – working brake cylinder; 15 - bolt; 16 – a bolt of fastening of the working brake cylinder; 17 – parking brake cable; 18 - rubber cap; 19 - air removal fitting; 20 - steel ball; 21 - dust cover; 22 - piston; 23 - piston cuffs; 24 – spring cup; 25 - spring
The elements of the rear drum brake mechanism are shown in fig. 10.7.
Raise the vehicle and secure it on stands.
Remove the wheel.
Attention! Be sure to replace all pads on the same vehicle axle, even if only one is worn.
Attention! Do not confuse the parts of the left and right brake mechanisms, work on each brake mechanism in turn.
Attention! If old brake pads are installed again, they must be marked before removal.
Attention! Every time you work on the brake system, remember that abrasion of the brake pads produces dust containing asbestos, which is harmful to health.
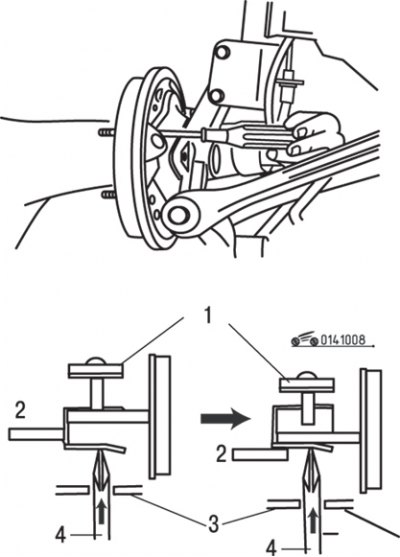
Pic. 10.8. Using a screwdriver to release the springs holding the brake pads: 1 - springs fixing the brake shoes; 2 – control lever; 3 – a protective casing of a back brake; 4 - screwdriver
Remove the brake drum/hub assembly. If the brake drum cannot be easily removed immediately, remove the plug in the rear brake guard, insert a screwdriver through the hole, and press the fixing spring to increase the clearance between the brake shoes and the brake drum, as shown in Fig. 10.8. If this prevents the drum from being removed, loosen the parking brake lever set nut to increase pad travel.
Remove the brake shoe return springs.
Remove fixing springs and pins.
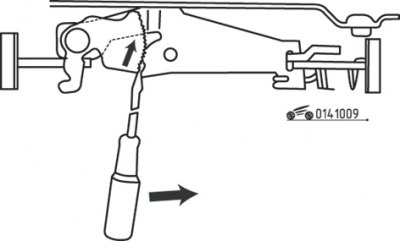
Pic. 10.9. Use of a screwdriver and direction of pressure to release the adjustment bar
Remove the primary brake shoe and adjusting bar. It may be necessary to loosen the adjustment bar with a screwdriver, as shown in fig. 10.9. This will make it easier to remove the primary brake pad.
Remove the secondary brake shoe and disconnect the parking brake cable.
Remove the bracket and disconnect the control lever from the brake shoe.
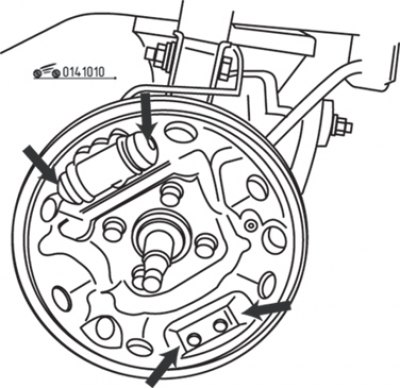
Pic. 10.10. Places for applying grease to the rear brake guard
Lubricate the contact surfaces of the rear brake guard with a thin coat of white lithium based grease at the points shown in fig. 10.10. Be careful not to allow lubricant and other contaminants to get on the friction surfaces.
Install the control lever on the new secondary brake pad.
Install the secondary brake shoe with anti-squeal spring.
Connect the parking brake cable.
Assemble the primary brake shoe and adjusting bar, connect the bar to the anti-squeal spring.
Install the retaining spring.
Install return springs.
Center the brake pad assembly.
Inspect the brake drum for cracks, scratches, deep scratches and blemishes that will show up as discolored areas. If the stains cannot be removed with fine sandpaper, the brake drum must be taken to a workshop for resanding. If the drum cannot be reground without exceeding the maximum drum diameter, replace the drum with a new one.
Install the hub/brake drum assembly and wheel bearings.
Install the wheel, screw in the bolts and tighten them to the required torque, lower the car.
Remove air from the hydraulic drive of the brake system.
Check the operation of the parking brake and adjust if necessary.
Press the brake pedal several times so that the brake pads are installed with a certain clearance in relation to the brake drum, fill the reservoir with brake fluid.
Avoid hard braking as far as possible for the first few hundred kilometers of the vehicle until the new pads are completely worn in.