
MazBook.ru
English Русский
Български
Беларускі
Український
Српски
Hrvatski
Română
Polski
Slovenský
Magyar
• Bookmark • Sitemap • Contacts •   
Cars Opel Cars Ford Cars Volkswagen Cars Audi Cars Kia Cars Renault Cars Peugeot


Familia Capella Mazda3 Mazda6 CX-? Others Articles
Capella 3 (1982-1992, petrol) Capella 3 and 4 (1982-1992) Capella 4 (1987-1992) Capella 5 (1991-1997) Capella 6 (1997-2005, petrol)

Removal the crankshaft (Mazda Capella GC)

  • Home
  • Mazda Capella
  • Capella GC (1982-1992)
  • Power unit
  • Engine overhaul (gasoline)
  • Removal the crankshaft
0
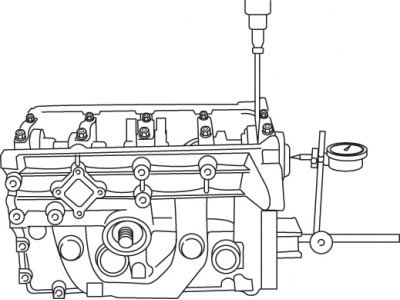
Figure 3.34. Using a dial indicator to measure crankshaft axial play

Figure 3.34. Using a dial indicator to measure crankshaft axial play


Before removing the crankshaft, check its axial play. Install the indicator so that its measuring tip coincides with the axis of the crankshaft and touches the end of the shaft (figure 3.34).

Pull the crankshaft towards the rear of the engine with maximum force and in this position set the indicator scale to zero. Then move the crankshaft forward to the maximum distance and read the indicator readings. Axial play is equal to the distance the shaft has moved. If the axial play exceeds the value given in the technical data, check the wear of the shaft thrust flange surfaces. If the wear is minor, the play should be compensated by installing new main bearings.

Measuring axial play with a feeler gauge without an indicator is not easy, since the thrust half rings of the middle main bearing of the crankshaft are only on the seat side, but not on the cover side. Loosen each of the main bearing cap bolts by 1/4 turn until they can be turned freely by hand. Check the markings on the caps, which should match the cylinder number. Typically the covers are numbered starting from the front of the engine. If there is no marking, apply marks with a punch or stamp. The main bearing caps are cast with arrows pointing towards the front of the engine.


Using light hammer blows through a soft spacer, move the covers out of place and remove them from the cylinder block. If necessary, remove the covers by inserting the mounting bolts into them and using them as levers. Do not allow the main bearing to fall out if it remains in the cover.
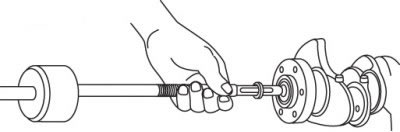
Figure 3.35. Using an impact puller to remove a needle bearing from the end of a crankshaft

Figure 3.35. Using an impact puller to remove a needle bearing from the end of a crankshaft


(Text taken from an online platform: MAZbook.ru)

Carefully remove the crankshaft from the cylinder block. It is recommended to do this with an assistant, as the shaft is quite heavy. Install the main bearing caps together with the bearings onto the cylinder block in the same order and tighten the bolts by hand. On manual transmission models, use an impact puller to remove the pilot needle bearing from the end of the crankshaft (figure 3.35).
This article is available at: russian, bulgarian, belarusian, ukrainian, serbian, croatian, romanian, polish, slovak, hungarian
This text was checked by: Georgy Afanasyev
Share with friends on social networks:

Previous
Capella 3 and 4 » Engine overhaul (gasoline)
Next

Removal pistons and connecting rods
Cylinder head assembly
Valve repair
Cleaning and checking the cylinder head
Disassembling the cylinder head
Cleaning the cylinder block
Checking the technical condition of the cylinder block
Checking the technical condition of the camshaft
Checking the technical condition of pistons and connecting rods
Checking the technical condition of the crankshaft
More articles on repairing other Mazda models
Crankshaft and main bearing — description Mazda3 BK (2003-2009)
Crankshaft and main bearing Mazda6 GG (2002-2008)
Replacing the front crankshaft oil seal Mazda CX-5KE (2012-2017)
Crankshaft Mazda BT-50 (1) (2006-2011)
Link in different formats to this article
Comments and feedback from visitors
No comments yet


How much will 23 + 39 ?


Capella 6 (1997-2005, petrol) 
  • General information
  • Introduction to guide
  • User manual
  • Troubleshooting
  • Maintenance
  • Power unit
  • 4-cylinder engines
  • 6-cylinder engines
  • Engine overhaul
  • Cooling and ventilation
  • Power and exhaust systems
  • Engine electrics
  • Control system
  • Transmission
  • Mechanical gearbox
  • Automatic gearbox
  • Clutch and drive shafts
  • Chassis
  • Brake system
  • Car suspension
  • Steering
  • Body
  • Exterior (external elements)
  • Interior (internal elements)
  • Doors, windows and locks
  • Electrical equipment
  • Equipment and devices
  • Electrical circuits
Capella 5 (1991-1997) 
  • General information
  • User manual
  • Maintenance
  • Helpful hints
  • Power unit
  • Petrol engines 1.6 and 1.8
  • Petrol engines 2.0
  • 2.5 petrol engines
  • Overhaul engines 1.6 and 1.8
  • Overhaul engines 2.0 and 2.5
  • Diesel engine 2.0
  • Engine electrics
  • Cooling system
  • Air conditioner
  • Carburetor Nikki 30/34
  • Power system (1.6 and 1.8)
  • Power system (2.0 and 2.5)
  • Control system
  • Transmission
  • Mechanical gearbox
  • Automatic gearbox
  • Clutch and axles
  • Chassis
  • Brake system
  • Suspension and wheels
  • Steering
  • Body
  • Exterior (external elements)
  • Interior (internal elements)
  • Doors and windows
  • Electrical equipment
  • Equipment and devices
  • Electrical circuits
Capella 4 (1987-1992) 
  • General information
  • Introduction to manual
  • Vehicle specifications
  • Power unit
  • Engine repair
  • Lubrication system
  • Cooling system
  • Fuel system (carburetor)
  • Fuel injection (FE)
  • Fuel injection (DOHC)
  • Fuel system (diesel)
  • Ignition system
  • Transmission
  • Clutch
  • Gearbox
  • Drive shafts
  • Chassis
  • Front suspension
  • Rear suspension
  • Steering system
  • Brake system
  • Electrical equipment
  • Equipment and devices
  • Electrical circuits
Capella 3 and 4 (1982-1992) 
  • General information
  • User manual
  • Maintenance
  • Power unit
  • Gasoline engine
  • Engine overhaul (gasoline)
  • Diesel engine
  • Cooling and heating
  • Supply system
  • Ignition system
  • Emission reduction
  • Transmission
  • Clutch
  • Mechanical gearbox
  • Automatic gearbox
  • Drive shafts
  • Chassis
  • Brake system
  • Suspension and wheels
  • Steering
  • Body
  • Exterior (external elements)
  • Interior (internal elements)
  • Electrical equipment
  • Equipment and devices
  • Power devices
  • Electrical circuits
Capella 3 (1982-1992, petrol) 
  • General information
  • User manual
  • Maintenance
  • Troubleshooting
  • Late models
  • Power unit
  • Engine in car
  • Engine overhaul
  • Cooling and heating system
  • Fuel and exhaust system
  • Engine electrical system
  • Emission control system
  • Transmission
  • Mechanical gearbox
  • Automatic gearbox
  • Clutch and drive shafts
  • Chassis
  • Brake system
  • Suspension and wheels
  • Steering
  • Body
  • Exterior (external elements)
  • Interior (internal elements)
  • Electrical equipment
  • Equipment and devices
  • Lighting and lamps
  • Electrical circuits
MazBook.ru © 2018–2026 · Mobile version · Articles and news · Sitemap: EN BG BY UA RS HR RO PL SK HU · Feedback · Site search · Add to bookmarks Familia 5 (BF) · Familia 6 (BG) · Capella 3 (GC) · Capella 3 and 4 (GC) · Capella 4 (GD) · Capella 5 (GE) · Capella 6 (GF) · Mazda3 BK · Mazda6 GG · CX-5KE · Mazda 121 (3) · Mazda BT-50 (1) ·
By continuing to use the site, you agree to the use of cookies 🔐