
MazBook.ru
English Русский
Български
Беларускі
Український
Српски
Hrvatski
Română
Polski
Slovenský
Magyar
• Bookmark • Sitemap • Contacts •   
Cars Opel Cars Ford Cars Volkswagen Cars Audi Cars Kia Cars Renault Cars Peugeot


Familia Capella Mazda3 Mazda6 CX-? Others Articles
Capella 3 (1982-1992, petrol) Capella 3 and 4 (1982-1992) Capella 4 (1987-1992) Capella 5 (1991-1997) Capella 6 (1997-2005, petrol)

Checking the technical condition of the cylinder block (Mazda Capella GC)

  • Home
  • Mazda Capella
  • Capella GC (1982-1992)
  • Power unit
  • Engine overhaul (gasoline)
  • Checking the technical condition of the cylinder block
0
Clean the cylinder block thoroughly and double check that the ridges on the top edges of the cylinders are completely removed.

Visually check the block for cracks and signs of corrosion. Repair stripped threads in holes. It is recommended to check the tightness of the cylinder block in auto repair shops that have the appropriate equipment. If any defects are found, repair the unit or replace it.

Check for scratches and burrs on the inner surfaces of the cylinders.
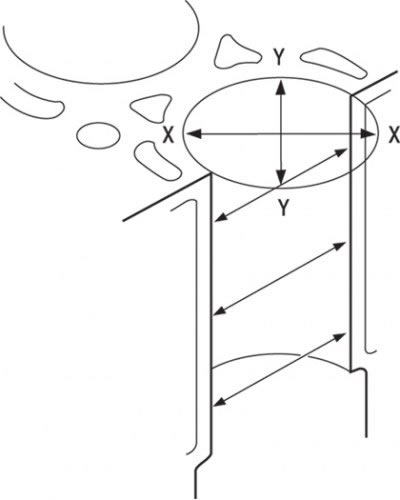
Figure 3.36. Places for measuring the inner diameter of the cylinder: directly under the flange (X…

Figure 3.36. Places for measuring the inner diameter of the cylinder: directly under the flange (X and Y), in the center and at the bottom


Measure the inside diameter of the cylinder at the top (right under the flange), middle and lower parts parallel to the crankshaft axis (figure 3.36). Then take measurements at the same levels, but in a direction perpendicular to the crankshaft axis. Compare the measurement results with the values in the technical data. If there are severe burrs and scratches on the cylinder surfaces, or the ovality and taper of the cylinders exceed the established maximum permissible values, take the block to an auto repair shop for boring and honing. After repair, pistons and rings of repair sizes will be needed.


If the condition of the cylinders is acceptable, the wear of the cylinder and the clearance between the cylinder and the piston do not exceed the established standards, then boring is not required. The only operation that remains necessary is honing.

(Information copied from the portal: «www.MazBook.ru»)

Before honing, install the crankshaft main bearing caps (without bearings) and tighten the bolts to the required torque.
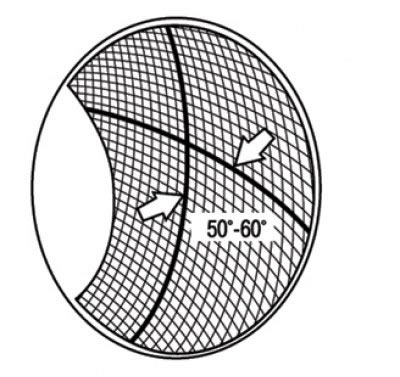
Figure 3.37. The cylinder surface after honing should be covered with a grid of thin lines…

Figure 3.37. The cylinder surface after honing should be covered with a grid of thin lines intersecting at an angle of about 60°


Honing requires a special device with fine grinding heads, a large amount of oil, a rag and an electric drill. Clamp the fixture into the drill, secure the grinding heads and insert the fixture into the first cylinder. Lubricate the cylinder surface well with oil, turn on the electric drill and periodically move it up and down in the cylinder. A network of thin lines intersecting at an angle of about 60° should form on the surface of the cylinder walls (figure 3.37).

Keep the cylinder surface generously lubricated at all times. Do not remove the device while rotating. After turning off the drill, continue moving it up and down until it comes to a complete stop, then squeeze the legs of the attachment with the grinding heads and remove it from the cylinder. Remove oil from the cylinder surface and repeat the operation on the remaining cylinders. If the device is not available, this operation can be performed at a car repair shop for a reasonable fee. Satisfactory results are obtained using an emery wheel attached to an electric drill or even by performing the operation manually with sandpaper.


After honing, chamfer the top edges of the cylinder bore with a small file to prevent the rings from binding when installing the piston.

The entire cylinder block must be re-rinsed with warm water and detergent to remove any remaining abrasive material from honing. Clean all channels with a brush and rinse with running water. After washing, dry the cylinder block and lubricate all treated surfaces with spindle oil. Before assembly, store the unit under a plastic cover.
This article is available at: russian, bulgarian, belarusian, ukrainian, serbian, croatian, romanian, polish, slovak, hungarian
This text was checked by: Georgy Afanasyev
Share with friends on social networks:

Previous
Capella 3 and 4 » Engine overhaul (gasoline)
Next

Cleaning the cylinder block
Removal the crankshaft
Removal pistons and connecting rods
Cylinder head assembly
Valve repair
Checking the technical condition of the camshaft
Checking the technical condition of pistons and connecting rods
Checking the technical condition of the crankshaft
Checking main and connecting rod bearings
Installing piston rings
More articles on repairing other Mazda models
Technical characteristics of the cylinder block Mazda Familia 5 (1985-1989)
Checking the cylinder block Mazda3 BK (2003-2009)
Checking the cylinder block Mazda6 GG (2002-2008)
Checking the cylinder block Mazda CX-5KE (2012-2017)
Cylinder Block — Checking, Cleaning and Repairing Mazda BT-50 (1) (2006-2011)
Link in different formats to this article
Comments and feedback from visitors
No comments yet


How much will 23 + 38 ?


Capella 6 (1997-2005, petrol) 
  • General information
  • Introduction to guide
  • User manual
  • Troubleshooting
  • Maintenance
  • Power unit
  • 4-cylinder engines
  • 6-cylinder engines
  • Engine overhaul
  • Cooling and ventilation
  • Power and exhaust systems
  • Engine electrics
  • Control system
  • Transmission
  • Mechanical gearbox
  • Automatic gearbox
  • Clutch and drive shafts
  • Chassis
  • Brake system
  • Car suspension
  • Steering
  • Body
  • Exterior (external elements)
  • Interior (internal elements)
  • Doors, windows and locks
  • Electrical equipment
  • Equipment and devices
  • Electrical circuits
Capella 5 (1991-1997) 
  • General information
  • User manual
  • Maintenance
  • Helpful hints
  • Power unit
  • Petrol engines 1.6 and 1.8
  • Petrol engines 2.0
  • 2.5 petrol engines
  • Overhaul engines 1.6 and 1.8
  • Overhaul engines 2.0 and 2.5
  • Diesel engine 2.0
  • Engine electrics
  • Cooling system
  • Air conditioner
  • Carburetor Nikki 30/34
  • Power system (1.6 and 1.8)
  • Power system (2.0 and 2.5)
  • Control system
  • Transmission
  • Mechanical gearbox
  • Automatic gearbox
  • Clutch and axles
  • Chassis
  • Brake system
  • Suspension and wheels
  • Steering
  • Body
  • Exterior (external elements)
  • Interior (internal elements)
  • Doors and windows
  • Electrical equipment
  • Equipment and devices
  • Electrical circuits
Capella 4 (1987-1992) 
  • General information
  • Introduction to manual
  • Vehicle specifications
  • Power unit
  • Engine repair
  • Lubrication system
  • Cooling system
  • Fuel system (carburetor)
  • Fuel injection (FE)
  • Fuel injection (DOHC)
  • Fuel system (diesel)
  • Ignition system
  • Transmission
  • Clutch
  • Gearbox
  • Drive shafts
  • Chassis
  • Front suspension
  • Rear suspension
  • Steering system
  • Brake system
  • Electrical equipment
  • Equipment and devices
  • Electrical circuits
Capella 3 and 4 (1982-1992) 
  • General information
  • User manual
  • Maintenance
  • Power unit
  • Gasoline engine
  • Engine overhaul (gasoline)
  • Diesel engine
  • Cooling and heating
  • Supply system
  • Ignition system
  • Emission reduction
  • Transmission
  • Clutch
  • Mechanical gearbox
  • Automatic gearbox
  • Drive shafts
  • Chassis
  • Brake system
  • Suspension and wheels
  • Steering
  • Body
  • Exterior (external elements)
  • Interior (internal elements)
  • Electrical equipment
  • Equipment and devices
  • Power devices
  • Electrical circuits
Capella 3 (1982-1992, petrol) 
  • General information
  • User manual
  • Maintenance
  • Troubleshooting
  • Late models
  • Power unit
  • Engine in car
  • Engine overhaul
  • Cooling and heating system
  • Fuel and exhaust system
  • Engine electrical system
  • Emission control system
  • Transmission
  • Mechanical gearbox
  • Automatic gearbox
  • Clutch and drive shafts
  • Chassis
  • Brake system
  • Suspension and wheels
  • Steering
  • Body
  • Exterior (external elements)
  • Interior (internal elements)
  • Electrical equipment
  • Equipment and devices
  • Lighting and lamps
  • Electrical circuits
MazBook.ru © 2018–2026 · Mobile version · Articles and news · Sitemap: EN BG BY UA RS HR RO PL SK HU · Feedback · Site search · Add to bookmarks Familia 5 (BF) · Familia 6 (BG) · Capella 3 (GC) · Capella 3 and 4 (GC) · Capella 4 (GD) · Capella 5 (GE) · Capella 6 (GF) · Mazda3 BK · Mazda6 GG · CX-5KE · Mazda 121 (3) · Mazda BT-50 (1) ·
By continuing to use the site, you agree to the use of cookies 🔐