


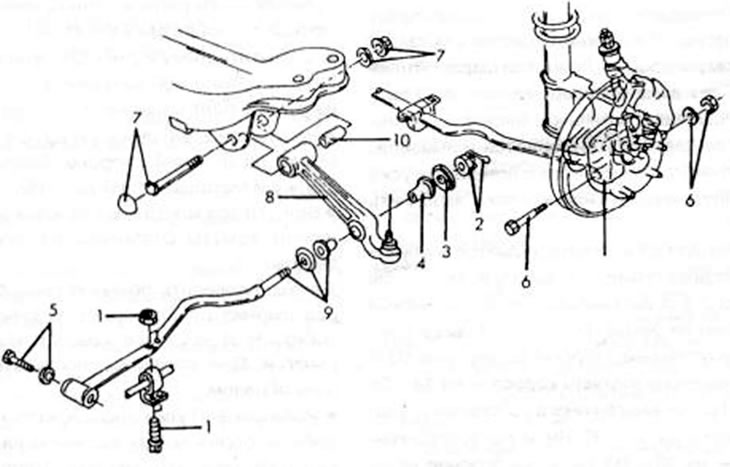
Figure 204. Individual parts of the rear wheel suspension with four-wheel steering installed: 1. Bolts and nuts; 2. Nut and cotter pin, 89-103 Nm; 3. Metal disk; 4. Cutter sleeve; 5. Bolt, 63-93 Nm; 6. Bolt and nut, 43-54 Nm; 7. Bolt and nut, 95-120 Nm; 8. Lower suspension arm; 9. Trailing arm; 10. Bushing
Loosen the wheel nuts and place the rear of the car on jack stands. Unscrew the rear wheel from the corresponding side.
Release the bolt (4) and levers from the trailing arm rod.
Pull the cotter pin out of the nut (2) and unscrew the nut from the end of the trailing arm rod. Remove the metal disk (3) and use a screwdriver to push out the rubber bushing (4).
Remove the bolt (5) from the front mounting of the trailing arm rod and pull out the rod (9). Remove the second rubber bushing and metal disk from the end of the rod.
Remove the clamp bolts and nuts on the underside of the shock absorber strut and use a tire iron to push down on the control arm until the studs disengage from the wheel hub support. If necessary, insert a screwdriver into the slot of the clamp.
(The article is copied from the website: «MAZbook.ru»)
Loosen the nuts and bolts (7) on the inside of the wishbone bearings and lift the wishbone upwards.
Check all removed parts. If the control arm bushings are knocked out, they can be replaced by pressing them out and then pressing them back in. Before pressing in, wet new bushings with a soapy alkaline solution. A broken ball joint requires replacement of the control arm. The rubber cap on the hinge, however, needs to be replaced. It can be chipped off with a chisel and pressed on with a piece of pipe. Fill the inside of the cap with grease.
Installation of parts is carried out in reverse order. Tighten the fasteners after the vehicle is on the ground with its wheels. Tighten the inner wishbone to 93-120 Nm and the wheel hub support to 44-55 Nm. Tighten the trailing arm rod on the body side to 65-95 Nm and the wishbone to 90-103 Nm. Finally, insert a new cotter pin into the split nut.