
MazBook.ru
English Русский
Български
Беларускі
Український
Српски
Hrvatski
Română
Polski
Slovenský
Magyar
• Bookmark • Sitemap • Contacts •   
Cars Opel Cars Ford Cars Volkswagen Cars Audi Cars Kia Cars Renault Cars Peugeot


Familia Capella Mazda3 Mazda6 CX-? Others Articles
Capella 3 (1982-1992, petrol) Capella 3 and 4 (1982-1992) Capella 4 (1987-1992) Capella 5 (1991-1997) Capella 6 (1997-2005, petrol)

Rear wheel geometry (Mazda Capella GD)

  • Home
  • Mazda Capella
  • Capella GD (1987-1992)
  • Chassis
  • Rear suspension
  • Rear wheel geometry
0
The rear wheel camber is set at the factory and cannot be adjusted. The rear wheel toe-in should be measured if the wishbone has been removed or, in the case of a four-wheel steering system, work has been performed on the steering.

The toe-in during normal driving is set using an adjustable wishbone. With four-wheel steering installed, conventional tie rods are used, as they are installed on the front axle.

Measure the toe-in as described when setting the toe-in chapter 14.5.2. If the toe-in is not 0 mm with a tolerance of plus or minus 3.0 mm when driving two wheels, or 3 mm with a tolerance of 3 mm, the following adjustment must be made.

When driving on two wheels:


  • Place the rear of the vehicle on jack stands and loosen both lock nuts of the adjustable wishbone.
  • Place the wrench in the middle and turn the right strut to the left and the left strut to the right to increase the toe-in, or vice versa to decrease the toe-in (see figure 206). Both the left and right control arms should always be adjusted by the same amount. One turn of the intermediate element (on both sides) changes the toe-in by approx. 11.6 mm.
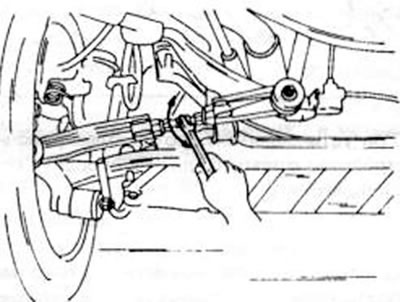

Figure 206. Adjusting the intermediate element of the transverse suspension arm for installation.…

Figure 206. Adjusting the intermediate element of the transverse suspension arm for installation. Rear wheel alignment.


  • After adjustment, tighten the lock nuts to 56-82 Nm
  • At the same time, hold the intermediate element as shown in the figure 207.
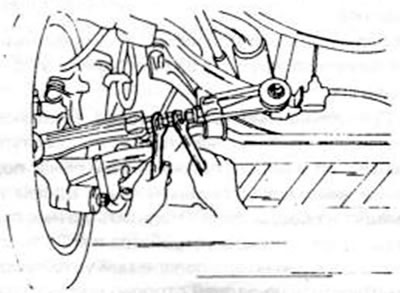
Figure 207. Locking the nuts of the transverse suspension arm. Hold the spacer while tightening the…

Figure 207. Locking the nuts of the transverse suspension arm. Hold the spacer while tightening the nuts


When steering four wheels:


The toe-in adjustment is carried out in the same way as described in chapter 14.5.2. for front tie rods. To increase the toe-in, turn the right tie rod forward and the left tie rod back, but move both rods by the same amount. One turn of the tie rod (on both sides) changes the toe-in by approx. 7.8 mm. After adjustment, tighten the nuts to 70-100 Nm, as shown in the figure 208.
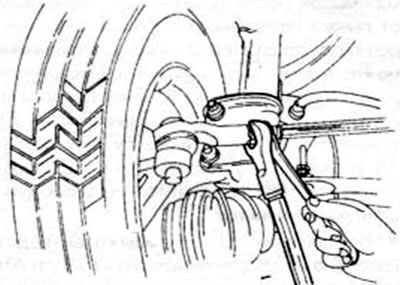
Figure 208. Locking the nut of the transverse steering rod on the rear wheel control.

Figure 208. Locking the nut of the transverse steering rod on the rear wheel control.


Data provided by the website: MAZBOOK
This article is available at: russian, bulgarian, belarusian, ukrainian, serbian, croatian, romanian, polish, slovak, hungarian
This text was checked by: Georgy Afanasyev
Share with friends on social networks:

Previous
Capella 4 » Rear suspension
Next

Removal and installation the rear carrier shaft
Anti-roll bar
Suspension arms and trailing arm rod
Rear wishbones and connecting rods
Rear shock absorbers and struts
Brake system — design features
Front wheel brakes
More articles on repairing other Mazda models
Checking and adjusting the rear wheel alignment angles Mazda Familia 5 (1985-1989)
Rear Wheel Hub Components Mazda3 BK (2003-2009)
Folding the rear seat on all-wheel drive station wagons Mazda6 GG (2002-2008)
Removal and installation the rear wheel hub assembly Mazda CX-5KE (2012-2017)
Rear Wheel Speed Sensors — Removal and Installation Mazda BT-50 (1) (2006-2011)
Link in different formats to this article
Comments and feedback from visitors
No comments yet


How much will 25 + 41 ?


Capella 6 (1997-2005, petrol) 
  • General information
  • Introduction to guide
  • User manual
  • Troubleshooting
  • Maintenance
  • Power unit
  • 4-cylinder engines
  • 6-cylinder engines
  • Engine overhaul
  • Cooling and ventilation
  • Power and exhaust systems
  • Engine electrics
  • Control system
  • Transmission
  • Mechanical gearbox
  • Automatic gearbox
  • Clutch and drive shafts
  • Chassis
  • Brake system
  • Car suspension
  • Steering
  • Body
  • Exterior (external elements)
  • Interior (internal elements)
  • Doors, windows and locks
  • Electrical equipment
  • Equipment and devices
  • Electrical circuits
Capella 5 (1991-1997) 
  • General information
  • User manual
  • Maintenance
  • Helpful hints
  • Power unit
  • Petrol engines 1.6 and 1.8
  • Petrol engines 2.0
  • 2.5 petrol engines
  • Overhaul engines 1.6 and 1.8
  • Overhaul engines 2.0 and 2.5
  • Diesel engine 2.0
  • Engine electrics
  • Cooling system
  • Air conditioner
  • Carburetor Nikki 30/34
  • Power system (1.6 and 1.8)
  • Power system (2.0 and 2.5)
  • Control system
  • Transmission
  • Mechanical gearbox
  • Automatic gearbox
  • Clutch and axles
  • Chassis
  • Brake system
  • Suspension and wheels
  • Steering
  • Body
  • Exterior (external elements)
  • Interior (internal elements)
  • Doors and windows
  • Electrical equipment
  • Equipment and devices
  • Electrical circuits
Capella 4 (1987-1992) 
  • General information
  • Introduction to manual
  • Vehicle specifications
  • Power unit
  • Engine repair
  • Lubrication system
  • Cooling system
  • Fuel system (carburetor)
  • Fuel injection (FE)
  • Fuel injection (DOHC)
  • Fuel system (diesel)
  • Ignition system
  • Transmission
  • Clutch
  • Gearbox
  • Drive shafts
  • Chassis
  • Front suspension
  • Rear suspension
  • Steering system
  • Brake system
  • Electrical equipment
  • Equipment and devices
  • Electrical circuits
Capella 3 and 4 (1982-1992) 
  • General information
  • User manual
  • Maintenance
  • Power unit
  • Gasoline engine
  • Engine overhaul (gasoline)
  • Diesel engine
  • Cooling and heating
  • Supply system
  • Ignition system
  • Emission reduction
  • Transmission
  • Clutch
  • Mechanical gearbox
  • Automatic gearbox
  • Drive shafts
  • Chassis
  • Brake system
  • Suspension and wheels
  • Steering
  • Body
  • Exterior (external elements)
  • Interior (internal elements)
  • Electrical equipment
  • Equipment and devices
  • Power devices
  • Electrical circuits
Capella 3 (1982-1992, petrol) 
  • General information
  • User manual
  • Maintenance
  • Troubleshooting
  • Late models
  • Power unit
  • Engine in car
  • Engine overhaul
  • Cooling and heating system
  • Fuel and exhaust system
  • Engine electrical system
  • Emission control system
  • Transmission
  • Mechanical gearbox
  • Automatic gearbox
  • Clutch and drive shafts
  • Chassis
  • Brake system
  • Suspension and wheels
  • Steering
  • Body
  • Exterior (external elements)
  • Interior (internal elements)
  • Electrical equipment
  • Equipment and devices
  • Lighting and lamps
  • Electrical circuits
MazBook.ru © 2018–2026 · Mobile version · Articles and news · Sitemap: EN BG BY UA RS HR RO PL SK HU · Feedback · Site search · Add to bookmarks Familia 5 (BF) · Familia 6 (BG) · Capella 3 (GC) · Capella 3 and 4 (GC) · Capella 4 (GD) · Capella 5 (GE) · Capella 6 (GF) · Mazda3 BK · Mazda6 GG · CX-5KE · Mazda 121 (3) · Mazda BT-50 (1) ·
By continuing to use the site, you agree to the use of cookies 🔐