
MazBook.ru
English Русский
Български
Беларускі
Український
Српски
Hrvatski
Română
Polski
Slovenský
Magyar
• Bookmark • Sitemap • Contacts •   
Cars Opel Cars Ford Cars Volkswagen Cars Audi Cars Kia Cars Renault Cars Peugeot


Familia Capella Mazda3 Mazda6 CX-? Others Articles
Capella 3 (1982-1992, petrol) Capella 3 and 4 (1982-1992) Capella 4 (1987-1992) Capella 5 (1991-1997) Capella 6 (1997-2005, petrol)

Rear wheel hubs and wheel bearings (Mazda Capella GD)

  • Home
  • Mazda Capella
  • Capella GD (1987-1992)
  • Chassis
  • Rear suspension
  • Rear wheel hubs and wheel bearings
0
Contents: 15.1.1. Removing the brake drum and…⇓ 15.1.2. Removing the wheel bearing ⇓ 15.1.3. Bearing installation and…⇓

15.1.1. Removing the brake drum and wheel hub


To check the rear wheel bearing for wear or damage, you need to place the rear of the car on jack stands, grab the wheel with your hands on both sides and move it back and forth, similar to how it was indicated on figure 184 for the front wheel. Excessive clearance indicates bearing damage. For another check, you need to quickly turn the wheel several times and pay attention to suspicious noises.

Too much clearance on the first check could indicate a poorly installed wheel bearing. In this case, the bearing is installed as described in Chapter 15.1.3. Otherwise, the wheel bearing must be replaced as described below, paying attention to the difference between drum and disc brakes:
  • Loosen the wheel nuts.
  • Carefully separate the wheel cap from the hub using a screwdriver or small chisel. To do this, you need to turn the drum or brake disc to knock out the cap evenly around the circumference. Wipe off excess grease from the wheel nuts.
  • Remove the notch from the spike nut and loosen the nut.
  • Place the rear of the car on jack stands and remove the wheel.
  • Completely unscrew the hub nuts.
  • With the disc brake installed, remove the wheel brake caliper and secure it to the rear wheel suspension with a piece of wire.
  • Remove the brake drum or disc with the hub from the drive shaft as shown in the figure 199. If the brake drum must sit very rigidly, the distance between the drum and the brake friction linings can be increased as described in Chapter "Brakes".
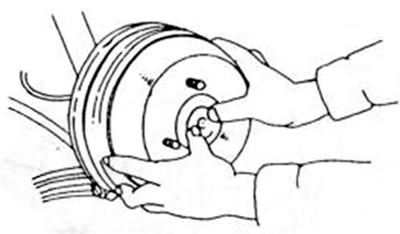
Figure 199. Removing the brake drum

Figure 199. Removing the brake drum


15.1.2. Removing the wheel bearing


If it is definitely required, the wheel bearing should only be replaced:
  • Using a punched screwdriver, press out the oil seal ring from the back of the brake drum or hub. If an anti-lock braking system is installed, a gear wheel is found on the inside. It serves as a sensor for wheel speed. This gear needs to be removed using a puller.
  • Using inward facing snap ring pliers, remove the ring from the inside of the brake drum or disc.
  • Place the brake drum or disc with the hub on a work bench and knock out the bearing.
  • Clean all parts thoroughly. Wash the bearing with gasoline and dry it with compressed air without rotating it. Replace the bearing if it shows signs of wear, rust or discoloration. If the carrier shaft is worn in, this means that the inner ring has been rotating with it. In this case, the carrier shaft must be replaced. Light scratches can be removed by using a lubricating gel by dipping the shaft in oil.

15.1.3. Bearing installation and adjustment


When assembling the wheel hub, you need to do the following:
  • Place the brake drum or disc on the workbench and press the wheel bearing in with the appropriate mandrel. With the ABS installed, press the ring gear through the belt on the inside of the brake drum.
  • Insert the snap ring into the groove of the drum or disc.
  • Lubricate the new sealing ring on the chamfers with grease and use a mandrel to drive the ring into the rear side of the brake drum or disc until the surface of the ring is sheared off. Wipe off all squeezed out grease thoroughly.
  • Check the brake friction linings for cleanliness and place the brake drum on the carrier shaft and pads, or insert the brake disc with the hub.
  • Screw in the new hub nut and tighten to a torque of 98-177 Nm.
  • A pointer indicator, similar to the one shown in figure 189 for the rear wheel hub, install it on the rear wheel hub and move the brake drum or disc back and forth. The dial indicator should show no more than 0.20 mm. Then, make a notch on the nut.
  • Partially fill the wheel cap with grease and press it onto the brake drum.
  • All further work should be carried out in reverse order. Adjust the brake pads if they have been replaced.
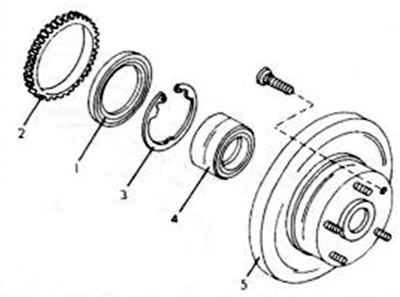
Figure 200. Rear wheel bearing with disc brake installed. The drum brake has the same bearing…

Figure 200. Rear wheel bearing with disc brake installed. The drum brake has the same bearing arrangement. 1. Oil seal ring; 2. Crown gear (installation of anti-lock braking system); 3. Snap ring; 4 Rear wheel bearing; 5. Brake disc
This article is available at: russian, bulgarian, belarusian, ukrainian, serbian, croatian, romanian, polish, slovak, hungarian
This text was checked by: Georgy Afanasyev
Share with friends on social networks:

Previous
Capella 4 » Rear suspension
Next

Rear wheel suspension
Rear shock absorbers and struts
Rear wishbones and connecting rods
Suspension arms and trailing arm rod
Anti-roll bar
Removal and installation the rear carrier shaft
More articles on repairing other Mazda models
Checking and adjusting the rear wheel alignment angles Mazda Familia 5 (1985-1989)
Rear Wheel Hub Components Mazda3 BK (2003-2009)
Folding the rear seat on all-wheel drive station wagons Mazda6 GG (2002-2008)
Removal and installation the rear wheel hub assembly Mazda CX-5KE (2012-2017)
Wheel bearings — design description Mazda 121 (3) (1996-2003)
Link in different formats to this article
Comments and feedback from visitors
No comments yet


How much will 18 + 31 ?


Capella 6 (1997-2005, petrol) 
  • General information
  • Introduction to guide
  • User manual
  • Troubleshooting
  • Maintenance
  • Power unit
  • 4-cylinder engines
  • 6-cylinder engines
  • Engine overhaul
  • Cooling and ventilation
  • Power and exhaust systems
  • Engine electrics
  • Control system
  • Transmission
  • Mechanical gearbox
  • Automatic gearbox
  • Clutch and drive shafts
  • Chassis
  • Brake system
  • Car suspension
  • Steering
  • Body
  • Exterior (external elements)
  • Interior (internal elements)
  • Doors, windows and locks
  • Electrical equipment
  • Equipment and devices
  • Electrical circuits
Capella 5 (1991-1997) 
  • General information
  • User manual
  • Maintenance
  • Helpful hints
  • Power unit
  • Petrol engines 1.6 and 1.8
  • Petrol engines 2.0
  • 2.5 petrol engines
  • Overhaul engines 1.6 and 1.8
  • Overhaul engines 2.0 and 2.5
  • Diesel engine 2.0
  • Engine electrics
  • Cooling system
  • Air conditioner
  • Carburetor Nikki 30/34
  • Power system (1.6 and 1.8)
  • Power system (2.0 and 2.5)
  • Control system
  • Transmission
  • Mechanical gearbox
  • Automatic gearbox
  • Clutch and axles
  • Chassis
  • Brake system
  • Suspension and wheels
  • Steering
  • Body
  • Exterior (external elements)
  • Interior (internal elements)
  • Doors and windows
  • Electrical equipment
  • Equipment and devices
  • Electrical circuits
Capella 4 (1987-1992) 
  • General information
  • Introduction to manual
  • Vehicle specifications
  • Power unit
  • Engine repair
  • Lubrication system
  • Cooling system
  • Fuel system (carburetor)
  • Fuel injection (FE)
  • Fuel injection (DOHC)
  • Fuel system (diesel)
  • Ignition system
  • Transmission
  • Clutch
  • Gearbox
  • Drive shafts
  • Chassis
  • Front suspension
  • Rear suspension
  • Steering system
  • Brake system
  • Electrical equipment
  • Equipment and devices
  • Electrical circuits
Capella 3 and 4 (1982-1992) 
  • General information
  • User manual
  • Maintenance
  • Power unit
  • Gasoline engine
  • Engine overhaul (gasoline)
  • Diesel engine
  • Cooling and heating
  • Supply system
  • Ignition system
  • Emission reduction
  • Transmission
  • Clutch
  • Mechanical gearbox
  • Automatic gearbox
  • Drive shafts
  • Chassis
  • Brake system
  • Suspension and wheels
  • Steering
  • Body
  • Exterior (external elements)
  • Interior (internal elements)
  • Electrical equipment
  • Equipment and devices
  • Power devices
  • Electrical circuits
Capella 3 (1982-1992, petrol) 
  • General information
  • User manual
  • Maintenance
  • Troubleshooting
  • Late models
  • Power unit
  • Engine in car
  • Engine overhaul
  • Cooling and heating system
  • Fuel and exhaust system
  • Engine electrical system
  • Emission control system
  • Transmission
  • Mechanical gearbox
  • Automatic gearbox
  • Clutch and drive shafts
  • Chassis
  • Brake system
  • Suspension and wheels
  • Steering
  • Body
  • Exterior (external elements)
  • Interior (internal elements)
  • Electrical equipment
  • Equipment and devices
  • Lighting and lamps
  • Electrical circuits
MazBook.ru © 2018–2026 · Mobile version · Articles and news · Sitemap: EN BG BY UA RS HR RO PL SK HU · Feedback · Site search · Add to bookmarks Familia 5 (BF) · Familia 6 (BG) · Capella 3 (GC) · Capella 3 and 4 (GC) · Capella 4 (GD) · Capella 5 (GE) · Capella 6 (GF) · Mazda3 BK · Mazda6 GG · CX-5KE · Mazda 121 (3) · Mazda BT-50 (1) ·
By continuing to use the site, you agree to the use of cookies 🔐