
MazBook.ru
English Русский
Български
Беларускі
Український
Српски
Hrvatski
Română
Polski
Slovenský
Magyar
• Bookmark • Sitemap • Contacts •   
Cars Opel Cars Ford Cars Volkswagen Cars Audi Cars Kia Cars Renault Cars Peugeot


Familia Capella Mazda3 Mazda6 CX-? Others Articles
Capella 3 (1982-1992, petrol) Capella 3 and 4 (1982-1992) Capella 4 (1987-1992) Capella 5 (1991-1997) Capella 6 (1997-2005, petrol)

Setting the injection time (Mazda Capella GD)

  • Home
  • Mazda Capella
  • Capella GD (1987-1992)
  • Power unit
  • Fuel system (diesel)
  • Setting the injection time
0
The injection time must be set when installing the pump, if the console was unscrewed from the pump, and also if it is determined that something is wrong with the injection. This requires a certain amount of special tools. Work cannot be carried out if it is not possible to acquire these tools. To install the pump, you need to understand the following description.
  • Check that the drive belt tension is correct. You can read about this in the chapter on installing the cylinder head.
  • Disconnect the wire from the battery terminals
  • Insert a screwdriver as shown in Figure 150 and move the device to facilitate starting a cold engine.
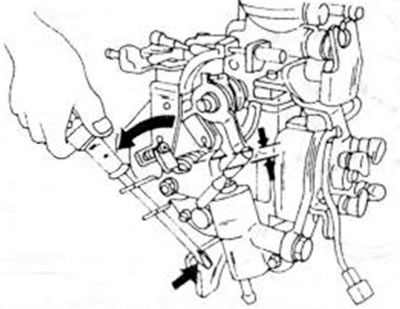
Figure 150. Moving the device to facilitate starting a cold engine

Figure 150. Moving the device to facilitate starting a cold engine

  • Unscrew the clutch housing cover and turn the engine until the OT mark on the flywheel is aligned with the pointer.
  • Disconnect the fuel lines from the high pressure pump (see figure 149).
  • For further installation, a pointer indicator with a guide is required (figure 151). It is inserted into the hole on the back of the pump after the plug has been removed from the pump cover.
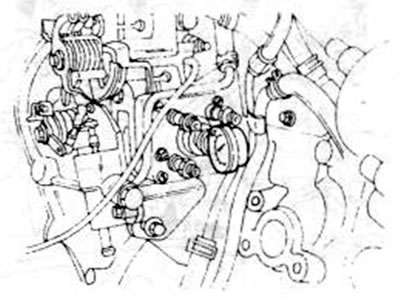
Figure 151. Pointer indicator for injection control, mounted on the rear side of the pump

Figure 151. Pointer indicator for injection control, mounted on the rear side of the pump


  • Screw the guide with the arrow indicator into the hole in the plug and set the indicator to a pre-tension of approx. 2.0 mm. Screw the crankshaft with a dial indicator into the plug hole and set the indicator to a pre-tension of approx. 2.0 mm. Now slowly turn the crankshaft to the left (against the direction of rotation), until the needle of the dial indicator stops moving. In this position, set the needle to zero, with a preliminary tension of approx. 1.0 mm
  • Now slowly turn the crankshaft to the right (in the direction of rotation), until 1° after the OT marking on the flywheel is equal to the reference mark. The dial indicator should read 0.98-1.02 mm. If this doesn't happen, the pump needs to be adjusted.
  • To adjust, you need to loosen the pump mounting bolts.
  • Turn the pump in accordance with the direction of the arrow in Figure 152 until, when checking with the arrow indicator, a value of 1.0 mm is reached.
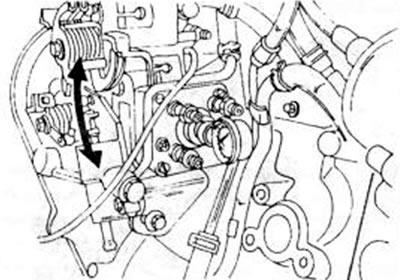
Figure 152. Turn the pump in the direction of the arrow to ensure adjustment of the injection system

Figure 152. Turn the pump in the direction of the arrow to ensure adjustment of the injection system

  • Repeat the adjustment several times until the indicator shows the above readings each time. Finally, tighten the bolts to 25 Nm.
  • Unscrew the indicator again and screw in the plug with a new sealing washer. The tightening torque is 15 Nm.
This article is available at: russian, bulgarian, belarusian, ukrainian, serbian, croatian, romanian, polish, slovak, hungarian
This text was checked by: Georgy Afanasyev
Share with friends on social networks:

Previous
Capella 4 » Fuel system (diesel)
Next

High pressure fuel pump
Fuel filter
Safety precautions when working on the injection system
Fuel injection system tuning
Injectors — removal and installation
Air filter
Glow plugs
More articles on repairing other Mazda models
Setting the ignition timing Mazda Familia 5 (1985-1989)
Time indication Mazda3 BK (2003-2009)
Time indication Mazda6 GG (2002-2008)
Setting the engine to the TDC position of the first cylinder Mazda 121 (3) (1996-2003)
Link in different formats to this article
Comments and feedback from visitors
No comments yet


How much will 16 + 30 ?


Capella 6 (1997-2005, petrol) 
  • General information
  • Introduction to guide
  • User manual
  • Troubleshooting
  • Maintenance
  • Power unit
  • 4-cylinder engines
  • 6-cylinder engines
  • Engine overhaul
  • Cooling and ventilation
  • Power and exhaust systems
  • Engine electrics
  • Control system
  • Transmission
  • Mechanical gearbox
  • Automatic gearbox
  • Clutch and drive shafts
  • Chassis
  • Brake system
  • Car suspension
  • Steering
  • Body
  • Exterior (external elements)
  • Interior (internal elements)
  • Doors, windows and locks
  • Electrical equipment
  • Equipment and devices
  • Electrical circuits
Capella 5 (1991-1997) 
  • General information
  • User manual
  • Maintenance
  • Helpful hints
  • Power unit
  • Petrol engines 1.6 and 1.8
  • Petrol engines 2.0
  • 2.5 petrol engines
  • Overhaul engines 1.6 and 1.8
  • Overhaul engines 2.0 and 2.5
  • Diesel engine 2.0
  • Engine electrics
  • Cooling system
  • Air conditioner
  • Carburetor Nikki 30/34
  • Power system (1.6 and 1.8)
  • Power system (2.0 and 2.5)
  • Control system
  • Transmission
  • Mechanical gearbox
  • Automatic gearbox
  • Clutch and axles
  • Chassis
  • Brake system
  • Suspension and wheels
  • Steering
  • Body
  • Exterior (external elements)
  • Interior (internal elements)
  • Doors and windows
  • Electrical equipment
  • Equipment and devices
  • Electrical circuits
Capella 4 (1987-1992) 
  • General information
  • Introduction to manual
  • Vehicle specifications
  • Power unit
  • Engine repair
  • Lubrication system
  • Cooling system
  • Fuel system (carburetor)
  • Fuel injection (FE)
  • Fuel injection (DOHC)
  • Fuel system (diesel)
  • Ignition system
  • Transmission
  • Clutch
  • Gearbox
  • Drive shafts
  • Chassis
  • Front suspension
  • Rear suspension
  • Steering system
  • Brake system
  • Electrical equipment
  • Equipment and devices
  • Electrical circuits
Capella 3 and 4 (1982-1992) 
  • General information
  • User manual
  • Maintenance
  • Power unit
  • Gasoline engine
  • Engine overhaul (gasoline)
  • Diesel engine
  • Cooling and heating
  • Supply system
  • Ignition system
  • Emission reduction
  • Transmission
  • Clutch
  • Mechanical gearbox
  • Automatic gearbox
  • Drive shafts
  • Chassis
  • Brake system
  • Suspension and wheels
  • Steering
  • Body
  • Exterior (external elements)
  • Interior (internal elements)
  • Electrical equipment
  • Equipment and devices
  • Power devices
  • Electrical circuits
Capella 3 (1982-1992, petrol) 
  • General information
  • User manual
  • Maintenance
  • Troubleshooting
  • Late models
  • Power unit
  • Engine in car
  • Engine overhaul
  • Cooling and heating system
  • Fuel and exhaust system
  • Engine electrical system
  • Emission control system
  • Transmission
  • Mechanical gearbox
  • Automatic gearbox
  • Clutch and drive shafts
  • Chassis
  • Brake system
  • Suspension and wheels
  • Steering
  • Body
  • Exterior (external elements)
  • Interior (internal elements)
  • Electrical equipment
  • Equipment and devices
  • Lighting and lamps
  • Electrical circuits
MazBook.ru © 2018–2026 · Mobile version · Articles and news · Sitemap: EN BG BY UA RS HR RO PL SK HU · Feedback · Site search · Add to bookmarks Familia 5 (BF) · Familia 6 (BG) · Capella 3 (GC) · Capella 3 and 4 (GC) · Capella 4 (GD) · Capella 5 (GE) · Capella 6 (GF) · Mazda3 BK · Mazda6 GG · CX-5KE · Mazda 121 (3) · Mazda BT-50 (1) ·
By continuing to use the site, you agree to the use of cookies 🔐