
MazBook.ru
English Русский
Български
Беларускі
Український
Српски
Hrvatski
Română
Polski
Slovenský
Magyar
• Bookmark • Sitemap • Contacts •   
Cars Opel Cars Ford Cars Volkswagen Cars Audi Cars Kia Cars Renault Cars Peugeot


Familia Capella Mazda3 Mazda6 CX-? Others Articles
Capella 3 (1982-1992, petrol) Capella 3 and 4 (1982-1992) Capella 4 (1987-1992) Capella 5 (1991-1997) Capella 6 (1997-2005, petrol)

Replacing the oil pan seal (removing and installing the oil pan) (Mazda Capella GD)

  • Home
  • Mazda Capella
  • Capella GD (1987-1992)
  • Power unit
  • Lubrication system
  • Replacing the oil pan seal (removing and installing the oil pan)
0
The oil pan can be removed with the engine installed. Once the oil drain plug has been removed and the engine oil has drained, removing the oil pan is a simple matter.

For a gasoline engine:


  • Place the front part of the engine on jack stands.
  • For a standard engine, unscrew the engine turning stop. Insert the bolts from the top and sides into the cylinder block.
  • For a standard engine, unscrew the shield under the clutch housing.
  • With 4-wheel steering installed, unscrew the reinforcement sheet under the oil pan.
  • Unscrew the front exhaust pipe from the branch pipe and lower the exhaust gas outlet unit without placing the pipe under pressure.
  • Place a cable or chain under the front of the engine and hang the ends on a lifting mechanism. Slowly raise the engine while the engine shaft bearings are under load.
  • Release the engine mount at the front of the engine.
  • Raise the front of the engine as far as possible without placing any load on other parts.
  • On a standard engine, loosen the oil pan bolts and carefully insert a screwdriver between the oil pan and the engine block to pry the pan out. Turn the front pan to the left and lift it between the cylinder block and the exhaust pipe.
  • Unscrew the oil intake pipe screen.
  • For a standard engine, remove the reinforcement plate between the cylinder block and the oil pan.
  • For a DOHC engine, the oil pan can be emptied without being pressed out as follows:

- after releasing the pan bolts, screw the bolts (A) into the threaded holes (B) on both sides;

- tighten both bolts evenly until the oil pan is pressed away from the cylinder block. This engine does not come with a reinforcement plate.
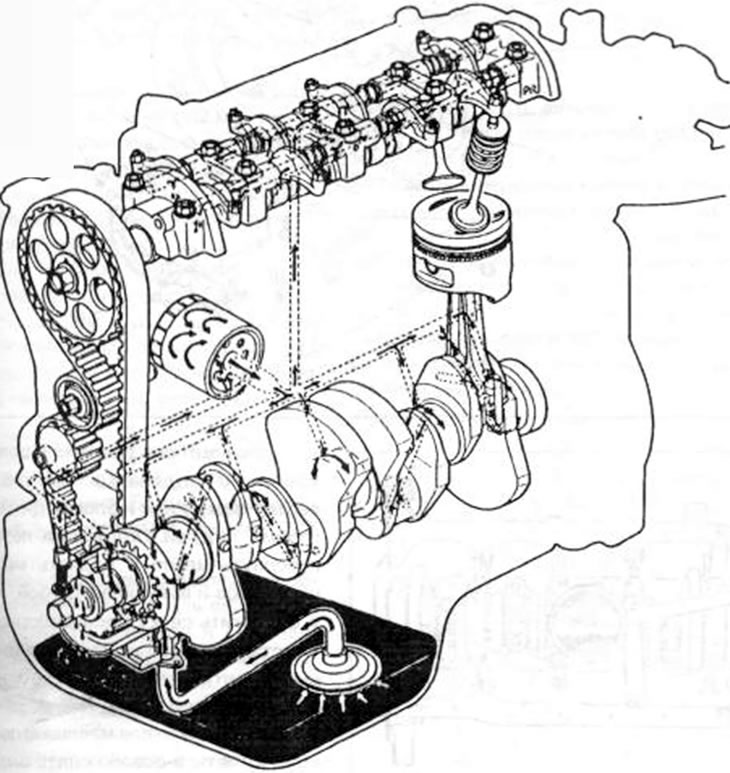


Figure 109. Lubrication diagram of a standard engine
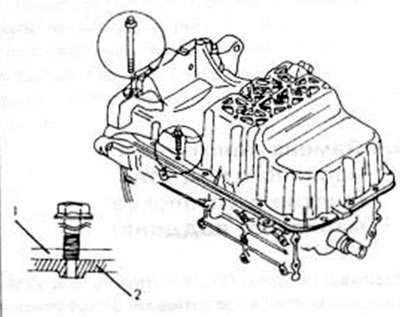
Figure 109. Lubrication diagram of a standard engine


Figure 110. DOHC engine oil pan removal details. Note bolts (A) in place (B) (on both sides) and…

Figure 110. DOHC engine oil pan removal details. Note bolts (A) in place (B) (on both sides) and squeeze out the tray. Which is possible thanks to the tightening of the bolts.1. Oil pan; 2. Cylinder block


For a diesel engine:


  • In addition to the engine oil, also drain the coolant.
  • Raise the engine using a cable and a lift and unscrew the crossmember from the lower part of the body.
  • Unscrew the torque support on the left side.
  • Unscrew the roof from the clutch housing.
  • Remove the water line at the bottom of the oil pan.
  • Answer the tray and carefully insert the screwdriver into the connector to remove the tray. At the same time, try not to cause damage.
  • Unscrew the oil pickup tube mesh from the southern part of the crankcase and remove it. Clean the magnetic drain plug and check the surface of the oil pan on the gearbox. The installation of the pallet is carried out in reverse order, observing the following points:
  • All sealing surfaces must be thoroughly cleaned of any remaining old seal or sealant.
  • Screw the oil pick-up pipe onto the cylinder block. Tighten the bolts to 8-12 Nm.
  • The oil pan of a gasoline engine is installed with a sealant. The sealant is applied in a circle to the sealing surface of the oil bath. If a reinforcement plate is installed, it is treated in the same way and secured to the cylinder blocks.
  • The diesel engine oil pan can be installed with or without a seal. If a seal is used, apply sealant to the areas shown in the figure 112, then put the pallet seal.
  • Install the oil pan. At the same time, make sure that the seal (if it applies) was not skewed. Tighten the bolts evenly in a crosswise pattern with a tightening torque of 7-12 Nm.
  • After tightening the bolts, immediately screw in the blind hole plug and tighten it.
  • All other work should be carried out in reverse order. Figure 111 shows the tightening torques for the cast parts. For a diesel engine, tighten the crossmember to 36-54 Nm and the torque support to 37-52 Nm
  • Replace the engine with the prescribed amount of oil. If you don't have an accurate measuring vessel, you can pour oil until the level reaches the "Min" mark on the oil level indicator. After this, start the engine and add another liter of oil until its level reaches the "Max" mark on the oil level indicator. For a diesel engine, you definitely need to fill it with the appropriate oil.
  • After replacing the oil pan seal, you should always check it. Because non-hermetic bridges may form. Therefore, after warming up the engine, the car should be tilted briefly again from the front and all sealing connections should be checked from below.
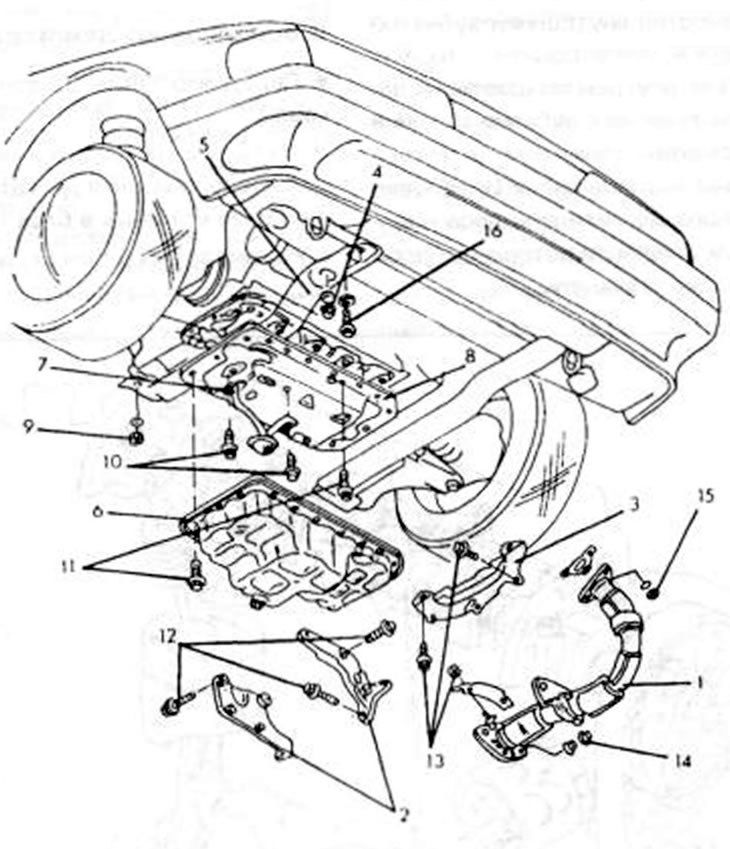
Figure 111. Details of removal and installation of the oil pan on a gasoline engine 1. Exhaust…

Figure 111. Details of removal and installation of the oil pan on a gasoline engine 1. Exhaust pipe; 2. Anti-rotation stops; 3. Clutch housing shield; 4. Bolts, 75-93 Nm; 5. Traverse; 6. Oil pan; 7. Oil intake tube mesh; 8. Reinforcement block; 9. Nut, 75-93 Nm; 10. Bolts, 7-12 Nm; 11. Bolts, 7-12 Nm; 12. Bolts, 37-52 Nm; 13. Bolts, 8-11 Nm; 14. Nut, 64-89 Nm; 15. Nut, 31 46 Nm; 16. Bolts, 36-54 Nm
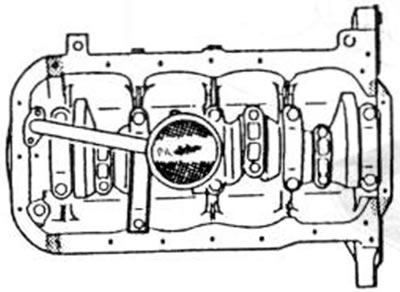


Figure 112. When using a seal (diesel engine) four corners are lubricated with sealant.

Figure 112. When using a seal (diesel engine) four corners are lubricated with sealant.
This article is available at: russian, bulgarian, belarusian, ukrainian, serbian, croatian, romanian, polish, slovak, hungarian
This text was checked by: Georgy Afanasyev
Share with friends on social networks:

Previous
Capella 4 » Lubrication system
Next

Engine Lubrication — general information
Oil pump
Oil filter
Checking the condition of engine oil
Oil pressure control
Oil cooler
More articles on repairing other Mazda models
Checking/removing and installing the fuel shut-off valve Mazda Familia 6 (1989-1994)
Installing the front crankshaft oil seal Mazda3 BK (2003-2009)
Installing the front crankshaft oil seal Mazda6 GG (2002-2008)
Replacing the right oil seal No. 1 of the transfer case Mazda CX-5KE (2012-2017)
Ford KA: Removing and installing the outside rearview mirror Mazda 121 (3) (1996-2003)
Link in different formats to this article
Comments and feedback from visitors
No comments yet


How much will 28 + 22 ?


Capella 6 (1997-2005, petrol) 
  • General information
  • Introduction to guide
  • User manual
  • Troubleshooting
  • Maintenance
  • Power unit
  • 4-cylinder engines
  • 6-cylinder engines
  • Engine overhaul
  • Cooling and ventilation
  • Power and exhaust systems
  • Engine electrics
  • Control system
  • Transmission
  • Mechanical gearbox
  • Automatic gearbox
  • Clutch and drive shafts
  • Chassis
  • Brake system
  • Car suspension
  • Steering
  • Body
  • Exterior (external elements)
  • Interior (internal elements)
  • Doors, windows and locks
  • Electrical equipment
  • Equipment and devices
  • Electrical circuits
Capella 5 (1991-1997) 
  • General information
  • User manual
  • Maintenance
  • Helpful hints
  • Power unit
  • Petrol engines 1.6 and 1.8
  • Petrol engines 2.0
  • 2.5 petrol engines
  • Overhaul engines 1.6 and 1.8
  • Overhaul engines 2.0 and 2.5
  • Diesel engine 2.0
  • Engine electrics
  • Cooling system
  • Air conditioner
  • Carburetor Nikki 30/34
  • Power system (1.6 and 1.8)
  • Power system (2.0 and 2.5)
  • Control system
  • Transmission
  • Mechanical gearbox
  • Automatic gearbox
  • Clutch and axles
  • Chassis
  • Brake system
  • Suspension and wheels
  • Steering
  • Body
  • Exterior (external elements)
  • Interior (internal elements)
  • Doors and windows
  • Electrical equipment
  • Equipment and devices
  • Electrical circuits
Capella 4 (1987-1992) 
  • General information
  • Introduction to manual
  • Vehicle specifications
  • Power unit
  • Engine repair
  • Lubrication system
  • Cooling system
  • Fuel system (carburetor)
  • Fuel injection (FE)
  • Fuel injection (DOHC)
  • Fuel system (diesel)
  • Ignition system
  • Transmission
  • Clutch
  • Gearbox
  • Drive shafts
  • Chassis
  • Front suspension
  • Rear suspension
  • Steering system
  • Brake system
  • Electrical equipment
  • Equipment and devices
  • Electrical circuits
Capella 3 and 4 (1982-1992) 
  • General information
  • User manual
  • Maintenance
  • Power unit
  • Gasoline engine
  • Engine overhaul (gasoline)
  • Diesel engine
  • Cooling and heating
  • Supply system
  • Ignition system
  • Emission reduction
  • Transmission
  • Clutch
  • Mechanical gearbox
  • Automatic gearbox
  • Drive shafts
  • Chassis
  • Brake system
  • Suspension and wheels
  • Steering
  • Body
  • Exterior (external elements)
  • Interior (internal elements)
  • Electrical equipment
  • Equipment and devices
  • Power devices
  • Electrical circuits
Capella 3 (1982-1992, petrol) 
  • General information
  • User manual
  • Maintenance
  • Troubleshooting
  • Late models
  • Power unit
  • Engine in car
  • Engine overhaul
  • Cooling and heating system
  • Fuel and exhaust system
  • Engine electrical system
  • Emission control system
  • Transmission
  • Mechanical gearbox
  • Automatic gearbox
  • Clutch and drive shafts
  • Chassis
  • Brake system
  • Suspension and wheels
  • Steering
  • Body
  • Exterior (external elements)
  • Interior (internal elements)
  • Electrical equipment
  • Equipment and devices
  • Lighting and lamps
  • Electrical circuits
MazBook.ru © 2018–2026 · Mobile version · Articles and news · Sitemap: EN BG BY UA RS HR RO PL SK HU · Feedback · Site search · Add to bookmarks Familia 5 (BF) · Familia 6 (BG) · Capella 3 (GC) · Capella 3 and 4 (GC) · Capella 4 (GD) · Capella 5 (GE) · Capella 6 (GF) · Mazda3 BK · Mazda6 GG · CX-5KE · Mazda 121 (3) · Mazda BT-50 (1) ·
By continuing to use the site, you agree to the use of cookies 🔐