
MazBook.ru
English Русский
Български
Беларускі
Український
Српски
Hrvatski
Română
Polski
Slovenský
Magyar
• Bookmark • Sitemap • Contacts •   
Cars Opel Cars Ford Cars Volkswagen Cars Audi Cars Kia Cars Renault Cars Peugeot


Familia Capella Mazda3 Mazda6 CX-? Others Articles
Capella 3 (1982-1992, petrol) Capella 3 and 4 (1982-1992) Capella 4 (1987-1992) Capella 5 (1991-1997) Capella 6 (1997-2005, petrol)

Clutch repair (Mazda Capella GD)

  • Home
  • Mazda Capella
  • Capella GD (1987-1992)
  • Transmission
  • Clutch
  • Clutch repair
0
Check the pressure plate and cover for defects or distortion. If damaged, replace both parts as a set. Check that the driven disk springs are still in perfect condition and that the splined connection has not become excessively loose. Since oily friction linings cannot be cleaned, the driven disc must be replaced.

Check the friction linings for reuse by measuring from the surface of the lining to the top of the rivet head using a depth gauge (figure 161). If the size is less than 0.30 mm, the disc must be replaced. The disk is also changed if the size approaches this value.
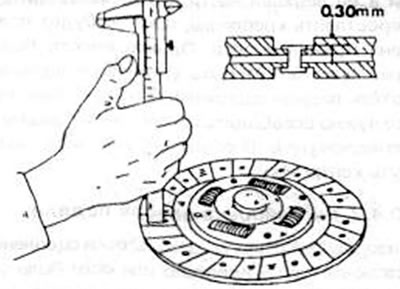
Figure 161. Measuring the thickness of the clutch disc lining to the rivet head

Figure 161. Measuring the thickness of the clutch disc lining to the rivet head


To check the driven disk for runout, it is clamped on a suitable mandrel or clutch shaft between lathe centers and a dial indicator is fixed on a suitable stand next to the disk so that the measuring pin is against the edge of the disk (with a diameter of 175 mm). Rotate the disk slowly and read the indicator readings (figure 162). If the reading is greater than 0.1 mm, you can, if desired, carefully align the disc using pliers. Otherwise, the disk needs to be replaced. Check the sliding of the driven disk sleeve on the splined connection of the clutch shaft. To do this, you need to put the disk on and take it between your thumb and index finger. Move the disc back and forth in the direction of rotation. If the gap is greater than 0.4 mm, there is wear in the splined connection, which is usually located in the disc. Check the inner edges of the disc springs for wear. If deep wear areas are detected, the entire clutch must be replaced.
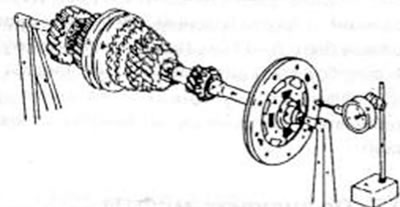


Figure 162. Checking the driven disk for runout between lathe centers

Figure 162. Checking the driven disk for runout between lathe centers


The tops of all disc springs must not exceed 0.5 mm at the same height. The bent tops need to be straightened again. A special tool is usually used for this (figure 163), however, you can use a steel strip with a slot and bend the edges.
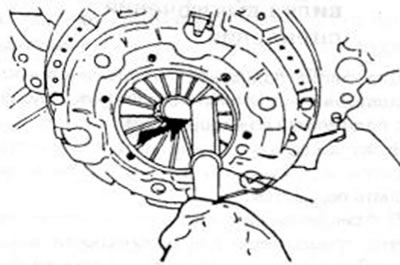
Figure 163. Extension of the disc spring fingers

Figure 163. Extension of the disc spring fingers


Lubricate the moving parts of the clutch lever and release sleeve.
This article is available at: russian, bulgarian, belarusian, ukrainian, serbian, croatian, romanian, polish, slovak, hungarian
This text was checked by: Georgy Afanasyev
Share with friends on social networks:

Previous
Capella 4 » Clutch
Next

Removal the clutch
Clutch — general information
Clutch installation
Clutch adjustment
Clutch release bearing and clutch release fork
Clutch booster master cylinder
Clutch head cylinder
More articles on repairing other Mazda models
Repair of cylinder head of engines B3, B5, B6 Mazda Familia 5 (1985-1989)
General information about the clutch Mazda3 BK (2003-2009)
General information about the clutch Mazda6 GG (2002-2008)
Temporary tyre repair kit (optional) Mazda CX-5KE (2012-2017)
Clutch — design description Mazda 121 (3) (1996-2003)
Link in different formats to this article
Comments and feedback from visitors
No comments yet


How much will 47 + 17 ?


Capella 6 (1997-2005, petrol) 
  • General information
  • Introduction to guide
  • User manual
  • Troubleshooting
  • Maintenance
  • Power unit
  • 4-cylinder engines
  • 6-cylinder engines
  • Engine overhaul
  • Cooling and ventilation
  • Power and exhaust systems
  • Engine electrics
  • Control system
  • Transmission
  • Mechanical gearbox
  • Automatic gearbox
  • Clutch and drive shafts
  • Chassis
  • Brake system
  • Car suspension
  • Steering
  • Body
  • Exterior (external elements)
  • Interior (internal elements)
  • Doors, windows and locks
  • Electrical equipment
  • Equipment and devices
  • Electrical circuits
Capella 5 (1991-1997) 
  • General information
  • User manual
  • Maintenance
  • Helpful hints
  • Power unit
  • Petrol engines 1.6 and 1.8
  • Petrol engines 2.0
  • 2.5 petrol engines
  • Overhaul engines 1.6 and 1.8
  • Overhaul engines 2.0 and 2.5
  • Diesel engine 2.0
  • Engine electrics
  • Cooling system
  • Air conditioner
  • Carburetor Nikki 30/34
  • Power system (1.6 and 1.8)
  • Power system (2.0 and 2.5)
  • Control system
  • Transmission
  • Mechanical gearbox
  • Automatic gearbox
  • Clutch and axles
  • Chassis
  • Brake system
  • Suspension and wheels
  • Steering
  • Body
  • Exterior (external elements)
  • Interior (internal elements)
  • Doors and windows
  • Electrical equipment
  • Equipment and devices
  • Electrical circuits
Capella 4 (1987-1992) 
  • General information
  • Introduction to manual
  • Vehicle specifications
  • Power unit
  • Engine repair
  • Lubrication system
  • Cooling system
  • Fuel system (carburetor)
  • Fuel injection (FE)
  • Fuel injection (DOHC)
  • Fuel system (diesel)
  • Ignition system
  • Transmission
  • Clutch
  • Gearbox
  • Drive shafts
  • Chassis
  • Front suspension
  • Rear suspension
  • Steering system
  • Brake system
  • Electrical equipment
  • Equipment and devices
  • Electrical circuits
Capella 3 and 4 (1982-1992) 
  • General information
  • User manual
  • Maintenance
  • Power unit
  • Gasoline engine
  • Engine overhaul (gasoline)
  • Diesel engine
  • Cooling and heating
  • Supply system
  • Ignition system
  • Emission reduction
  • Transmission
  • Clutch
  • Mechanical gearbox
  • Automatic gearbox
  • Drive shafts
  • Chassis
  • Brake system
  • Suspension and wheels
  • Steering
  • Body
  • Exterior (external elements)
  • Interior (internal elements)
  • Electrical equipment
  • Equipment and devices
  • Power devices
  • Electrical circuits
Capella 3 (1982-1992, petrol) 
  • General information
  • User manual
  • Maintenance
  • Troubleshooting
  • Late models
  • Power unit
  • Engine in car
  • Engine overhaul
  • Cooling and heating system
  • Fuel and exhaust system
  • Engine electrical system
  • Emission control system
  • Transmission
  • Mechanical gearbox
  • Automatic gearbox
  • Clutch and drive shafts
  • Chassis
  • Brake system
  • Suspension and wheels
  • Steering
  • Body
  • Exterior (external elements)
  • Interior (internal elements)
  • Electrical equipment
  • Equipment and devices
  • Lighting and lamps
  • Electrical circuits
MazBook.ru © 2018–2026 · Mobile version · Articles and news · Sitemap: EN BG BY UA RS HR RO PL SK HU · Feedback · Site search · Add to bookmarks Familia 5 (BF) · Familia 6 (BG) · Capella 3 (GC) · Capella 3 and 4 (GC) · Capella 4 (GD) · Capella 5 (GE) · Capella 6 (GF) · Mazda3 BK · Mazda6 GG · CX-5KE · Mazda 121 (3) · Mazda BT-50 (1) ·
By continuing to use the site, you agree to the use of cookies 🔐