MazBook.ru
English Русский
Български
Беларускі
Український
Српски
Hrvatski
Română
Polski
Slovenský
Magyar
• Bookmark • Sitemap • Contacts •   
Cars Opel Cars Ford Cars Volkswagen Cars Audi Cars Kia Cars Renault Cars Peugeot


Familia Capella Mazda3 Mazda6 CX-? Others Articles
Capella 3 (1982-1992, petrol) Capella 3 and 4 (1982-1992) Capella 4 (1987-1992) Capella 5 (1991-1997) Capella 6 (1997-2005, petrol)

Clutch release bearing and fork — removal, inspection and installation (Mazda Capella GF)

  • Home
  • Mazda Capella
  • Capella GF (1997-2005)
  • Transmission
  • Clutch and drive shafts
  • Clutch release bearing and fork — removal, inspection and installation
0
Contents: Removal ⇓ Examination ⇓ Installation ⇓
Caution! When the clutch disc wears, dust containing asbestos is formed, which is hazardous to your health. DO NOT remove dust with compressed air or inhale it. DO NOT use gasoline or gasoline-based solvents to clean clutch components. Brake system cleaner can be used to clean the components. Wipe the clutch components with a clean cloth, then discard the cloth in a closed container.


Removal


1. Remove the clutch slave cylinder mounting bolts (see paragraph 4), but do not disconnect the pipeline from it. Move the cylinder to the side and tie it with a piece of wire.

Caution: After disconnecting the slave cylinder, do not depress the clutch pedal.


2. Remove the gearbox (see chapter 7A).

3. Remove the clutch fork from the pivot support, then remove the release bearing from the gearbox input shaft neck together with the fork (figure 7.3).
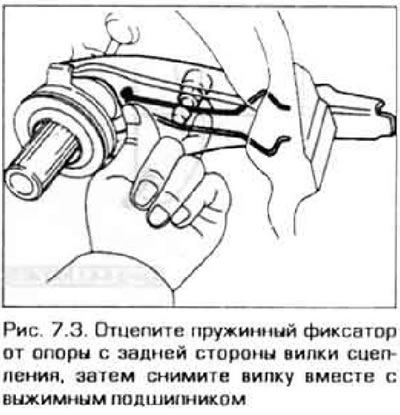
3. Remove the clutch fork from the pivot support, then remove the release bearing from the gearbox…


Examination


4. Hold the release bearing by the outer ring and rotate the inner ring, applying force to it (figure 7.4). If the bearing rotates with binding or has play, replace the bearing. Wipe the bearing with a clean cloth, then inspect it carefully to ensure there is no damage, cracks or other breakage. Typically, the release bearing is replaced during clutch disassembly, regardless of its condition. Do not wash the bearing in solvent, as this will wash away the grease contained in the sealed bearing.
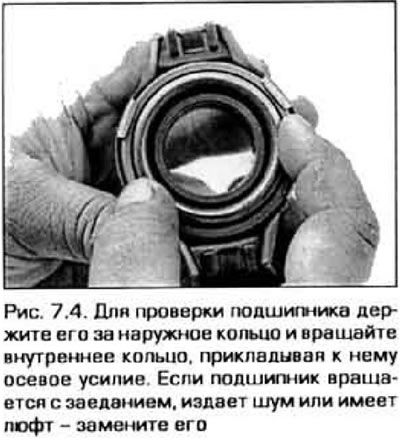


4. Hold the release bearing by the outer ring and rotate the inner ring, applying force to it…


5. Inspect the fork and make sure there are no cracks or signs of wear.

Installation


6. Apply a small amount of high temperature grease to the release bearing seating surface in the transmission housing. Also apply a small amount of grease to the gearbox spline shaft, clutch fork joint and the front surface of the release bearing (figure 7.6).
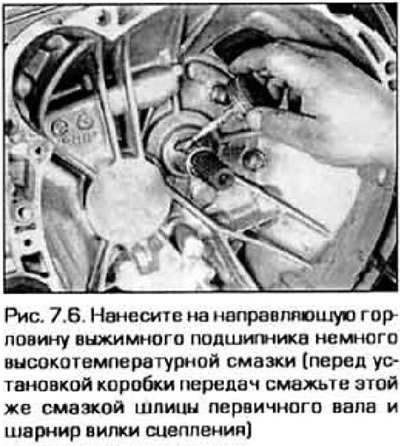
6. Apply a small amount of high temperature grease to the release bearing seating surface in the…


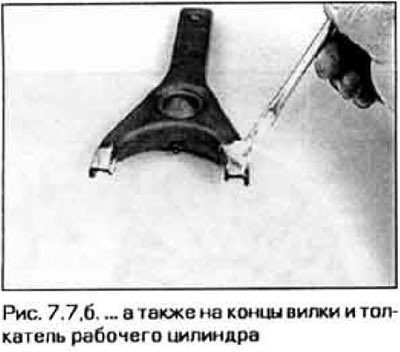
7. Lubricate the clutch fork support, fork ends, and the slave cylinder push rod with high-temperature grease (figure 7.7, a, b).
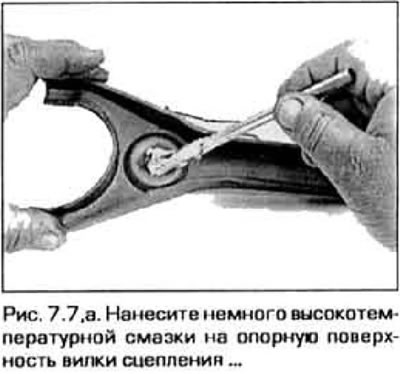
7. Lubricate the clutch fork support, fork ends, and the slave cylinder push rod with…

8. Install the release bearing on the fork.


9. Place the bearing on the gearbox input shaft and thread the end of the fork through the hole in the clutch housing. Place the fork on the support.

10. Apply a small amount of high temperature grease to the surface of the release bearing.

11. The rest of the installation procedure is carried out in the reverse order of removal.
This article is available at: russian, bulgarian, belarusian, ukrainian, serbian, croatian, romanian, polish, slovak, hungarian
This text was checked by: German Vorobyov
Share with friends on social networks:

Previous
Capella 6 » Clutch and drive shafts
Next

Clutch Components — removal, inspection, and installation
Clutch hydraulic system — bleeding
Clutch slave cylinder — removal, repair and installation
Clutch Master Cylinder — removal and installation
Clutch — description and testing
Clutch pedal adjustment
Clutch Pedal Start Switch — checking, replacing, and adjusting
Drive shafts — basic information and inspection
Drive shafts — removal and installation
Intermediate shaft — removal and installation
More articles on repairing other Mazda models
Removal and installation / checking the clutch release bearing Mazda Familia 6 (1989-1994)
Bleeding the hydraulic clutch release drive Mazda3 BK (2003-2009)
Bleeding the hydraulic clutch release drive Mazda6 GG (2002-2008)
Clutch Pedal Position Sensor Mazda CX-5KE (2012-2017)
Removal, installation and checking the release bearing and slave… Mazda 121 (3) (1996-2003)
Link in different formats to this article
Comments and feedback from visitors
No comments yet


How much will 36 + 31 ?


Capella 6 (1997-2005, petrol) 
  • General information
  • Introduction to guide
  • User manual
  • Troubleshooting
  • Maintenance
  • Power unit
  • 4-cylinder engines
  • 6-cylinder engines
  • Engine overhaul
  • Cooling and ventilation
  • Power and exhaust systems
  • Engine electrics
  • Control system
  • Transmission
  • Mechanical gearbox
  • Automatic gearbox
  • Clutch and drive shafts
  • Chassis
  • Brake system
  • Car suspension
  • Steering
  • Body
  • Exterior (external elements)
  • Interior (internal elements)
  • Doors, windows and locks
  • Electrical equipment
  • Equipment and devices
  • Electrical circuits
Capella 5 (1991-1997) 
  • General information
  • User manual
  • Maintenance
  • Helpful hints
  • Power unit
  • Petrol engines 1.6 and 1.8
  • Petrol engines 2.0
  • 2.5 petrol engines
  • Overhaul engines 1.6 and 1.8
  • Overhaul engines 2.0 and 2.5
  • Diesel engine 2.0
  • Engine electrics
  • Cooling system
  • Air conditioner
  • Carburetor Nikki 30/34
  • Power system (1.6 and 1.8)
  • Power system (2.0 and 2.5)
  • Control system
  • Transmission
  • Mechanical gearbox
  • Automatic gearbox
  • Clutch and axles
  • Chassis
  • Brake system
  • Suspension and wheels
  • Steering
  • Body
  • Exterior (external elements)
  • Interior (internal elements)
  • Doors and windows
  • Electrical equipment
  • Equipment and devices
  • Electrical circuits
Capella 4 (1987-1992) 
  • General information
  • Introduction to manual
  • Vehicle specifications
  • Power unit
  • Engine repair
  • Lubrication system
  • Cooling system
  • Fuel system (carburetor)
  • Fuel injection (FE)
  • Fuel injection (DOHC)
  • Fuel system (diesel)
  • Ignition system
  • Transmission
  • Clutch
  • Gearbox
  • Drive shafts
  • Chassis
  • Front suspension
  • Rear suspension
  • Steering system
  • Brake system
  • Electrical equipment
  • Equipment and devices
  • Electrical circuits
Capella 3 and 4 (1982-1992) 
  • General information
  • User manual
  • Maintenance
  • Power unit
  • Gasoline engine
  • Engine overhaul (gasoline)
  • Diesel engine
  • Cooling and heating
  • Supply system
  • Ignition system
  • Emission reduction
  • Transmission
  • Clutch
  • Mechanical gearbox
  • Automatic gearbox
  • Drive shafts
  • Chassis
  • Brake system
  • Suspension and wheels
  • Steering
  • Body
  • Exterior (external elements)
  • Interior (internal elements)
  • Electrical equipment
  • Equipment and devices
  • Power devices
  • Electrical circuits
Capella 3 (1982-1992, petrol) 
  • General information
  • User manual
  • Maintenance
  • Troubleshooting
  • Late models
  • Power unit
  • Engine in car
  • Engine overhaul
  • Cooling and heating system
  • Fuel and exhaust system
  • Engine electrical system
  • Emission control system
  • Transmission
  • Mechanical gearbox
  • Automatic gearbox
  • Clutch and drive shafts
  • Chassis
  • Brake system
  • Suspension and wheels
  • Steering
  • Body
  • Exterior (external elements)
  • Interior (internal elements)
  • Electrical equipment
  • Equipment and devices
  • Lighting and lamps
  • Electrical circuits
MazBook.ru © 2018–2026 · Mobile version · Articles and news · Sitemap: EN BG BY UA RS HR RO PL SK HU · Feedback · Site search · Add to bookmarks Familia 5 (BF) · Familia 6 (BG) · Capella 3 (GC) · Capella 3 and 4 (GC) · Capella 4 (GD) · Capella 5 (GE) · Capella 6 (GF) · Mazda3 BK · Mazda6 GG · CX-5KE · Mazda 121 (3) · Mazda BT-50 (1) ·
By continuing to use the site, you agree to the use of cookies 🔐