
Note: Manufacturers do not specify an exact replacement interval for spark plugs, only recommend that they be inspected regularly. Practice shows that during inspection it is better to replace the candles, even if they are still outwardly in good condition.
1. Spark plug replacement requires a special socket that fits a ratchet wrench. This seat will protect the porcelain insulator of the spark plug and hold the spark plug in place while it is installed in the cylinder bore. You will also need a special feeler gauge to check and adjust the spark plug gap (photo).
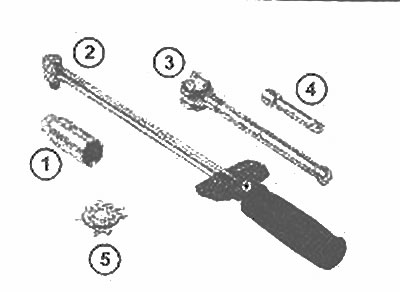
Tools needed to replace the spark plug:
- 1. Nest
- 2. Torque wrench
- 3. Ratchet wrench
- 4. Extension
- 5. Spark plug gap gauge
2. The spark plugs are located on the front side of the engine.
3. It is best to buy new spark plugs in advance, adjust their gap, and then replace the spark plugs one at a time.
4. The operation and efficiency of the engine depends on the functioning of the spark plugs. It is necessary that the installed spark plugs match the engine (the correct brand of spark plugs is listed at the beginning of this Section). Cleaning spark plugs is very rarely necessary and should not be attempted unless you have the proper equipment, as the electrodes can easily be damaged.
5. Allow the engine to cool completely before removing the spark plug. At this time, inspect each of the new spark plugs for defects and check their gaps.
6. To check the gap, insert the feeler gauge lead between the electrodes at the tip of the spark plug. The interelectrode gap is specified in Specifications. The wire should just touch each of the electrodes. If the gap is not correct, use the adjuster on the probe body to slightly bend the bent side electrode to achieve the correct gap. If the side electrode is offset from the center electrode, use the adjuster to align them. Check the porcelain insulator for cracks indicating that the spark plug cannot be used.
7. Remove the wire from one of the spark plugs (the engine is cold), by grabbing the tip of the wire, not the wire itself. Sometimes it is necessary to turn the tip several times to release it.
8. Apply compressed air to remove all dirt from the spark plug and its seat (you can use a regular bicycle pump). This is to remove dirt that may have entered the cylinder after the spark plug has been removed.
9. Place the socket on the spark plug and remove the spark plug from the engine by turning it counterclockwise.
10. Inspect the candle and assess its condition.
11. Screw the spark plug into the cylinder by hand, then tighten it with a torque wrench. Where it is difficult to insert a spark plug into the cylinder bore, place a short piece of rubber tube on the end of the spark plug. The flexible tube will act as a universal joint to help align the spark plug with the hole, and if the spark plug threads are misaligned, the tube will slide easily over the spark plug to prevent damage to the threads. The correct tightening torque is indicated in the Specifications. If a torque wrench is not available, tighten the plug no more than a quarter of a turn from the point where the washer contacts the sealing surface.
12. Before installing the spark plug wire to its end, inspect it as described in Chapter 36.
13. Install wire to new spark plug. Make sure the wire runs away from the exhaust manifold.
14. Follow the same procedure on the remaining spark plugs, replacing them one at a time so as not to mix up the wires.