
Inspection
1. Jack up the vehicle and place it securely on axle stands. Spin the rear wheels and make sure they turn silently, freely and without wobble. Now grasp the wheel at its top and bottom points. Try to move the wheel away from you - towards you. If this wheel is misaligned by more than 0.13 mm, the bearings should be checked and adjusted or, if necessary, replaced.
2. Unlike the front wheel bearings, maintenance of the rear wheel bearings on these models does not require disassembly of the hub assembly.
Bearing lubrication
3. Raise and securely support the rear of the vehicle on axle stands.
4. Remove the wheels and apply the parking brake.
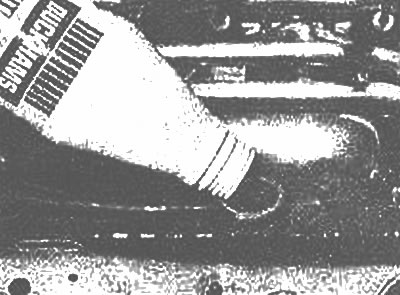
5. Use a flat chisel and a hammer to remove the grease cap by tapping its periphery.
6. Bend back the blocking rim and remove the hub nut. The manufacturer recommends using a new nut when installing.
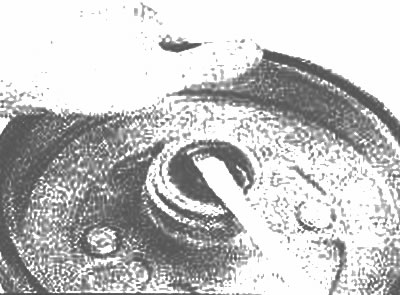
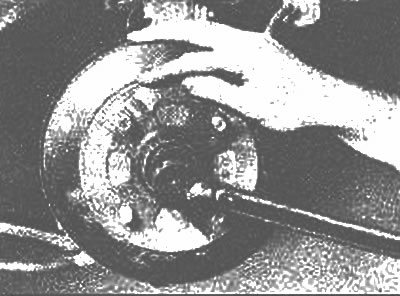
7. Pull out the hub assembly slightly, then push it back into its original position. This should push out the outer bearing and washer enough. so that they can be removed (photo). If the hub-drum assembly cannot be displaced, see paragraph 4 of Chapter 6 Section 9.
Extend the hub to pop out and remove the washer... | 
... and outer bearing |
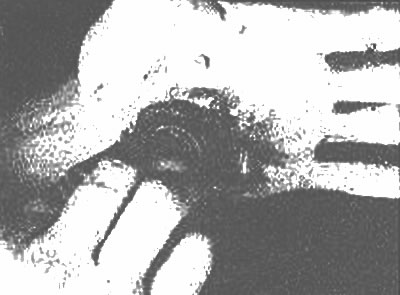
8. Remove the hub, place it on a suitable work surface and pry out the inner bearing seal with a screwdriver (photo).
Remove the bearing seal from the hub
9. Use solvent to remove all traces of old grease from bearings, hub and axle. Let the components dry.
10. Carefully inspect the bearings for cracks, scratches and uneven surface wear. If the bearing rings are defective, see Section 10. The bearings and rings are matched sets, so changing the rings requires replacing the bearings. Likewise, changing bearings requires new rings to be installed in the hub.
11. Thoroughly lubricate the bearings with a specified high temperature wheel bearing grease.
Bearing lubrication with high temperature grease. Make sure the rollers are lubricated on all sides
12. Apply a light coat of grease to the axle at the outer bearing seat, inner bearing seat, shoulder, and seal seat.
13. Apply a small amount of grease to the ring of each bearing inside the hub.
14. Install the lubricated inner bearing into the hub and coat its edge with additional grease.
15. Install a new seal on the inner bearing with the open end facing the bearing.
16. Lubricate the seal with a small amount of grease, carefully place the hub assembly on the axle and push the well-lubricated outer bearing and washer into place (photo).
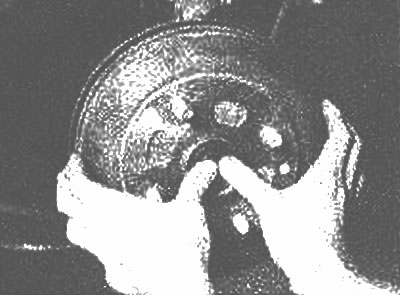
Place the hub on the axle, holding the outer bearing and washer with your thumbs
17. Install a new hub nut and adjust the bearing preload using the following procedure:
- a) Tighten the hub nut with a tightening torque specified specifications (photo).
- b) Rotate the hub two or three turns to seat the bearings, then loosen the hub nut one turn (make sure the hub rotates freely).
- c) Install a dynamometer on the top wheel stud and measure the torque at which the hub begins to turn (is the compaction resistance).
- d) Tighten the hub nut so that the resistance (force at which the hub begins to turn) was approximately 3.9-9.8 N·more than the seal resistance measured in the previous paragraph.
- e) Use a hammer and punch or other suitable blunt tool to drive the locking rim of the nut into the axle groove (photo).
Tighten the hub nut with a torque wrench | 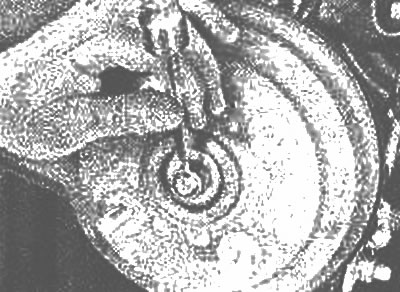
Use a hammer and a small punch to drive the locking collar of the nut into the axle groove |

18. Fill the cap with grease and install it by tapping its periphery with a hammer and punch.
19. Install the wheels and lower the vehicle to the ground. Tighten the wheel nuts.
20. Depress the brake pedal several times to adjust the position of the brake pads, then check the travel of the parking brake lever and adjust it if necessary (Section 9, Chapter 10).