
Warning! Gasoline is extremely flammable, therefore, when working with elements of the power system, the use of fire, sparking devices, open flammable light devices and smoking is prohibited. Avoid sparking when working with wires and electrical devices.
Warning! Since gasoline is a carcinogenic substance, it is necessary to exclude its contact with the body and the paintwork of the car. Otherwise, immediately wash the area with soap and water.
The fuel supply system is constantly under pressure, therefore, before disconnecting the pipelines, relieve pressure in the fuel system.
Close all disconnected fuel lines immediately to prevent fuel from leaking from the fuel tank.
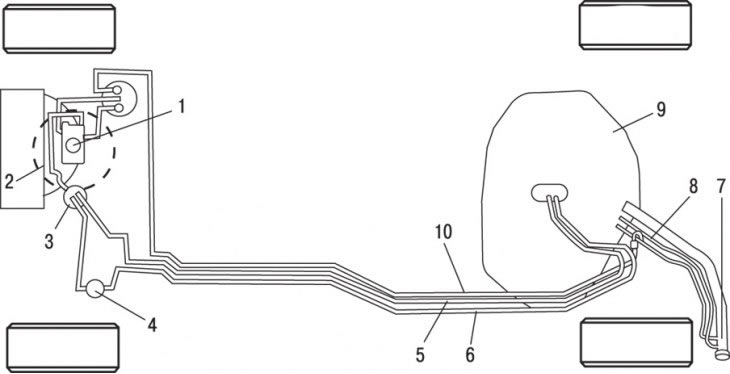
Pic. 2.13. The location of the main elements of the power system on the car: 1 - carburetor; 2 - air filter; 3 - fuel pump; 4 - fuel filter; 5 – fuel return pipeline; 6 - fuel supply pipeline; 7 - filler neck; 8 - bypass valve; 9 – fuel tank; 10 - pipeline for the removal of fuel vapors
It is more convenient to service the power system on a car raised on a lift, since all systems are clearly visible and accessible from below the car (pic. 2.13).
If you smell gasoline, inspect the power system immediately.
Open the filler cap and check it for damage and corrosion. The cover gasket must be elastic and not damaged, otherwise replace it.
Inspect the fuel supply and return hoses for cracks or damage. Replace if damaged.
Raise the vehicle on a lift to inspect the fuel tank and the fuel pipes connected to it. Pay special attention to the hose connecting the fuel tank and the filler neck.
Warning! Under no circumstances should you repair the fuel tank yourself. When using a welding torch or any open flame, fuel vapors accumulated in the tank may explode.
Fuel filter replacement
The power system is sensitive to fuel contamination, so it passes through a special fuel filter. Dirt particles suspended in the fuel can come from a freshly filled container at a gas station.
The fuel filter is located on the left side of the engine compartment. It belongs to a consumable, disposable type of part, it must be replaced in accordance with the indicated intervals.
Place a rag or newspaper under the fuel filter in order to collect the fuel flowing out when the hoses are disconnected.
Mark the location of the fuel supply and output hoses on the fuel filter, loosen the clamps and disconnect the hoses from the filter.
Mark the direction of flow on the filter with an arrow and remove the filter from the holder.
Install a new filter, the arrow should point in the right direction, then connect the hoses and secure them with clamps.
Checking and adjusting the accelerator cable
Accelerator cable (throttle control) must be checked and adjusted periodically to ensure its proper functioning.
Measure the full length of the cable to make sure it is long enough for adjustment.
At normal engine operating temperature, make sure the carburetor choke is fully open.
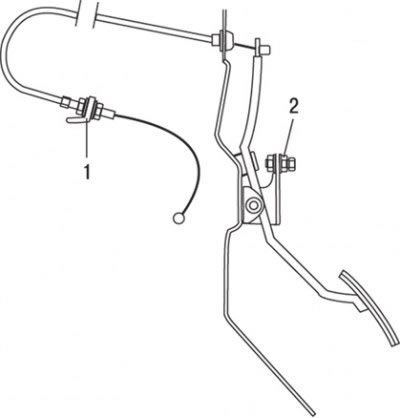
Pic. 2.14. Accelerator cable adjustment elements: 1 - nut for adjusting the free play of the accelerator cable from the carburetor side; 2 - a bolt for adjusting the position of the accelerator pedal for full throttle opening
Measure the cable free play on the carburetor side and adjust if necessary. If the free play exceeds 3 mm, adjust it by turning the nut 1 (pic. 2.14) attaching the cable sheath to the bracket.
Checking the tightening torques of the carburetor mounting nuts
The carburetor is attached with four nuts to the top of the intake manifold. Nuts can loosen due to vibration and high temperatures, which can lead to leakage and air leakage.
If you suspect that air is being sucked into the bottom of the carburetor, take a long hose, the diameter of which is equal to the diameter of the fuel supply hose. Start the engine and put one end of the hose to your ear, with the other end inspect the area around the base of the carburetor. If there is an air leak, a hiss will be heard.
Remove the air filter housing and label each detachable hose with adhesive tape to facilitate subsequent installation.
Determine what special tools or adapters are required to tighten the carburetor mounting nuts. Manufacturers do not indicate the tightening torques of the carburetor mounting nuts.
Tighten nuts securely and evenly. Do not pinch them as the threads may be stripped.
If, after tightening the nuts, air leakage continues, the carburetor must be removed and a new gasket installed.
After tightening the carburetor mounting nuts, reinstall the air filter housing and connect all hoses.