
Removing
1. Raise the vehicle and place it on jack stands. Remove transmission (see chapter 7).
2. On a manual transmission model, remove the clutch basket and friction disc (see chapter 8). Now is the time to check and, if necessary, replace the clutch disc and release bearing.
3. Mark with paint or punch the position of the flywheel relative to the rear wall of the engine to facilitate further installation (pic. 14.3).
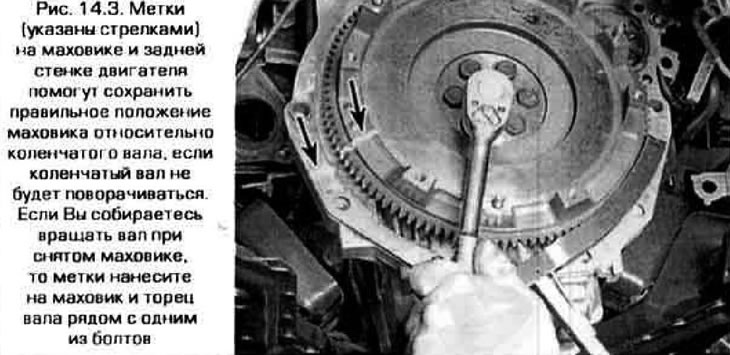
4. Turn out bolts of fastening of a flywheel to a cranked shaft (see fig. 14.3). If the shaft is rotating, stop the flywheel by inserting a sturdy screwdriver into the flywheel ring gear.
Note. Do not rotate the crankshaft after removing the flywheel, as this will violate their relative position. If you need to turn the shaft or remove it, mark with a center punch on the flywheel and on the end of the shaft next to one of the bolt holes.
5. Remove the flywheel from the shaft. On automatic transmission models, also remove the pressure ring and adapter behind the faceplate. Remember which side these parts are installed so as not to experience difficulties during assembly. Note: The flywheel is heavy - support it as you remove the last bolt. Be careful the flywheel ring gear may have a sharp edge - wear work gloves.
6. Wash away dirt and oil from the flywheel. Inspect its surface for cracks and broken crown teeth. Lay the flywheel on a level surface and check it for warping (to do this, attach it to the surface of the edge of the steel ruler). Slight warping can be corrected by sanding in a machine shop.
7. Clean and inspect flywheel mating surfaces (faceplates) and crankshaft. If the rear engine seal is leaking, replace it before installing the flywheel (see paragraph 15).
Installation
8. Drive the bolt holes in the end of the shaft with a tap. Remove dirt and thread seal residue from them. Also clean the bolts.
Note. If the thread seal cannot be completely removed from the bolt, replace the bolt. Do not apply sealant to new bolts.
9. On manual transmission models, install the clutch assembly on the flywheel. On models with automatic transmission, install the adapter, faceplate and pressure ring. Align the flywheel to the marks made before disassembly. Apply thread sealant to the old bolts (no need to apply it to new bolts).
10. Stop the flywheel by inserting a strong screwdriver into the ring gear. Screw in and tighten the flywheel mounting bolts gradually, in three or four passes, in a crosswise sequence until the required tightening torque is reached.
11. The rest of the assembly is performed in the reverse order of disassembly.