
Attention! Allow the engine to cool completely before removing the manifold.
Removing
1. Relieve pressure in the fuel system (see chapter 4).
2. Disconnect the negative cable from the battery.
Warning! If your car has an anti-theft audio system, make sure you have the unlock code before disconnecting the battery.
3. Drain the coolant from the radiator and from the cylinder block (see chapter 1).
4. Drain the engine oil and remove the oil filter.
5. Remove the inlet duct.
6. Turn out spark plugs.
7. Remove intake manifold (see paragraph 8).
8. Remove the exhaust manifold (see paragraph 9).
9. Remove the cylinder head cover (see paragraph 6).
10. Remove the timing belt covers and remove the timing belt (belts) (see paragraph 5).
11. Remove the belt (belts) generator drive and power steering pump (see chapter 1).
12. Remove the generator bracket.
13. Remove the crank angle sensor and ignition distributor (or ignition coil pack).
14. Turn away bolts and remove the pump of a steering amplifier, without disconnecting from it hoses. Move the pump to the side. Tag and disconnect any hoses and wiring that may interfere with cylinder head removal.
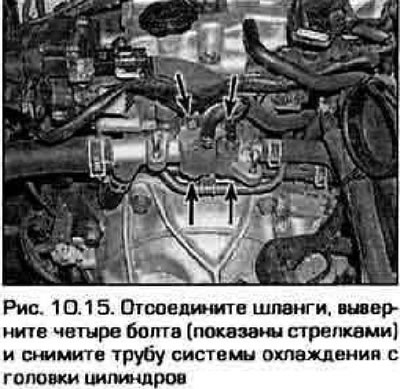
15. Turn away bolts and remove a pipe of system of cooling from transmission side (pic. 10.15).
16. Remove both camshafts and remove pushers (see paragraph 7).
17. Turn away bolts of fastening of a head of cylinders in sequence, return to that shown in fig. 10.27. Unscrew the bolts in turn and gradually, no more than a quarter of a turn at a time, until it becomes possible to unscrew them by hand, the bolts can be discarded (keep only the washers for reinstallation) - when installing the head, all bolts must be replaced.
18. Lift the head off the block. If this fails, gently press the head away from the block on the transmission side.
19. Remove any parts from the head that will interfere with its cleaning and inspection. More about the cylinder head see chapter 2B.
Installation
20. Before assembly, the mating surfaces of the head and cylinder block must be absolutely clean.
21. Scrape off the old gasket and carbon deposits from the surfaces. Then wash them with nitro thinner or acetone. Stuff a clean rag into the cylinders to keep scraped dirt out of the cylinders. At the end of work, clean the cylinders with a vacuum cleaner to remove dirt particles that may have entered there despite the precautions. Be careful not to scratch the surface of the soft aluminum alloy block.
22. Examine mating surfaces of a head and the block of cylinders on presence of deep dents, scratches and other damages. If the damage is not large, it can be repaired with a thin file, but for significant damage, machining is required for repair.
23. Drive the threaded holes in the block for the bolts with a tap of the appropriate size, then remove the chips from the holes with compressed air.
Caution: Be sure to wear protective goggles when blowing holes with compressed air. Make sure that there is no dirt, rust, chips, sealant residue left in the threaded holes, and that the thread itself is not damaged, as all this will prevent you from evenly and with the necessary force to press the head to the block, even if the bolt heads are applied moment, regulated technical data,
24. Install on the head of the parts that were removed from it.
25. Put a new gasket on the block, pay attention to the markings on it like TOP (top) or FRONT (front side). Gently lower the head onto the block being careful not to move the gasket.
26. Lubricate the threads of the NEW head bolts and screw them into the holes by hand.
27. Tighten the bolts gradually, over several passes, in the sequence shown in fig. 10.27, until the specified torque value corresponding to the 1st tightening stage is reached, then tighten from two passes to the specified angle (see technical data).

28. Further assembly is performed in the reverse order of disassembly.
29. Fill the cooling system. Install a new oil filter and fill the engine with oil (see chapter 1).
30. Start the engine and check for leaks. Check ignition timing (see chapter 5). Take a test drive.
31. Check the coolant level frequently for the first few hundred kilometers to be sure there are no leaks.