
MazBook.ru
English Русский
Български
Беларускі
Український
Српски
Hrvatski
Română
Polski
Slovenský
Magyar
• Bookmark • Sitemap • Contacts •   
Cars Opel Cars Ford Cars Volkswagen Cars Audi Cars Kia Cars Renault Cars Peugeot


Familia Capella Mazda3 Mazda6 CX-? Others Articles
Capella 3 (1982-1992, petrol) Capella 3 and 4 (1982-1992) Capella 4 (1987-1992) Capella 5 (1991-1997) Capella 6 (1997-2005, petrol)

Checking, adjusting tension and replacing drive belts (Mazda Capella GC)

  • Home
  • Mazda Capella
  • Capella GC (1982-1992)
  • General information
  • Maintenance
  • Checking, adjusting tension and replacing drive belts
0
Drive belts, or V-belts, are located at the front of the engine and drive the accessories. It is necessary to periodically check the condition and tension of the belts.

Cars are equipped with specially designed belts that must only be replaced with belts of the same type.

The number of belts used on a vehicle depends on the equipment installed. Belts are used to drive the generator, power steering pump and air conditioning compressor. Depending on the arrangement of the pulleys, one belt can be used to drive several units.
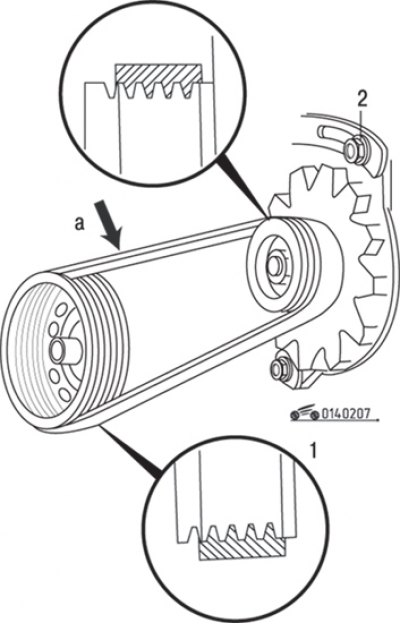
Figure 2.7. Location and place (a) for measuring the deflection of the generator drive belt: 1 –…

Figure 2.7. Location and place (a) for measuring the deflection of the generator drive belt: 1 – generator pulley; 2 – adjusting bolt


The location of the belts on the engine is shown in the figure 2.7, 2.8, 2.9, 2.10.
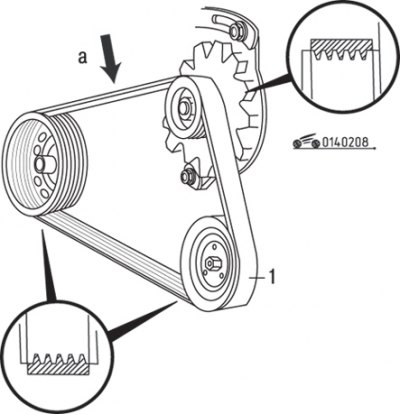
Figure 2.8. Location and place (a) for measuring the deflection of the alternator and power…

Figure 2.8. Location and place (a) for measuring the deflection of the alternator and power steering pump drive belt: 1 – power steering pump pulley


Original version of the article on the website: mazbook
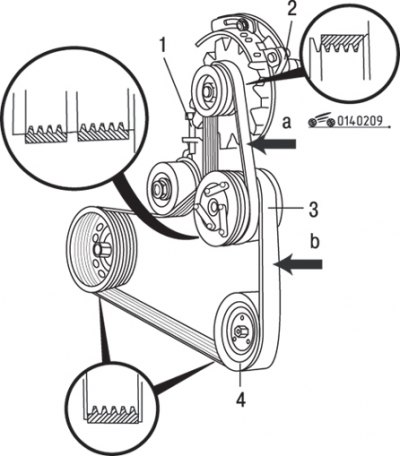
Figure 2.9. Location and measurement points for the deflection of the V-belts for the generator…

Figure 2.9. Location and measurement points for the deflection of the V-belts for the generator drive (a), air conditioning compressor and power steering pump (b): 1 – adjusting bolt; 2 – adjusting bar bolt; 3 – air conditioning compressor pulley; 4 – power steering pump pulley
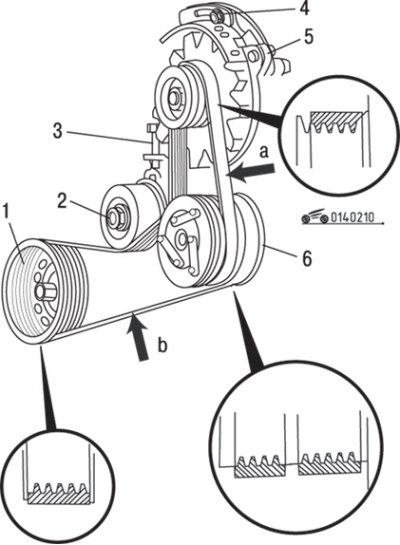

Figure 2.10. Location for measuring the deflection of the generator drive V-belt (a) and air…

Figure 2.10. Location for measuring the deflection of the generator drive V-belt (a) and air conditioning compressor (b): 1 – drive pulley; 2 – lock nut; 3, 4 – adjusting bolts; 5 – adjusting bar bolt; 6 – air conditioning compressor pulley


While turning the engine crankshaft, turn the poly V-belt a few turns and visually inspect its condition. This is the only way to see all surfaces of the poly V-belt, as the belt often has only one, but deep, crack, which, when inspected, can be located exactly on the pulley. If there are any defects, replace the poly V-belt immediately.


The tension of each belt is checked by measuring the deflection when pressing on the belt at the center between the pulleys (at the points indicated by the arrows in the figure 2.7, 2.8, 2.9, 2.10). Press firmly on the belt with your thumb and measure the belt deflection with a ruler.

Tension (and weakening) the belt is adjusted by a tensioning mechanism. Each engine unit is secured with adjusting and hinge bolts, which must be released to move the unit. The tension of the power steering and air conditioning compressor drive belt is adjusted by turning only the idler pulley adjusting bolt. Before adjustment, it is necessary to loosen the idler pulley lock nut and tighten it after adjustment is completed.

After loosening the bolts, move the unit away from the engine to increase belt tension or toward the engine to decrease belt tension. While holding the unit in this position, check the belt tension. If the tension is normal, carefully tighten the two bolts, then recheck the tension. To move the unit when adjusting the belt tension, you can use a mounting paddle. Use it very carefully so as not to damage the unit being moved or the element being used as a stop.

To replace, loosen the tension on the old belt and remove it from the pulleys. If two belts are installed, the belt furthest from the engine must be removed from the engine first, even if it does not require replacement. Install a new belt and adjust its tension, keeping in mind that the tension of a new belt is different from the tension of a used belt. After driving the vehicle for a short period of time, check the belt tension again.
This article is available at: russian, bulgarian, belarusian, ukrainian, serbian, croatian, romanian, polish, slovak, hungarian
This text was checked by: Georgy Afanasyev
Share with friends on social networks:

Previous
Capella 3 and 4 » Maintenance
Next

Checking and servicing the battery
Checking the levels of operating fluids
Checking tires and tire pressure
Checking the technical condition and servicing the engine
Maintenance intervals
Checking the cooling system
Checking and replacing hoses
Inspection and replacement of windshield wipers
Chassis lubrication
Checking the exhaust system
More articles on repairing other Mazda models
Adjusting the tension of the power steering pump drive belt Mazda Familia 5 (1985-1989)
Checking the accessory drive belt Mazda3 BK (2003-2009)
Checking the accessory drive belt Mazda6 GG (2002-2008)
Checking the drive belts of the accessory equipment Mazda CX-5KE (2012-2017)
Checking and adjusting thermal clearances in the valve drive Mazda BT-50 (1) (2006-2011)
Link in different formats to this article
Comments and feedback from visitors
No comments yet


How much will 11 + 16 ?


Capella 6 (1997-2005, petrol) 
  • General information
  • Introduction to guide
  • User manual
  • Troubleshooting
  • Maintenance
  • Power unit
  • 4-cylinder engines
  • 6-cylinder engines
  • Engine overhaul
  • Cooling and ventilation
  • Power and exhaust systems
  • Engine electrics
  • Control system
  • Transmission
  • Mechanical gearbox
  • Automatic gearbox
  • Clutch and drive shafts
  • Chassis
  • Brake system
  • Car suspension
  • Steering
  • Body
  • Exterior (external elements)
  • Interior (internal elements)
  • Doors, windows and locks
  • Electrical equipment
  • Equipment and devices
  • Electrical circuits
Capella 5 (1991-1997) 
  • General information
  • User manual
  • Maintenance
  • Helpful hints
  • Power unit
  • Petrol engines 1.6 and 1.8
  • Petrol engines 2.0
  • 2.5 petrol engines
  • Overhaul engines 1.6 and 1.8
  • Overhaul engines 2.0 and 2.5
  • Diesel engine 2.0
  • Engine electrics
  • Cooling system
  • Air conditioner
  • Carburetor Nikki 30/34
  • Power system (1.6 and 1.8)
  • Power system (2.0 and 2.5)
  • Control system
  • Transmission
  • Mechanical gearbox
  • Automatic gearbox
  • Clutch and axles
  • Chassis
  • Brake system
  • Suspension and wheels
  • Steering
  • Body
  • Exterior (external elements)
  • Interior (internal elements)
  • Doors and windows
  • Electrical equipment
  • Equipment and devices
  • Electrical circuits
Capella 4 (1987-1992) 
  • General information
  • Introduction to manual
  • Vehicle specifications
  • Power unit
  • Engine repair
  • Lubrication system
  • Cooling system
  • Fuel system (carburetor)
  • Fuel injection (FE)
  • Fuel injection (DOHC)
  • Fuel system (diesel)
  • Ignition system
  • Transmission
  • Clutch
  • Gearbox
  • Drive shafts
  • Chassis
  • Front suspension
  • Rear suspension
  • Steering system
  • Brake system
  • Electrical equipment
  • Equipment and devices
  • Electrical circuits
Capella 3 and 4 (1982-1992) 
  • General information
  • User manual
  • Maintenance
  • Power unit
  • Gasoline engine
  • Engine overhaul (gasoline)
  • Diesel engine
  • Cooling and heating
  • Supply system
  • Ignition system
  • Emission reduction
  • Transmission
  • Clutch
  • Mechanical gearbox
  • Automatic gearbox
  • Drive shafts
  • Chassis
  • Brake system
  • Suspension and wheels
  • Steering
  • Body
  • Exterior (external elements)
  • Interior (internal elements)
  • Electrical equipment
  • Equipment and devices
  • Power devices
  • Electrical circuits
Capella 3 (1982-1992, petrol) 
  • General information
  • User manual
  • Maintenance
  • Troubleshooting
  • Late models
  • Power unit
  • Engine in car
  • Engine overhaul
  • Cooling and heating system
  • Fuel and exhaust system
  • Engine electrical system
  • Emission control system
  • Transmission
  • Mechanical gearbox
  • Automatic gearbox
  • Clutch and drive shafts
  • Chassis
  • Brake system
  • Suspension and wheels
  • Steering
  • Body
  • Exterior (external elements)
  • Interior (internal elements)
  • Electrical equipment
  • Equipment and devices
  • Lighting and lamps
  • Electrical circuits
MazBook.ru © 2018–2026 · Mobile version · Articles and news · Sitemap: EN BG BY UA RS HR RO PL SK HU · Feedback · Site search · Add to bookmarks Familia 5 (BF) · Familia 6 (BG) · Capella 3 (GC) · Capella 3 and 4 (GC) · Capella 4 (GD) · Capella 5 (GE) · Capella 6 (GF) · Mazda3 BK · Mazda6 GG · CX-5KE · Mazda 121 (3) · Mazda BT-50 (1) ·
By continuing to use the site, you agree to the use of cookies 🔐