MazBook.ru
English Русский
Български
Беларускі
Український
Српски
Hrvatski
Română
Polski
Slovenský
Magyar
• Bookmark • Sitemap • Contacts •   
Cars Opel Cars Ford Cars Volkswagen Cars Audi Cars Kia Cars Renault Cars Peugeot


Familia Capella Mazda3 Mazda6 CX-? Others Articles
Capella 3 (1982-1992, petrol) Capella 3 and 4 (1982-1992) Capella 4 (1987-1992) Capella 5 (1991-1997) Capella 6 (1997-2005, petrol)

Automatic air damper — checking and adjustment (Mazda Capella GC)

  • Home
  • Mazda Capella
  • Capella GC (1982-1992)
  • General information
  • Late models
  • Automatic air damper — checking and adjustment
0
1. The automatic air damper heater winding can be tested for continuity by disconnecting the supply wire and connecting an ohmmeter between the wire and ground. If the meter needle remains at maximum resistance, there is no continuity and the automatic air damper cover must be replaced.

2. The procedure for adjusting the diaphragm of the damper will be given in Section 4, Chapter 8, but the gap is 1.66 to 2.16 mm.

3. To adjust the fast cool setting. throttle travel, open the throttle then release the quick travel lever. the stroke to the second highest step of the fast, idle cam. Using a drill, check the clearance between the primary throttle valve and the bushing wall; it should be between 0.94 and 1.38 mm. If necessary, turn the adjusting screw as needed.

4. The throttle lock test procedure is as described in Section 4, Chapter 8, but the primary throttle valve must be opened 50° before the secondary throttle valve begins to open. The test size is from 7.32 to 8.28 mm.

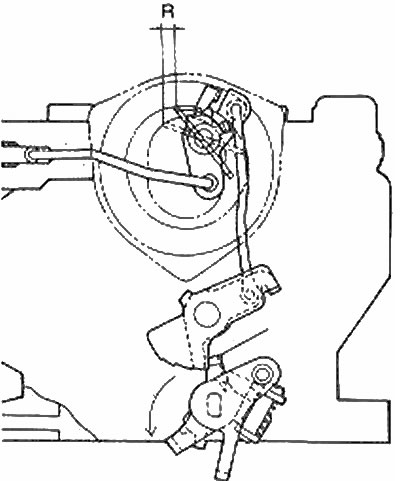
5. To adjust the fast cool setting. choke travel, open the throttle, then lower the quick idle lever. move the camshaft to the second-highest position of the high-speed, idle camshaft. Using a twist drill, check that the clearance between the top edge of the choke valve and the bushing wall is 0.60-1.00 mm. If minor adjustment is required, bend the key on the trigger rod. If minor adjustment is required, bend the throttle return rod.

(The article is copied from the website www.MAZbook.ru)

6. To adjust the throttle lever, fully open the primary throttle valve, then use a twist drill to check the clearance between the top edge of the throttle valve and the bushing walls - from 0.07 to 0.51 mm. Bend the key if necessary.


7. To check for increased choke frequency, start the engine and warm it up to normal temperature, then stop it and remove the air filter. Open the throttle valve slightly, then close the choke valve completely and release the throttle valve. The fast idle cam will, with the primary throttle valve clamped, be open in the fast idle position. connect a tachometer to the engine, then, without touching the accelerator pedal, start the engine and check the engine speed - from 3000 to 4000 rpm. If necessary, turn the fast idle adjustment screw as required. running. Stop the engine, disconnect the tachometer and install the air filter.
Adjusting the quick cool air damper. move - R

Adjusting the quick cool air damper. move - R
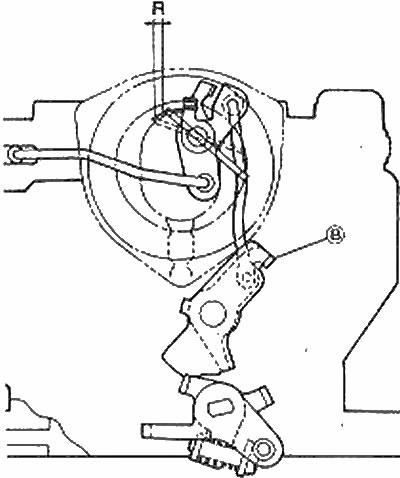
B - Adjustment key
Adjusting the throttle linkage clearance - R

Adjusting the throttle linkage clearance - R
A - Adjustment key
This article is available at: russian, bulgarian, belarusian, ukrainian, serbian, croatian, romanian, polish, slovak, hungarian
This text was checked by: Evdokia Filimonova
Share with friends on social networks:

Previous
Capella 3 » Late models
Next

Automatic air choke cover — removal and installation
Carburetor (late models) — description
Late model engine
Adjustment and routine maintenance of later models
Late model specifications
Electronic Gas Injection (EGI) — description
Air Flow Meter (EGI) — check
Air Flow Meter (EGI) — removal and installation
Throttle Body (EGI) — inspection
Throttle body (EG/) — removal and installation
More articles on repairing other Mazda models
Checking the functionality of the automatic transmission Mazda Familia 5 (1985-1989)
Checking the automatic drive belt tensioner Mazda3 BK (2003-2009)
Checking the automatic drive belt tensioner Mazda6 GG (2002-2008)
Checking the automatic drive belt tensioner Mazda CX-5KE (2012-2017)
Automatic transmission: checking fluid level/changing fluid and filter Mazda 121 (3) (1996-2003)
Link in different formats to this article
Comments and feedback from visitors
No comments yet


How much will 27 + 15 ?


Capella 6 (1997-2005, petrol) 
  • General information
  • Introduction to guide
  • User manual
  • Troubleshooting
  • Maintenance
  • Power unit
  • 4-cylinder engines
  • 6-cylinder engines
  • Engine overhaul
  • Cooling and ventilation
  • Power and exhaust systems
  • Engine electrics
  • Control system
  • Transmission
  • Mechanical gearbox
  • Automatic gearbox
  • Clutch and drive shafts
  • Chassis
  • Brake system
  • Car suspension
  • Steering
  • Body
  • Exterior (external elements)
  • Interior (internal elements)
  • Doors, windows and locks
  • Electrical equipment
  • Equipment and devices
  • Electrical circuits
Capella 5 (1991-1997) 
  • General information
  • User manual
  • Maintenance
  • Helpful hints
  • Power unit
  • Petrol engines 1.6 and 1.8
  • Petrol engines 2.0
  • 2.5 petrol engines
  • Overhaul engines 1.6 and 1.8
  • Overhaul engines 2.0 and 2.5
  • Diesel engine 2.0
  • Engine electrics
  • Cooling system
  • Air conditioner
  • Carburetor Nikki 30/34
  • Power system (1.6 and 1.8)
  • Power system (2.0 and 2.5)
  • Control system
  • Transmission
  • Mechanical gearbox
  • Automatic gearbox
  • Clutch and axles
  • Chassis
  • Brake system
  • Suspension and wheels
  • Steering
  • Body
  • Exterior (external elements)
  • Interior (internal elements)
  • Doors and windows
  • Electrical equipment
  • Equipment and devices
  • Electrical circuits
Capella 4 (1987-1992) 
  • General information
  • Introduction to manual
  • Vehicle specifications
  • Power unit
  • Engine repair
  • Lubrication system
  • Cooling system
  • Fuel system (carburetor)
  • Fuel injection (FE)
  • Fuel injection (DOHC)
  • Fuel system (diesel)
  • Ignition system
  • Transmission
  • Clutch
  • Gearbox
  • Drive shafts
  • Chassis
  • Front suspension
  • Rear suspension
  • Steering system
  • Brake system
  • Electrical equipment
  • Equipment and devices
  • Electrical circuits
Capella 3 and 4 (1982-1992) 
  • General information
  • User manual
  • Maintenance
  • Power unit
  • Gasoline engine
  • Engine overhaul (gasoline)
  • Diesel engine
  • Cooling and heating
  • Supply system
  • Ignition system
  • Emission reduction
  • Transmission
  • Clutch
  • Mechanical gearbox
  • Automatic gearbox
  • Drive shafts
  • Chassis
  • Brake system
  • Suspension and wheels
  • Steering
  • Body
  • Exterior (external elements)
  • Interior (internal elements)
  • Electrical equipment
  • Equipment and devices
  • Power devices
  • Electrical circuits
Capella 3 (1982-1992, petrol) 
  • General information
  • User manual
  • Maintenance
  • Troubleshooting
  • Late models
  • Power unit
  • Engine in car
  • Engine overhaul
  • Cooling and heating system
  • Fuel and exhaust system
  • Engine electrical system
  • Emission control system
  • Transmission
  • Mechanical gearbox
  • Automatic gearbox
  • Clutch and drive shafts
  • Chassis
  • Brake system
  • Suspension and wheels
  • Steering
  • Body
  • Exterior (external elements)
  • Interior (internal elements)
  • Electrical equipment
  • Equipment and devices
  • Lighting and lamps
  • Electrical circuits
MazBook.ru © 2018–2026 · Mobile version · Articles and news · Sitemap: EN BG BY UA RS HR RO PL SK HU · Feedback · Site search · Add to bookmarks Familia 5 (BF) · Familia 6 (BG) · Capella 3 (GC) · Capella 3 and 4 (GC) · Capella 4 (GD) · Capella 5 (GE) · Capella 6 (GF) · Mazda3 BK · Mazda6 GG · CX-5KE · Mazda 121 (3) · Mazda BT-50 (1) ·
By continuing to use the site, you agree to the use of cookies 🔐