
MazBook.ru
English Русский
Български
Беларускі
Український
Српски
Hrvatski
Română
Polski
Slovenský
Magyar
• Bookmark • Sitemap • Contacts •   
Cars Opel Cars Ford Cars Volkswagen Cars Audi Cars Kia Cars Renault Cars Peugeot


Familia Capella Mazda3 Mazda6 CX-? Others Articles
Capella 3 (1982-1992, petrol) Capella 3 and 4 (1982-1992) Capella 4 (1987-1992) Capella 5 (1991-1997) Capella 6 (1997-2005, petrol)

Main and connecting rod bearings — inspection and selection of liners (Mazda Capella GF)

  • Home
  • Mazda Capella
  • Capella GF (1997-2005)
  • Power unit
  • Engine overhaul
  • Main and connecting rod bearings — inspection and selection of liners
0
Contents: Inspection ⇓ Selection of inserts ⇓

Inspection


1. Even if you decide to replace the main and connecting rod bearing shells, you must subject the old shells to the most thorough inspection, since such an inspection can provide valuable information about the condition of the engine (figure 20.1).
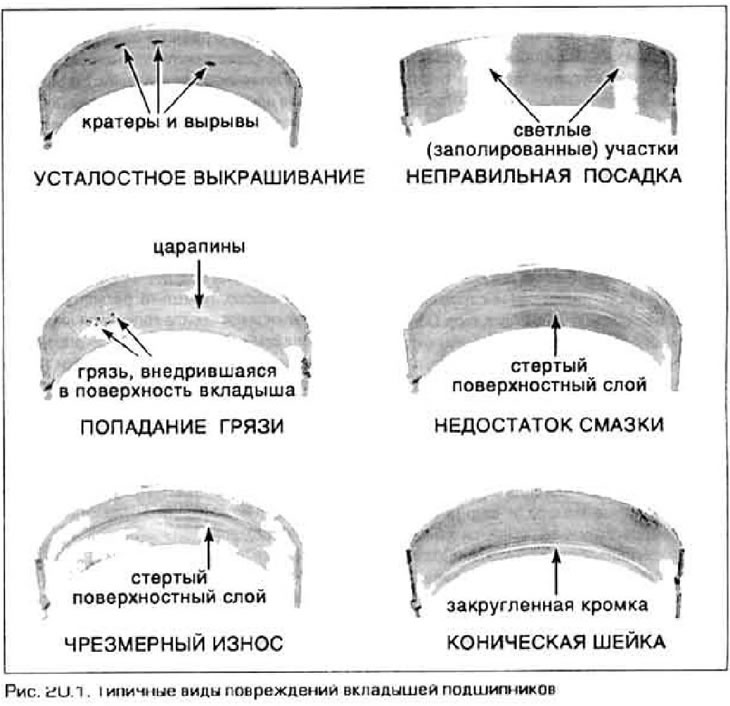
1. Even if you decide to replace the main and connecting rod bearing shells, you must subject the…


2. Bearing defects can be caused by insufficient lubrication, dirt and other foreign particles, engine overload, or corrosion. Regardless of the reason for the defect, its cause must be found and eliminated before the engine is assembled, otherwise the defect will reappear.

3. To inspect the liners, remove them from the bearings and caps. Place them on a clean surface in the order they are installed in the engine. This will allow you to compare the condition of the liners with the condition of the corresponding crankshaft journals.

4. Dirt and other foreign particles enter the engine in different ways. They can remain there after disassembly and assembly, they can penetrate through the filter or through the crankcase ventilation system. Then they can get into the oil, and along with it, into the bearings. Often, metal particles that have entered the crankcase during mechanical processing, as well as products of natural wear of engine parts, are found. Sometimes abrasive particles may be found in the engine, left over from surface treatments such as honing. Regardless of origin, small solid particles are embedded in the soft surfaces of the liners and are clearly visible. Large particles do not penetrate the liner material, but scratch the liner and neck. The best way to prevent bearing damage from this cause is to thoroughly clean all parts and assemble the engine in a sterile environment. It is also recommended to change the oil and filter more frequently during engine operation.


5. Insufficient lubrication (or stopping the oil supply) has many interconnected causes. Engine overheating (may make the oil film too thin), engine overload (may help to squeeze out the oil film from the bearing), oil leaks (increased bearing clearance, wear of the oil pump) - all this can lead to a disruption of the normal lubrication regime of bearings. Blocking the bearing's lubrication hole due to improper installation will also leave the bearing without lubrication and cause its destruction. An external sign of bearing failure due to lack of lubrication is the antifriction layer of the bearing shell being worn down to the base. Sometimes the steel base of the liner may turn blue due to overheating.

6. Driving style can sometimes be the reason for a decrease in bearing life. Running the engine at low speeds with the throttle fully open creates high pressure on the bearings and can cause grease to be squeezed out. Such loads create high stresses on the surface layer of the liner material and cause fatigue chipping of the material. Eventually, the antifriction material may simply crumble and wear off from the steel base. Frequent short-distance driving may cause bearing corrosion. This is explained by the fact that condensation and gases that cause corrosion are not removed from an insufficiently warmed-up engine. These products enter the oil and form acids and sludge there. Together with the oil, they get into the bearings and cause corrosion.

7. Incorrect bearing assembly can also cause its failure. Overtightening the mounting bolts can reduce the bearing operating clearance and thus deprive it of sufficient oil. Dirt that gets between the bearing shell and its seat during assembly can cause local deformation and subsequent rapid failure of the bearing when tightening it.


Selection of inserts


8. If the liners are damaged or have excessive wear, and if the clearance in the bearings does not correspond Technical data (see paragraphs 24 or 26). it is necessary to replace the liners, selecting them as described below. However, if the nal has been re-sharpened, it is necessary to install liners of a repair size, and in this case the procedure described below should not be used!

9. The workshop where the shaft was reground will help you select the right size bearings or advise you on how to do it. The repair size of the bearings depends on how much metal was removed from the journals. Typically, machining is done in 0.25 mm increments. Sometimes, different Meiariria sealants need to be removed from the main and crankpin journals, especially in cases of damaged crankpins. Typically, a machined crankshaft will have markings indicating how much metal has been removed. For example, the marking "25-25" means that both the main and connecting rod journals have been machined by 0.25 mm. This crankshaft requires the installation of bearings with a repair dimension 0.25 mm smaller than the nominal one (1st repair size).

10. Regardless of how the liners were selected, the main criterion for checking the correctness of the choice is the clearance in the bearings, which must correspond Technical data. Use a plastic feeler gauge to check the gap.
This article is available at: russian, bulgarian, belarusian, ukrainian, serbian, croatian, romanian, polish, slovak, hungarian
This text was checked by: German Vorobyov
Share with friends on social networks:

Previous
Capella 6 » Engine overhaul
Next

Crankshaft — inspection
Pistons and connecting rods — inspection
Cylinder honing
Cylinder block — inspection
Cylinder block — cleaning
Camshafts and tappets — inspection
Engine repair — assembly procedure
Piston rings — installation
Installing the crankshaft and checking the clearances in the main…
Installing the rear cuff
More articles on repairing other Mazda models
Main technical characteristics of the engine Mazda Familia 5 (1985-1989)
Measuring the radial clearance in the crankshaft main bearings Mazda3 BK (2003-2009)
Measuring the radial clearance in the crankshaft main bearings Mazda6 GG (2002-2008)
Disassembling the cylinder block and connecting rod and piston group Mazda CX-5KE (2012-2017)
Gearbox/Main gear Mazda 121 (3) (1996-2003)
Link in different formats to this article
Comments and feedback from visitors
No comments yet


How much will 30 + 17 ?


Capella 6 (1997-2005, petrol) 
  • General information
  • Introduction to guide
  • User manual
  • Troubleshooting
  • Maintenance
  • Power unit
  • 4-cylinder engines
  • 6-cylinder engines
  • Engine overhaul
  • Cooling and ventilation
  • Power and exhaust systems
  • Engine electrics
  • Control system
  • Transmission
  • Mechanical gearbox
  • Automatic gearbox
  • Clutch and drive shafts
  • Chassis
  • Brake system
  • Car suspension
  • Steering
  • Body
  • Exterior (external elements)
  • Interior (internal elements)
  • Doors, windows and locks
  • Electrical equipment
  • Equipment and devices
  • Electrical circuits
Capella 5 (1991-1997) 
  • General information
  • User manual
  • Maintenance
  • Helpful hints
  • Power unit
  • Petrol engines 1.6 and 1.8
  • Petrol engines 2.0
  • 2.5 petrol engines
  • Overhaul engines 1.6 and 1.8
  • Overhaul engines 2.0 and 2.5
  • Diesel engine 2.0
  • Engine electrics
  • Cooling system
  • Air conditioner
  • Carburetor Nikki 30/34
  • Power system (1.6 and 1.8)
  • Power system (2.0 and 2.5)
  • Control system
  • Transmission
  • Mechanical gearbox
  • Automatic gearbox
  • Clutch and axles
  • Chassis
  • Brake system
  • Suspension and wheels
  • Steering
  • Body
  • Exterior (external elements)
  • Interior (internal elements)
  • Doors and windows
  • Electrical equipment
  • Equipment and devices
  • Electrical circuits
Capella 4 (1987-1992) 
  • General information
  • Introduction to manual
  • Vehicle specifications
  • Power unit
  • Engine repair
  • Lubrication system
  • Cooling system
  • Fuel system (carburetor)
  • Fuel injection (FE)
  • Fuel injection (DOHC)
  • Fuel system (diesel)
  • Ignition system
  • Transmission
  • Clutch
  • Gearbox
  • Drive shafts
  • Chassis
  • Front suspension
  • Rear suspension
  • Steering system
  • Brake system
  • Electrical equipment
  • Equipment and devices
  • Electrical circuits
Capella 3 and 4 (1982-1992) 
  • General information
  • User manual
  • Maintenance
  • Power unit
  • Gasoline engine
  • Engine overhaul (gasoline)
  • Diesel engine
  • Cooling and heating
  • Supply system
  • Ignition system
  • Emission reduction
  • Transmission
  • Clutch
  • Mechanical gearbox
  • Automatic gearbox
  • Drive shafts
  • Chassis
  • Brake system
  • Suspension and wheels
  • Steering
  • Body
  • Exterior (external elements)
  • Interior (internal elements)
  • Electrical equipment
  • Equipment and devices
  • Power devices
  • Electrical circuits
Capella 3 (1982-1992, petrol) 
  • General information
  • User manual
  • Maintenance
  • Troubleshooting
  • Late models
  • Power unit
  • Engine in car
  • Engine overhaul
  • Cooling and heating system
  • Fuel and exhaust system
  • Engine electrical system
  • Emission control system
  • Transmission
  • Mechanical gearbox
  • Automatic gearbox
  • Clutch and drive shafts
  • Chassis
  • Brake system
  • Suspension and wheels
  • Steering
  • Body
  • Exterior (external elements)
  • Interior (internal elements)
  • Electrical equipment
  • Equipment and devices
  • Lighting and lamps
  • Electrical circuits
MazBook.ru © 2018–2026 · Mobile version · Articles and news · Sitemap: EN BG BY UA RS HR RO PL SK HU · Feedback · Site search · Add to bookmarks Familia 5 (BF) · Familia 6 (BG) · Capella 3 (GC) · Capella 3 and 4 (GC) · Capella 4 (GD) · Capella 5 (GE) · Capella 6 (GF) · Mazda3 BK · Mazda6 GG · CX-5KE · Mazda 121 (3) · Mazda BT-50 (1) ·
By continuing to use the site, you agree to the use of cookies 🔐