MazBook.ru
English Русский
Български
Беларускі
Український
Српски
Hrvatski
Română
Polski
Slovenský
Magyar
• Bookmark • Sitemap • Contacts •   
Cars Opel Cars Ford Cars Volkswagen Cars Audi Cars Kia Cars Renault Cars Peugeot


Familia Capella Mazda3 Mazda6 CX-? Others Articles
Capella 3 (1982-1992, petrol) Capella 3 and 4 (1982-1992) Capella 4 (1987-1992) Capella 5 (1991-1997) Capella 6 (1997-2005, petrol)

Cylinder block — cleaning (Mazda Capella GF)

  • Home
  • Mazda Capella
  • Capella GF (1997-2005)
  • Power unit
  • Engine overhaul
  • Cylinder block — cleaning
0
Caution: If the process plug is completely recessed into the cooling jacket channel, it will be extremely difficult or impossible to remove it from there.


1. There are technological holes in the cylinder block. They are needed to install rods that form cavities inside the block when casting it. After casting and disassembling the casting molds, these holes are closed with plugs. The plugs, in addition to their technological purpose, also have a functional purpose, preventing the block from rupturing when the coolant freezes in it.

2. The plugs can be pressed or screwed into the block on the thread. Threaded plugs can be unscrewed using a suitable key (they usually have either a hexagonal protrusion or a socket for an Allen key).
2. The plugs can be pressed or screwed into the block on the thread. Threaded plugs can be…

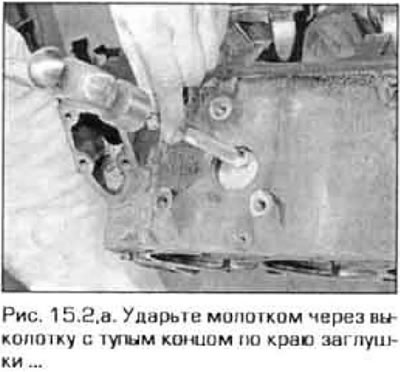
Press-fit plugs are typically round sheets of sheet metal. To remove such a plug, hit the edge of the plug with a hammer through a punch with a blunt end, turn it in the hole and pull it out with pliers (figure 15.2, a, b).


3. Use a scraper to remove any remaining gaskets from all surfaces of the block. During this operation, be careful not to damage the treated surfaces.

4. Remove the main bearing caps or crankcase (on a V-engine) and remove the main bearing shells. Label each insert with the pore number and whether it is in the block or in the cap, then set them aside.

5. Unscrew all the threaded plugs of the oil channels from the block. Usually the plugs are screwed in very tightly and it is impossible to unscrew them - in this case, they need to be drilled out, and the threads restored with a tap. When assembling the engine, screw in new plugs.

6. If the unit is significantly dirty, take it to a service station for steam treatment.

7. After returning the unit from steam cleaning, clean all openings and channels of the lubrication system again. There are various special brushes available for this purpose. Flush all channels with hot water until the water running out is clear. Dry the block thoroughly and lubricate all treated surfaces with light liquid oil to protect against corrosion. If you have compressed air available, use it to dry and blow out the ducts.

Caution! Protect your eyes when working with compressed air.


8. If the block is not too dirty, it can be washed in a warm soapy solution with a stiff brush. Take your time to do this work and do it as thoroughly as possible. Regardless of the cleaning method, thoroughly clean all oil holes and channels, dry the block and lubricate all treated surfaces with light liquid oil.


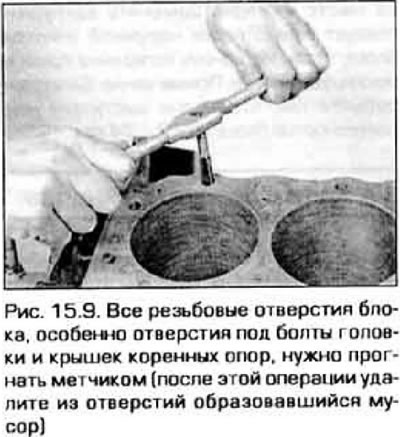
9. To ensure proper tightening of connections during assembly, all threaded holes must be clean. To remove corrosion, thread sealant residue and dirt from the holes, and to restore damaged threads, run a tap of the required size through the holes (figure 15.9). If possible, blow out the holes with compressed air after this operation. Also use a die to run through the threads of the cylinder head mounting bolts and main bearing caps.
9. To ensure proper tightening of connections during assembly, all threaded holes must be clean. To…


10. Reinstall the main bearing caps and tighten them with bolts by hand.

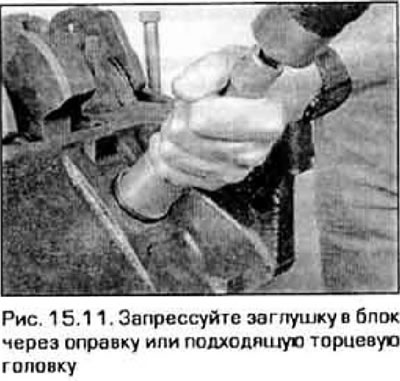
11. Coat the seating surfaces of the new process plugs with a suitable non-hardening sealant and install them into the block holes (figure 15.11). Make sure the plugs are tightly seated and not crooked, otherwise coolant may leak. There are special mandrels for pressing in plugs, but you can do without them. by selecting a suitable socket head or a piece of pipe with treated thorium.
11. Coat the seating surfaces of the new process plugs with a suitable non-hardening sealant and…


12. Apply non-hardening sealant to the threads of the new oil passage plugs and the block threaded service plugs, screw them into place and tighten them securely.

13. If you do not intend to begin assembling the engine immediately, cover the block with a large plastic bag to protect it from dirt.
This article is available at: russian, bulgarian, belarusian, ukrainian, serbian, croatian, romanian, polish, slovak, hungarian
This text was checked by: German Vorobyov
Share with friends on social networks:

Previous
Capella 6 » Engine overhaul
Next

Crankshaft — removal
Pistons and connecting rods — removal
Cylinder head assembly
Valve maintenance
Cylinder head — cleaning and inspection
Cylinder block — inspection
Cylinder honing
Pistons and connecting rods — inspection
Crankshaft — inspection
Main and connecting rod bearings — inspection and selection of liners
More articles on repairing other Mazda models
Technical characteristics of the cylinder block Mazda Familia 5 (1985-1989)
Cylinder Block — Description Mazda3 BK (2003-2009)
Cylinder block Mazda6 GG (2002-2008)
Assembly of the cylinder block and connecting rod and piston group Mazda CX-5KE (2012-2017)
Disassembly, inspection, cleaning and repair of the cylinder block Mazda BT-50 (1) (2006-2011)
Link in different formats to this article
Comments and feedback from visitors
No comments yet


How much will 43 + 45 ?


Capella 6 (1997-2005, petrol) 
  • General information
  • Introduction to guide
  • User manual
  • Troubleshooting
  • Maintenance
  • Power unit
  • 4-cylinder engines
  • 6-cylinder engines
  • Engine overhaul
  • Cooling and ventilation
  • Power and exhaust systems
  • Engine electrics
  • Control system
  • Transmission
  • Mechanical gearbox
  • Automatic gearbox
  • Clutch and drive shafts
  • Chassis
  • Brake system
  • Car suspension
  • Steering
  • Body
  • Exterior (external elements)
  • Interior (internal elements)
  • Doors, windows and locks
  • Electrical equipment
  • Equipment and devices
  • Electrical circuits
Capella 5 (1991-1997) 
  • General information
  • User manual
  • Maintenance
  • Helpful hints
  • Power unit
  • Petrol engines 1.6 and 1.8
  • Petrol engines 2.0
  • 2.5 petrol engines
  • Overhaul engines 1.6 and 1.8
  • Overhaul engines 2.0 and 2.5
  • Diesel engine 2.0
  • Engine electrics
  • Cooling system
  • Air conditioner
  • Carburetor Nikki 30/34
  • Power system (1.6 and 1.8)
  • Power system (2.0 and 2.5)
  • Control system
  • Transmission
  • Mechanical gearbox
  • Automatic gearbox
  • Clutch and axles
  • Chassis
  • Brake system
  • Suspension and wheels
  • Steering
  • Body
  • Exterior (external elements)
  • Interior (internal elements)
  • Doors and windows
  • Electrical equipment
  • Equipment and devices
  • Electrical circuits
Capella 4 (1987-1992) 
  • General information
  • Introduction to manual
  • Vehicle specifications
  • Power unit
  • Engine repair
  • Lubrication system
  • Cooling system
  • Fuel system (carburetor)
  • Fuel injection (FE)
  • Fuel injection (DOHC)
  • Fuel system (diesel)
  • Ignition system
  • Transmission
  • Clutch
  • Gearbox
  • Drive shafts
  • Chassis
  • Front suspension
  • Rear suspension
  • Steering system
  • Brake system
  • Electrical equipment
  • Equipment and devices
  • Electrical circuits
Capella 3 and 4 (1982-1992) 
  • General information
  • User manual
  • Maintenance
  • Power unit
  • Gasoline engine
  • Engine overhaul (gasoline)
  • Diesel engine
  • Cooling and heating
  • Supply system
  • Ignition system
  • Emission reduction
  • Transmission
  • Clutch
  • Mechanical gearbox
  • Automatic gearbox
  • Drive shafts
  • Chassis
  • Brake system
  • Suspension and wheels
  • Steering
  • Body
  • Exterior (external elements)
  • Interior (internal elements)
  • Electrical equipment
  • Equipment and devices
  • Power devices
  • Electrical circuits
Capella 3 (1982-1992, petrol) 
  • General information
  • User manual
  • Maintenance
  • Troubleshooting
  • Late models
  • Power unit
  • Engine in car
  • Engine overhaul
  • Cooling and heating system
  • Fuel and exhaust system
  • Engine electrical system
  • Emission control system
  • Transmission
  • Mechanical gearbox
  • Automatic gearbox
  • Clutch and drive shafts
  • Chassis
  • Brake system
  • Suspension and wheels
  • Steering
  • Body
  • Exterior (external elements)
  • Interior (internal elements)
  • Electrical equipment
  • Equipment and devices
  • Lighting and lamps
  • Electrical circuits
MazBook.ru © 2018–2026 · Mobile version · Articles and news · Sitemap: EN BG BY UA RS HR RO PL SK HU · Feedback · Site search · Add to bookmarks Familia 5 (BF) · Familia 6 (BG) · Capella 3 (GC) · Capella 3 and 4 (GC) · Capella 4 (GD) · Capella 5 (GE) · Capella 6 (GF) · Mazda3 BK · Mazda6 GG · CX-5KE · Mazda 121 (3) · Mazda BT-50 (1) ·
By continuing to use the site, you agree to the use of cookies 🔐